NAT Instance on AWS from scratch
11 June 2023
It's obvious that among the best practices in terms of security is to deploy some of your instance in a private network, where the outside world can't access them directly. They should be hidden behind a load balancer or some other instance. However, that prevents the instance from accessing the internet as well.
In AWS this can be solved in multiple ways. First of all, you can use a NAT Gateway. It's a managed service that does hide instances with private IPs behind a common gateway with a public IP. It's a great solution, highly-available but it's also quite expensive.

Another possibility is to enable IPv6 in our VPC, assign IPv6 addresses to our instances and route them to Egress-only Internet Gateway. This solution is even better as we don't pay for the NAT Gateway, it's simpler but it works only on IPv6 stack.
But what if we need to access an IPv4-only resource over the internet and we don't care about high-availability - for example a private RPM package registry? To keep things working in IPv4 and cheap at the same time, we can use a NAT instance. This is just an EC2 instance in a public subnet that forwards traffic between public internet and private subnet. It works the same as NAT Gateway but it is our responsibility to keep it running, secure and make it robust and reliable.
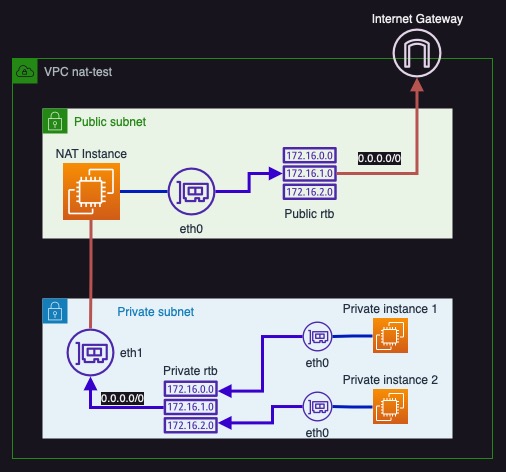
Today we will implement such an instance and configure our example VPC to use it. The draft of the architecture is seen as follows: one (NAT) instance in public subnet with assigned public IP will be guided by route table to forward the default traffic to the Internet Gateway from it's primary network interface. Next up we will add another network interface to this instance that will be associated with the private subnet, giving our NAT instance two private IPs: one in the public subnet on the network card #0 and another in the private subnet on the network card #1. In the private subnet we will disable public IP association and create a custom route table for it that will route the default traffic to the second network interface of the NAT instance. All the instances in the private subnet will then follow the routing rules and hit the NAT instance. The diagram of this description looks like this:
Repository for this post is available here: https://github.com/ppabis/nat-instance
Building the draft VPC
Let's start from the top of the diagram: the VPC and the Internet Gateway. In
Terraform it's a matter of few lines of code. We will use IP addresses of range
10.8.0.0 - 10.8.255.255.
# vpc.tf
resource "aws_vpc" "nat-test" {
  cidr_block = "10.8.0.0/16"
  enable_dns_hostnames = true
  enable_dns_support = true
  tags = { Name = "nat-test" }
}

resource "aws_internet_gateway" "igw" {
  vpc_id = aws_vpc.nat-test.id
  tags = { Name = "igw" }
}
Next up let us create the two green and blue subnets - public and private. For
the public one we can also already create a routing table and associate IGW with
it. For public I chose 10.8.1.0 - 10.8.1.255 range.
# public-subnet.tf
resource "aws_subnet" "public-subnet" {
    availability_zone = "eu-central-1b"
    cidr_block = "10.8.1.0/24"
    vpc_id = aws_vpc.nat-test.id
    map_public_ip_on_launch = true
    tags = { Name = "public-subnet" }
}

# Create and associate new routing table
resource "aws_route_table" "public-rtb" {
    vpc_id = aws_vpc.nat-test.id
}

resource "aws_route_table_association" "public-rtb" {
  subnet_id = aws_subnet.public-subnet.id
  route_table_id = aws_route_table.public-rtb.id
}

# Route default traffic to internet gateway
resource "aws_route" "default" {
    route_table_id = aws_route_table.public-rtb.id
    destination_cidr_block = "0.0.0.0/0"
    gateway_id = aws_internet_gateway.igw.id
}
For private we will use IPs 10.8.2.0 - 10.8.2.255. Let's also add an empty
route table to it.
# private-subnet.tf
resource "aws_subnet" "private-subnet" {
  availability_zone = "eu-central-1b"
  cidr_block = "10.8.2.0/24"
  vpc_id = aws_vpc.nat-test.id
  tags = { Name = "private-subnet" }
}

resource "aws_route_table" "private-rtb" {
  vpc_id = aws_vpc.nat-test.id
}

resource "aws_route_table_association" "private-rtb" {
  route_table_id = aws_route_table.private-rtb.id
  subnet_id = aws_subnet.private-subnet.id
}
Public subnet
So far we have the basic draft of our virtual datacenter. Let's create a test instance that we will use to test the connectivity to the internet. We will put it into the public subnet. This will be our future NAT instance. I will open SSH to it but you can configure it to work with Systems Manager (we will do this for private instances later on). I will use Amazon Linux 2023 AMI. The security group will allow SSH access from my IP subnet, so I will also import my public key to AWS.
# public-instance.tf
data "aws_ami" "amazon-linux-2023" {
  filter {
    name   = "name"
    values = ["amzn2-ami-hvm-2.0.2023*-arm64-gp2"]
  }
  most_recent = true
}

resource "aws_instance" "nat-instance" {
  associate_public_ip_address = true
  subnet_id = aws_subnet.public-subnet.id
  vpc_security_group_ids = [aws_security_group.nat-sg.id]
  key_name = aws_key_pair.nat-kp.key_name
  ami = data.aws_ami.amazon-linux-2023.id
  instance_type = "t4g.nano"
  availability_zone = "eu-central-1b"
  tags = { Name = "NAT-Instance" }
}

# Import public key
resource "aws_key_pair" "nat-kp" {
  public_key = file("~/.ssh/id_ed25519.pub")
}

# Allow SSH from my IP range
resource "aws_security_group" "nat-sg" {
  vpc_id = aws_vpc.nat-test.id
  name = "NAT"

  egress {
    from_port = 0
    to_port = 0
    protocol = "-1"
    cidr_blocks = ["0.0.0.0/0"]
  }

  ingress {
    from_port = 22
    to_port = 22
    protocol = "tcp"
    cidr_blocks = ["158.0.0.0/8"] # Change this to some other IP range
  }
}

# This is the IP to connect to via SSH
output "ip" {
  value = aws_instance.nat-instance.public_ip
}
By opening SSH session to the new instance and trying to ping google.com as
well as testing updates we can verify that our instance indeed can access the
internet.
Private subnet
Let's start by creating two private instances. By default I won't configure SSH
for them. You can do it and use the public instance as a bastion host but in
this example I prefer to use Systems Manager. The full configuration for what is
required for this to work is in the following file
ssm.tf. It sets up
all the necessary components for Systems Manager to work - IAM role, policy and
endpoints in the VPC.
What we will do now is start two example instances in the private subnet. Their security groups will allow only egress traffic.
resource "aws_instance" "private-instance" {
  count = 2
  ami = data.aws_ami.amazon-linux-2023.id
  subnet_id = aws_subnet.private-subnet.id
  vpc_security_group_ids = [aws_security_group.private.id]
  tags = { Name = "Private-Instance-${count.index}" }
  # Allow connecting from Systems Manager
  iam_instance_profile = aws_iam_instance_profile.ssm-profile.name
  instance_type = "t4g.nano"
  availability_zone = "eu-central-1b"
}

resource "aws_security_group" "private" {
  vpc_id = aws_vpc.nat-test.id
  name = "Private"
  egress {
    from_port = 0
    to_port = 0
    protocol = "-1"
    cidr_blocks = ["0.0.0.0/0"]
  }
}
So now we have private instances that can't access the internet. Let's try by
connecting to them via Systems Manager and pinging google.com or doing
sudo yum update.
As expected we cannot update nor ping anything outside (although we have DNS at least!). Our current setup looks like this diagram.

Configuring NAT
In order to match the diagram at the beginning of this post we need to add a new
network interface and configure the routing table for the private subnet to use
the other interface. To our public-instance.tf file we will add a network
interface resource that will be attacked to the instance and configure the
security group to allow all ingress traffic from the private subnet. We also
attach the same security group to this network interface. This new "network
card" will have its "cable connected" into the private subnet.
# public-instance.tf
...

resource "aws_security_group" "nat-sg" {
  vpc_id = aws_vpc.nat-test.id
  name = "NAT"
  ...

  ingress {
    from_port = 0
    to_port = 0
    protocol = "-1"
    security_groups = [ aws_security_group.private.id  ]
  }
}

resource "aws_network_interface" "private-sub-ni" {
  subnet_id = aws_subnet.private-subnet.id
  attachment {
    device_index = 1
    instance = aws_instance.nat-instance.id
  }
  security_groups = [aws_security_group.nat-sg.id]
  source_dest_check = false # Important flag
}
What is more important is to disable source/destination check on this network
interface. If we don't do this, packets that are not directed to this interface
or its subnet will be dropped. This is needed for NAT to work - imagine if we
want to reach Google's DNS server from our private instance. The packet sent to
the new interface will be addressed to 8.8.8.8 but the interface will drop it
because it is not addressed to it.
Next we need to create a new route for the private route table and connect the
default route to this new network interface. In private-subnet.tf we need to
add the following configuration.
# private-subnet.tf
...

resource "aws_route" "private-public" {
  route_table_id = aws_route_table.private-rtb.id
  destination_cidr_block = "0.0.0.0/0"
  network_interface_id = aws_network_interface.private-sub-ni.id
}
Let's SSH to our instance and see if it was assigned the new network interface and the private IP address from private subnet. If not we can try rebooting the instance.
[ec2-user@ip-10-8-1-227 ~]$ ifconfig
eth0: flags=4163<UP,BROADCAST,RUNNING,MULTICAST>  mtu 9001
        inet 10.8.1.227  netmask 255.255.255.0  broadcast 10.8.1.255
...
eth1: flags=4163<UP,BROADCAST,RUNNING,MULTICAST>  mtu 9001
        inet 10.8.2.148  netmask 255.255.255.0  broadcast 10.8.2.255
Our interfaces have names eth0 and eth1. The last part that we need is to
configure the NAT instance to forward traffic. First we enable forwarding in the
system. Then we use iptables to configure nat table on eth0 interface. Next
we configure the FORWARD chain to allow all stateful connections from eth0
to eth1 (responses from the internet) and forward any connections from eth1
to eth0. In the SSH session, run the following commands:
$ sudo sysctl -w net.ipv4.ip_forward=1
$ sudo iptables -t nat -A POSTROUTING -o eth0 -j MASQUERADE
$ sudo iptables -A FORWARD -i eth0 -o eth1 -m state --state RELATED,ESTABLISHED -j ACCEPT
$ sudo iptables -A FORWARD -i eth1 -o eth0 -j ACCEPT
This script can be added also to user_data in instance's Terraform resource.
resource "aws_instance" "nat-instance" {
  associate_public_ip_address = true
  subnet_id = aws_subnet.public-subnet.id
...
  user_data = <<-EOF
  #!/bin/bash
  sysctl -w net.ipv4.ip_forward=1
  iptables -t nat -A POSTROUTING -o eth0 -j MASQUERADE
  iptables -A FORWARD -i eth0 -o eth1 -m state --state RELATED,ESTABLISHED -j ACCEPT
  iptables -A FORWARD -i eth1 -o eth0 -j ACCEPT
  EOF
}
Now we can finally test the internet access on the private instances. To be
fully convinced that our instances are using the NAT instance we can curl
to https://api.ipify.org that will respond with our public IP address. We can
also compare it to the public IP address that AWS assigned to our NAT instance.
[ec2-user@ip-10-8-1-45 ~]$ curl https://api.ipify.org && echo
3.64.126.205

sh-4.2$ bash
[ssm-user@ip-10-8-2-120 bin]$ curl https://api.ipify.org && echo
3.64.126.205

sh-4.2$ bash
[ssm-user@ip-10-8-2-86 ~]$ curl https://api.ipify.org && echo
3.64.126.205