Easy MFA in AWS CLI, Terraform and others - Bash Script
03 December 2023
Multi-factor authentication is a must-have for any serious developer and administrator. It's Security 101: you should always use second factor if offered by the service. This is true also for AWS but not only in the Management Console. AWS STS offers time-limited tokens that can be configured (with the power of IAM policies) to only be issued with an MFA code. This all sounds good and all but in practice writing AWS CLI commands is straight up painful - write long command, very verbal arguments and then parse the JSON response. There are many scripts online that help with this but as I use multiple AWS accounts and don't want to relate them by IAM roles (so that they are fully separate), I happen to have many users, credentials and MFA entries.
Preparing the environment
Assuming you have AWS CLI installed, let's look at the basic example. We will use one account here for simplicity. First, we will go to IAM in our AWS Management Console (or use IaC if you prefer) and create two users that will have different permissions. If you want to configure it for multiple accounts, just log to the second account and create the second user there - it doesn't really matter as the process is so straightforward. Give them only programmatic access.
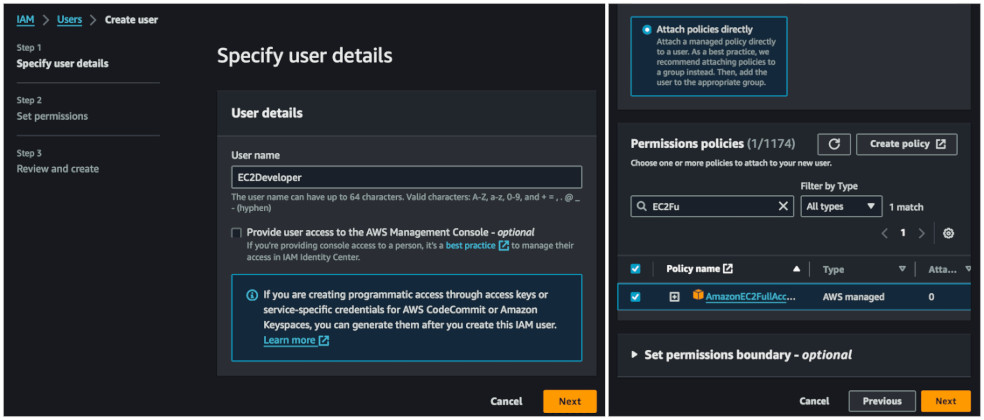
I will attach two different policies for these users. One will have
AmazonEC2FullAccess and the other AmazonS3FullAccess. Now we will create a
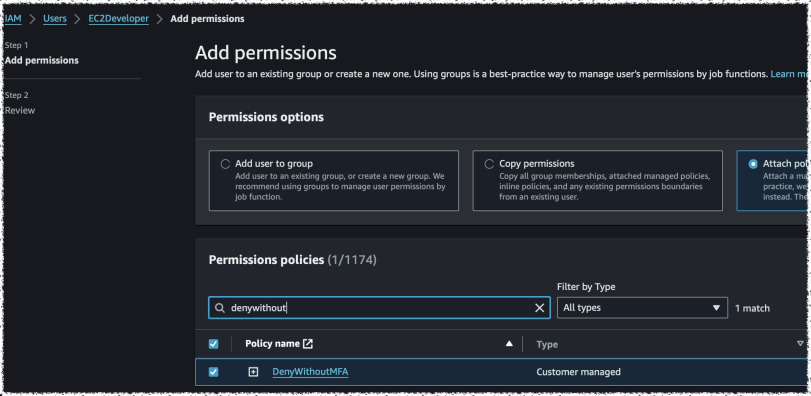
policy that denies these users access to anything if they don't have an MFA
session active. The only thing they will be able to do is to assign an MFA
device and do some basic account management on their account. The policy below
is taken directly from
AWS Documentation.
{
    "Version": "2012-10-17",
    "Statement": [
        {
            "Sid": "AllowViewAccountInfo",
            "Effect": "Allow",
            "Action": "iam:ListVirtualMFADevices",
            "Resource": "*"
        },
        {
            "Sid": "AllowManageOwnVirtualMFADevice",
            "Effect": "Allow",
            "Action": [
                "iam:CreateVirtualMFADevice"
            ],
            "Resource": "arn:aws:iam::*:mfa/*"
        },
        {
            "Sid": "AllowManageOwnUserMFA",
            "Effect": "Allow",
            "Action": [
                "iam:DeactivateMFADevice",
                "iam:EnableMFADevice",
                "iam:GetUser",
                "iam:GetMFADevice",
                "iam:ListMFADevices",
                "iam:ResyncMFADevice"
            ],
            "Resource": "arn:aws:iam::*:user/${aws:username}"
        },
        {
            "Sid": "DenyAllExceptListedIfNoMFA",
            "Effect": "Deny",
            "NotAction": [
                "iam:CreateVirtualMFADevice",
                "iam:EnableMFADevice",
                "iam:GetUser",
                "iam:ListMFADevices",
                "iam:ListVirtualMFADevices",
                "iam:ResyncMFADevice",
                "sts:GetSessionToken"
            ],
            "Resource": "*",
            "Condition": {
                "BoolIfExists": {"aws:MultiFactorAuthPresent": "false"}
            }
        }
    ]
}
Put this policy under the name DenyWithoutMFA and attach it to both users.
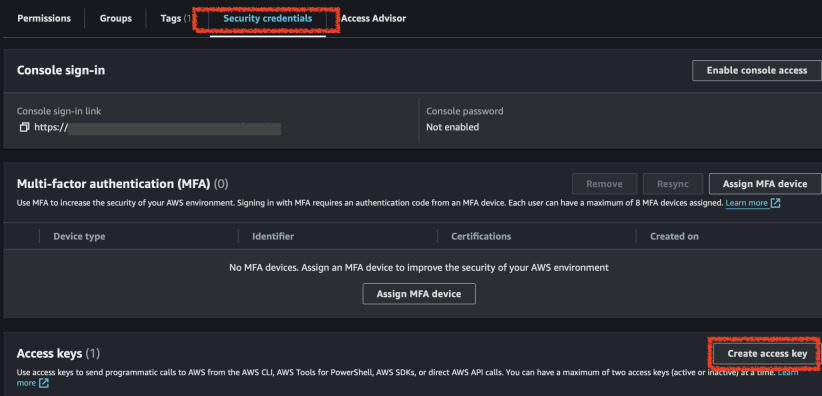
Now go to each user's details and create access keys. Copy them and paste into
~/.aws/credentials file as two separate profiles like so.
[EC2Developer]
aws_access_key_id = AKIA1234567890
aws_secret_access_key = abababba/bababa/abababab

[S3Developer]
aws_access_key_id = AKIA0987654321
aws_secret_access_key = babababa/ababab/abababa
Now you should be able to use the AWS CLI with these profiles. Let's try it out.
$ aws --profile EC2Developer ec2 describe-instances --region eu-west-1

An error occurred (UnauthorizedOperation) when calling the DescribeInstances operation: You are not authorized to perform this operation. User: arn:aws:iam::1234567890:user/EC2Developer is not authorized to perform: ec2:DescribeInstances with an explicit deny in an identity-based policy
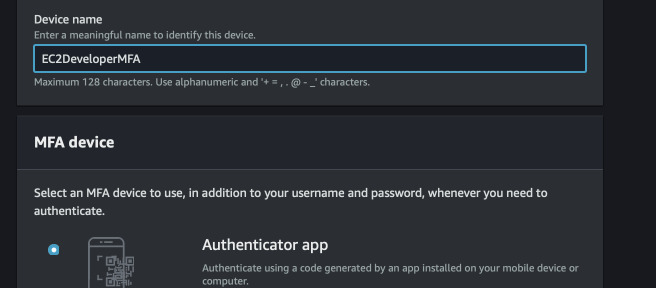
Ok, the policy works. Now we need to obtain temporary credentials in order to create an MFA session. But before that, we need to attach an MFA device. Using our administrative account that we used for creating both users, let's assign them an MFA device as well. It's on the same page as Access Keys. We can only use Authenticator app unfortunately as CLI doesn't support hardware tokens or Yubikeys. In order to use it, get your latest greatest iPhone 6S or Galaxy S3, download Google Authenticator/Authy/Microsoft Authenticator and follow the steps AWS gives you in the Management Console. After assigning the device, copy its identifier.
Now we can create a session using AWS CLI. To do this we will call STS service
with appropriate parameters. We will also use jq to parse the JSON response
and put the temporary credentials into environment variables. By running this in
the current console we should be able in the next step to retry running the
describe-instances command without specifying the profile. Replace the
--serial-number with your MFA device ARN and --token-code with the code
you have in your Authenticator app.
# Get temporary credentials
JSON_ACCESS_KEY="$(aws sts get-session-token\
 --serial-number arn:aws:iam::1234567890:mfa/EC2DeveloperMFA\
 --token-code 000111\
 --profile EC2Developer)"

# Overriding credentials using environment variables which takes precedent over configured profiles/credentials
export AWS_ACCESS_KEY_ID=$(jq -r '.Credentials.AccessKeyId' <<< $JSON_ACCESS_KEY)
export AWS_SECRET_ACCESS_KEY=$(jq -r '.Credentials.SecretAccessKey' <<< $JSON_ACCESS_KEY)
export AWS_SESSION_TOKEN=$(jq -r '.Credentials.SessionToken' <<< $JSON_ACCESS_KEY)

# Now we can run the command - it should output some JSON
aws ec2 describe-instances --region eu-west-1
Building a helper application
Now, writing above commands seem daunting. The computers were designed to make our lives easier by programming. Let's write a simple Bash script that will help us manage all the MFA ARNs, credentials and commands. The draft version will include only one user and one MFA. I base my code on this GitHub Project: nickGermi/aws-force-mfa
#!/bin/bash
### Easy MFA for AWS CLI - version 1.0

if [[ $# -lt 1 ]]; then
    echo "Usage: $0 <MFA code>"
    exit 1
fi

MFA="arn:aws:iam::1234567890:mfa/EC2DeveloperMFA"
MFACODE=$1
PROFILE="EC2Developer"

# Get temporary credentials
JSON_ACCESS_KEY="$(aws sts get-session-token\
 --serial-number $MFA\
 --token-code $MFACODE\
 --profile $PROFILE\
)"

export AWS_ACCESS_KEY_ID=$(jq -r '.Credentials.AccessKeyId' <<< $JSON_ACCESS_KEY)
export AWS_SECRET_ACCESS_KEY=$(jq -r '.Credentials.SecretAccessKey' <<< $JSON_ACCESS_KEY)
export AWS_SESSION_TOKEN=$(jq -r '.Credentials.SessionToken' <<< $JSON_ACCESS_KEY)

# Print logged-in user details using STS
CURRENT_USER="$(aws sts get-caller-identity)"
USER_NAME=$(jq -r '.Arn' <<< $CURRENT_USER | cut -d/ -f2)
ACCOUNT_ID=$(jq -r '.Account' <<< $CURRENT_USER)
echo "✅ Logged in as $USER_NAME @ $ACCOUNT_ID"
We will put this script in a /bin directory. Depending on your taste, you can
put it under /usr/local/bin so that it's available to everyone or create
~/.local/bin and add it to your PATH variable. To use the script, you need
to append a dot before it. This is needed so that the script is run in the
current shell and exported variables are copied over.
$ . aws-auth
Usage: /Users/ppabis/.local/bin/aws-auth <MFA code>
$ . aws-auth 223344
✅ Logged in as EC2Developer @ 999123456789
Extending the script
Now we can go to the real programming. This time we will not hardcode the values
in the script but rather keep them in a separate file - ~/.aws/credentials to
be specific. How will we do it? Using comments with specific markers. As an
example:
# @AuthEntry
# @Label:Staging/EC2Developer
# @MFA:arn:aws:iam::1234567890:mfa/EC2DeveloperMFA
[EC2Developer]
aws_access_key_id = AKIA1234567890
aws_secret_access_key = abababba/bababa/abababab

# @AuthEntry
# @Label:Staging/S3Developer
# @MFA:arn:aws:iam::1234567890:mfa/S3DeveloperMFA
[S3Developer]
aws_access_key_id = AKIA0987654321
aws_secret_access_key = babababa/ababab/abababa
In Bash we are going scan the file line by line and if we find @AuthEntry, we
will start parsing next lines until we find profile name in square brackets.
For convenience of use, we will build a GUI using dialog package. On Mac, you
can install it with Homebrew (brew install dialog). On Linux, it should be
installed by default (at least on Debian/Ubuntu).
Let's start by defining the arrays that will be filled with required data.
#!/bin/bash
### Easy MFA for AWS CLI - version 2.0

LIST=()
MFAS=()
PROFILES=()
Next, we will scan the file and fill the arrays. This part will be more complex.
We will use grep with Perl regex compatibility to check if the line contains
values we want. If we find the line with profile name, we will append all the
temporary variables into the arrays and reset them. If we find @AuthEntry, we
will mark a variable (AUTH_ENTRY_MARKER) that we are in the parsing mode. As
each item in dialog's list needs to have an id, we will also count how many
records we found.
On Mac, use grep -E instead of grep -P as the latter is not supported.
AUTH_ENTRY_MARKER=0         # Parsing on/off
AUTH_ENTRIES=0              # Number of entries found
CURRENT_ENTRY_LABEL=""      # Label of the entry
CURRENT_ENTRY_MFA=""        # MFA ARN of the entry
CURRENT_ENTRY_PROFILE=""    # Profile name of the entry

### The parsing logic
while IFS= read -r line; do
  if [[ $AUTH_ENTRY_MARKER -eq 1 ]]; then
    ## We are in a parsing mode
    ## Logic to handle single entry

    ## First: if line is the profile entry (`[]`), finish this routine and append the
    ## new entry to the list. Also reset the variables.
    if (echo "$line" | grep -Pq '^\[.*\]'); then

      CURRENT_ENTRY_PROFILE=$(echo "$line" | grep -oP '\[.*\]' | tr -d '[]')
      ## If the label was not specified, just use the profile name.
      [[ "$CURRENT_ENTRY_LABEL" == "" ]] && CURRENT_ENTRY_LABEL=$CURRENT_ENTRY_PROFILE

      ## Append the entry to the list only if it has a MFA
      if [[ "$CURRENT_ENTRY_MFA" != "" ]]; then
        LIST+=($AUTH_ENTRIES $CURRENT_ENTRY_LABEL)
        MFAS+=($CURRENT_ENTRY_MFA)
        PROFILES+=($CURRENT_ENTRY_PROFILE)
        AUTH_ENTRIES=$((AUTH_ENTRIES+1))
      fi

      ## Reset all the values
      AUTH_ENTRY_MARKER=0
      CURRENT_ENTRY_LABEL=""
      CURRENT_ENTRY_MFA=""
      CURRENT_ENTRY_PROFILE=""

    ## Match only lines starting with # @MFA: or # @Label: and extract the values
    elif (echo "$line" | grep -Pq '^#\s*@MFA:.*'); then
      CURRENT_ENTRY_MFA=$(echo "$line" | grep -oP '@MFA:.*\s*' | cut -d':' -f2- | tr -d ' ')
    elif (echo "$line" | grep -Pq '^#\s*@Label:.*'); then
      CURRENT_ENTRY_LABEL=$(echo "$line" | grep -oP '@Label:.*' | cut -d':' -f2- | tr -d ' ')
    fi

  else

    ## We are not parsing so continue searching the lines for the auth entry marker
    if (echo "$line" | grep -Pq '^#\s*@AuthEntry'); then
      ## We found @AuthEntry
      AUTH_ENTRY_MARKER=1
    fi
  fi
done < ~/.aws/credentials
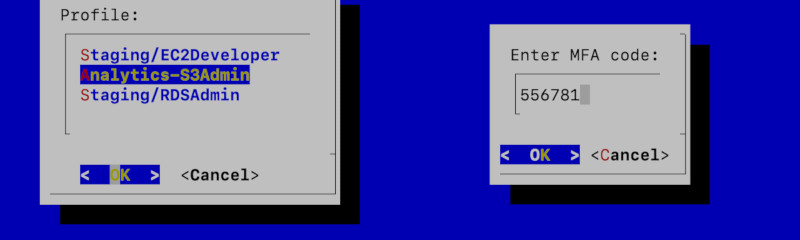
Now we have all the lists needed. We will now create a list using dialog and
after selection, we will ask for MFA code. In order to capture dialog's input to
a variable, we need to do some Bash magic with file descriptors
(3>&1 1>&2 2>&3 3>&-).
SELECTION=$(\
 dialog --no-tags\
 --menu "Profile:"\
 11 30 3\
 ${LIST[@]}\
 3>&1 1>&2 2>&3 3>&-\
)

if [[ $? -ne 0 ]]; then
  echo "Canceled"
  exit 1
fi

PROFILE=${PROFILES[$SELECTION]}
MFA=${MFAS[$SELECTION]}

MFACODE=$(\
 dialog --inputbox "Enter MFA code: "\
 8 20\
 3>&1 1>&2 2>&3 3>&-\
)

if [[ $? -ne 0 ]] || [[ "$MFACODE" == "" ]]; then
  echo "Canceled"
  exit 1
fi
Now we just append the code from the first version and we are good to go. The finished script is available on GitHub: