Speeding up ECS containers with SOCI
04 December 2024
Waiting for your deployment to finish. What a painful experience. You have to wait for build. You have to wait for tests. And then you have to wait for the startup. 10 minutes later, the new task definition is up and running. Then you realize that you made a mistake in the configuration and it was not covered by health checks. So you rush to roll back the image and it takes even more time.
Usually, starting a new container on ECS is pretty long, especially if you have a lot of big layers (such as Datadog plugins 😅). Recently, my colleague sent me the link to the article about SOCI containers on AWS. Seekable image sounds like some kind of tape you loaded back in C64 days 📼. But according to the article it speeds up the process of starting a new container. By how much? Today, we will find out!
To find complete code for this post, you can visit this GitHub repository: https://github.com/ppabis/ecs-soci-experiments/.
Base boilerplate
First, we need some basic infrastructure to perform our tests in. I generated (using Cursor and Sonnet) the following resources in Terraform:
- VPC, Internet Gateway,
- Two public and two private subnets with respective route tables,
- VPC endpoints for:
- S3 gateway,
- ECR API,
- ECR dkr,
- and CloudWatch Logs,
- Application Load Balancer with HTTP only listener,
- ELB Target Group with target type of
ip, - ECR repository,
- ECS Cluster,
- ECS Service with desired count of 0,
- ECS Task Definition which for now points to inexistent ECR image,
- Required Security Groups and IAM Roles.
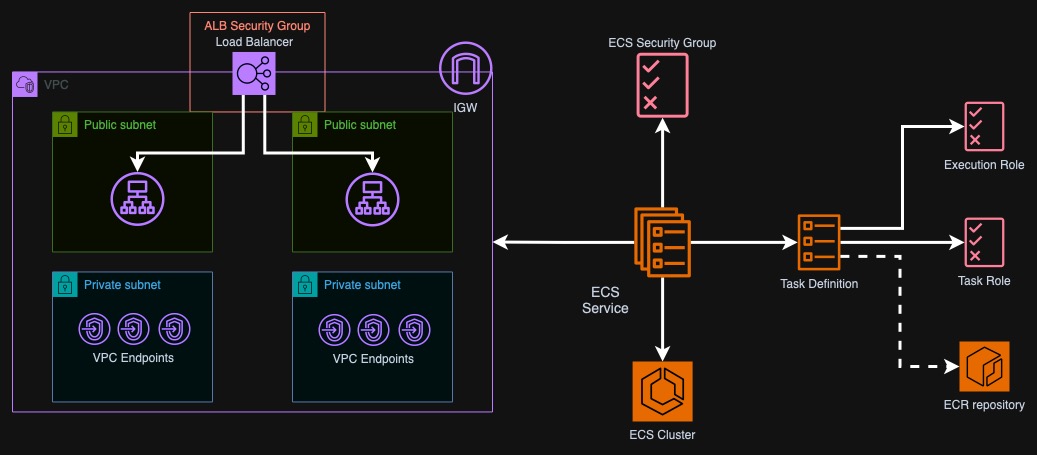
The load balancer will be deployed into two public subnets and allow connections from the ECS security group. The ECS service will be deployed into two private subnets and reference the target group to register with the load balancer. As we have enabled DNS and hostname resolution in the VPC, the ECS service should automatically pick up all the VPC endpoints.
For the above infrastructure, the Terraform code is available in the repository
on GitHub.
For my own convenience I also created an EC2 instance to build and upload the
images but it's not necessary, just the upload times are much faster than using
home internet 😄. If you also want to use it, change count to 1 in file
bastion.tf and connect to the instance using Session Manager. Also optionally
specify an S3 bucket that you will use to share the scripts with the machine -
again using copy-resources.sh script.
Enter the infrastructure directory and deploy it using Terraform/OpenTofu. You
can also change some of the variables such as aws_region and vpc_cidr.
$ cd infrastructure
$ tofu init
$ tofu apply
Building the first image
For both images we will use Nginx that will simply serve files. Additionally, I asked Sonnet to create a simple CLI tool in Go that will generate several types of hashes of a specified file. This procedure will simulate some boot sequence that might happen when you start your own application in a container.
The first image will have just one large file in a single layer. I used Big Buck
Bunny movie that is around 700 MB. The Dockerfile below will first compile the
Go application, copy it over to the target image, install curl (that will help
us get some ECS metadata later on), copy the script that will call hasher for
each found file and finally copy the movie file. Check the recipe here:
github.com/ppabis/ecs-soci-experiments/tree/main/image
# Build stage for Go application
FROM golang:1.21-alpine AS builder

WORKDIR /app
COPY hasher/ .
RUN CGO_ENABLED=0 GOOS=linux GOARCH=arm64 go build -o hasher

FROM nginx:alpine-slim

COPY --from=builder /app/hasher /usr/local/bin/hasher
RUN chmod +x /usr/local/bin/hasher

RUN apk add --no-cache curl
COPY 60-generate-hashes.sh /docker-entrypoint.d/60-generate-hashes.sh
RUN chmod +x /docker-entrypoint.d/60-generate-hashes.sh

COPY *.mov /usr/share/nginx/html/
The script for generating hashes is also very simple. We just run a loop through
all files found in /usr/share/nginx/html/ and call the hasher application on
it. Store the output of the hash in a file in tmp and copy back to Nginx root.
At the end of the file, we will append the task ARN and current date. This will
give us estimate on how long it took since the creation of the task to finishing
this start up sequence.
#!/bin/sh

# Process each file in the nginx html directory
for file in /usr/share/nginx/html/*; do
    if [ -f "$file" ]; then
        hasher "$file" >> "/tmp/hashes.txt"
        echo "" >> "/tmp/hashes.txt"
        echo "Generated hashes for $file"
    fi
done

# Get the container ARN "TaskARN":"arn:aws:ecs:eu-west-2:123456789012:task/demo-cluster/0123abcd0123abcd0123abcd"
curl -X GET ${ECS_CONTAINER_METADATA_URI_V4}/task | grep -oE "TaskARN\":\"arn:aws:ecs:${AWS_DEFAULT_REGION}:[0-9]+:task/[a-z0-9\\-]+/[a-z0-9]+" | cut -d':' -f 2- | tr -d '"' >> "/tmp/hashes.txt"
echo -n " Finished at " >> "/tmp/hashes.txt"
date >> "/tmp/hashes.txt"
echo "" >> "/tmp/hashes.txt"

# Move the hash files to nginx html directory
mv /tmp/hashes.txt /usr/share/nginx/html/
Such generated image can be pushed to ECR and tagged appropriately. Avoid using
latest as some time ago ECS introduced a feature that prevents accidental
updates of the image using the same tag. I just use current date and time as the
tag. To even more speed up the process I created a script that downloads the
movie, builds the image, saves tag into infrastructure/tag.txt and uploads the
image to ECR. Next step is to simply redeploy the infrastructure and generate
task definition.
#!/bin/bash

# You can alternatively use $(terraform output -raw) but this is easier to read
source infrastructure/outputs.env

ECR_REGION=$(echo $ECR_REPO_URL | cut -d '.' -f 4)

TAG=$(date "+%y%m%d%H%M")

# if the movie does not exist, download it
if [ ! -f "image/big_buck_bunny_1080p_h264.mov" ]; then
    wget https://download.blender.org/peach/bigbuckbunny_movies/big_buck_bunny_1080p_h264.mov -O image/big_buck_bunny_1080p_h264.mov
fi

aws ecr get-login-password --region $ECR_REGION | docker login --username AWS --password-stdin $ECR_REPO_URL
docker build -f image/Dockerfile.v1 -t $ECR_REPO_URL:$TAG image
docker push $ECR_REPO_URL:$TAG

echo "Pushed $ECR_REPO_URL:$TAG"

echo "$TAG" > infrastructure/tag.txt
Next up run deployment of the infrastructure again so that the task definition
loads tag.txt and changes the image. For now the desired count of tasks will
remain 0. We will use Python to control the scaling later.
$ ./docker-build-v1.sh
$ cd infrastructure
$ tofu apply
Testing startup times
This script is a bit more complicated. We need to control scaling of ECS service
and also wait for all the processes to complete. Let's define some basic
functions that will be useful for us. Assuming that you already have Python
packages installed for requests and boto3, import the following modules.
import datetime, time, re, csv, requests, argparse, boto3
Next we will load some arguments that we will need in order to control scaling
and read the boot time from the hashes.txt file. For that we will need three
arguments: the ECS service ARN, ECS cluster name and ELB DNS name (the load
balancer fronting the service). We will also define a global client for ECS.
parser = argparse.ArgumentParser(description="Test startup time of an ECS service")
parser.add_argument("--service-arn", help="ARN of the ECS service")
parser.add_argument("--cluster-name", help="Name of the ECS cluster")
parser.add_argument("--load-balancer-dns", help="DNS name of the load balancer")
args = parser.parse_args()

ECS = boto3.client("ecs")
The first function we will define will be one for scaling the ECS service. Once
the service is scaled we need to wait until it status changes to ACTIVE. We
should keep some delay in the loop to not overwhelm the API. It works for both
scaling up and down.
def scale_service(service_arn: str, cluster_name: str, desired_count: int):
    """Change desired tasks count of a given service and wait for completion."""
    status = "?"
    ECS.update_service(
        cluster=cluster_name,
        service=service_arn,
        desiredCount=desired_count,
    )
    time.sleep(5)

    # Wait for the service to scale
    while status != "ACTIVE":
        status = ECS.describe_services(
            cluster=cluster_name,
            services=[service_arn],
        )["services"][0]["status"]
        time.sleep(10)
Next thing is to define a function that will get a list of tasks that are assigned to the service. This seems trivial but I found out the hard way that AWS likes to lag behind and you often get an empty result after scaling up. For that reason I added a retry logic into the function.
def get_tasks(service_arn: str, cluster_name: str) -> list[str]:
    """Get a list of task ARNs for a given ECS service."""
    response = ECS.list_tasks(
        cluster=cluster_name,
        serviceName=service_arn,
    )

    repeats = 8
    while len(response["taskArns"]) == 0 and repeats > 0:
        print(f"Weird, I can't see any tasks, {repeats} repeats left")
        time.sleep(5)
        response = ECS.list_tasks(
            cluster=cluster_name,
            serviceName=service_arn,
        )
        repeats -= 1

    return response["taskArns"]
Next function will get information about the tasks. We will pass a list of tasks to it and it will format all the interesting information about the tasks for our use that will be more practical than just what AWS provides. We will calculate the start up time, connectivity time and pull time from the response.
def get_task_details(cluster_name: str, tasks: list[str]) -> list[dict]:
    """Calculates times for the task and gives information about it."""
    response = ECS.describe_tasks(
        cluster=cluster_name,
        tasks=tasks,
    )

    filtered_tasks = []
    for task in response["tasks"]:
        filtered_task = {
            "connectivity": task.get("connectivity"),
            "lastStatus": task.get("lastStatus"),
            "startTime": (task.get("startedAt") - task.get("createdAt")).total_seconds() if task.get("startedAt") and task.get("createdAt") else None,
            "firstConnectionTime": (task.get("connectivityAt") - task.get("createdAt")).total_seconds() if task.get("connectivityAt") and task.get("createdAt") else None,
            "pullTime": (task.get("pullStoppedAt") - task.get("pullStartedAt")).total_seconds() if task.get("pullStoppedAt") and task.get("pullStartedAt") else None,
        }
        filtered_tasks.append(filtered_task)
    return filtered_tasks
Now, not all of the tasks are obviously started immediately. What makes the
matter worse, not all tasks are stopped immediately (from experience, the latter
is way slower for no apparent reason). Before we do actual measurements, we need
the tasks to be all in RUNNING state. When scaling down, we also want to make
sure that no tasks are running in the service. The following function will wait
for all the tasks to be in running or stopped states.
def wait_for_all_tasks(cluster_name: str, tasks: list[str]):
    while True:
        _tasks = get_task_details(cluster_name, tasks)
        # check if all lastStatus are "RUNNING"
        if all(task.get("lastStatus") == "RUNNING" or task.get("lastStatus") == "STOPPED" for task in _tasks):
            return tasks
        time.sleep(5)
Finally, we can finish the script that will: - scale up the tasks to a desired number - I tested it 3 times with 1, 2, 3 and 8 tasks, - wait for all the tasks to start, - wait 45 seconds to check if the boot sequence is finished, - save recorded times, - scale down the service to 0 and wait for it to finish.
def main():
    results = []

    for test_case in [1, 2, 3, 8] * 3:
        # Scaling up
        scale_service(args.service_arn, args.cluster_name, test_case)
        time.sleep(5)
        print(f"Service scaled to {test_case}")

        # All tasks are up
        tasks = get_tasks(args.service_arn, args.cluster_name)
        tasks = wait_for_all_tasks(args.cluster_name, tasks)
        print(f"All tasks are running")

        # Boot should be finished by then.
        time.sleep(45)

        # Get times.
        task_details = get_task_details(args.cluster_name, tasks)
        averageFirstConnectionTime = sum(task.get("firstConnectionTime") for task in task_details) / len(task_details)
        averageStartTime = sum(task.get("startTime") for task in task_details) / len(task_details)
        averagePullTime = sum(task.get("pullTime") for task in task_details) / len(task_details)

        results.append({
            "taskCount": test_case,
            "averageFirstConnectionTime": averageFirstConnectionTime,
            "averageStartTime": averageStartTime,
            "averagePullTime": averagePullTime,
        })

        # Scale to 0
        scale_service(args.service_arn, args.cluster_name, 0)
        time.sleep(15)
        print(f"Service scaled to 0")

        # Wait for the tasks to stop. Mind you, the list given here is the same
        # as when scaling up. It is important so that you wait for the correct
        # tasks to stop.
        tasks = wait_for_all_tasks(args.cluster_name, tasks)
        print(f"All tasks are stopped")
However, we are not finished yet. We still have to get the boot time directly from script in the container to have somewhat more realistic measurement of task readiness. This is a bit more tricky, as we need to parse the date and task ARN. I used regular expressions for that. But because we sometimes start many tasks, we will sample some of the boot times (assuming ELB routes us to different ones) and return the average.
def sample_boot_time(load_balancer_dns: str, count: int):
    """Samples boot time by requesting the /hashes.txt file from the load balancer."""
    # The following pattern should match <task ARN> Finished at <date time>
    pattern = r'(arn:aws:ecs:.*:task.*)\s*\n?\s*Finished at \w{3} (\w{3}\s+\d+\s+\d+:\d+:\d+ UTC \d+)'
    results = []

    for i in range(count):
        response = requests.get(f"http://{load_balancer_dns}/hashes.txt")
        match = re.search(pattern, response.text)

        if match:
            task = match.group(1)
            date = match.group(2)
            # Get created time from ECS using task ARN
            created_time = ECS.describe_tasks(cluster = args.cluster_name, tasks=[task])['tasks'][0]['createdAt']
            boot_time = datetime.datetime.strptime(date, "%b %d %H:%M:%S %Z %Y").replace(tzinfo=datetime.timezone.utc)
            created_time = created_time.astimezone(datetime.timezone.utc)
            results.append((boot_time - created_time).total_seconds())
        else:
            print(f"No match found for {i}")

    return (sum(results) / len(results)) if len(results) > 0 else None
Add this function to the main test run and append it also to results. At the end we can finally save all the results to a CSV file.
...
        averagePullTime = sum(task.get("pullTime") for task in task_details) / len(task_details)
        averageBootTime = sample_boot_time(args.load_balancer_dns, test_case * 2)

        results.append({
            "taskCount": test_case,
            "averageFirstConnectionTime": averageFirstConnectionTime,
            "averageStartTime": averageStartTime,
            "averagePullTime": averagePullTime,
            "averageBootTime": averageBootTime,
        })
...
    with open("results.csv", "w") as f:
        writer = csv.DictWriter(f, fieldnames=["taskCount", "averageFirstConnectionTime", "averageStartTime", "averagePullTime", "averageBootTime"])
        writer.writeheader()
        writer.writerows(results)
First results
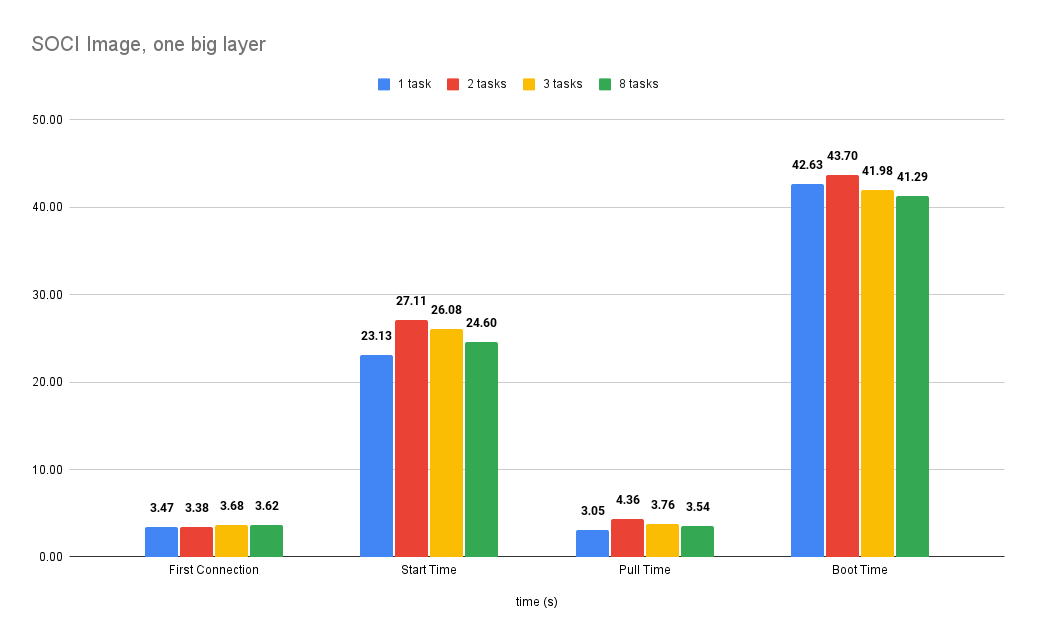
I measured the boot times for this setup. The amount of tasks do not change the times too much - despite it it can be around 7%, it seems like it's luck dependent and can be treated as noise. For further comparisons I will simply take average of all the times for each measurement type. First connection time, boot time and start time are measured from the moment task was created in AWS. Pull time is measured independently.

Installing SOCI
I use commands for Amazon Linux 2023. Adapt them to your distribution. I've never tried installing this on Mac or Windows, so I can't tell how. But what is SOCI anyway? It's a special manifest that indexes the layers in the container so that the container runtime detects which file you want to access and downloads layer with this file only when needed. Comparing this to the standard behavior, where all layers are needed. SOCI provides tooling that you need to use in order to create these manifests. Installation is quite simple. Assuming that you have containerd runtime installed (modern distributions install it alongside Docker), you can do the following:
mkdir -p ~/soci && cd ~/soci
wget https://github.com/awslabs/soci-snapshotter/releases/download/v0.8.0/soci-snapshotter-0.8.0-linux-arm64.tar.gz
tar -xf soci-snapshotter-0.8.0-linux-arm64.tar.gz
sudo mv soci /usr/local/bin/
sudo mv soci-snapshotter-grpc /usr/local/bin/
sudo chmod +x /usr/local/bin/soci
sudo chmod +x /usr/local/bin/soci-snapshotter-grpc
You should now have a soci command available. But this is not all. In the next
step, install soci-snapshotter service that will run as a daemon. Download the
following systemd unit file and activate it.
wget https://github.com/awslabs/soci-snapshotter/raw/refs/heads/main/soci-snapshotter.service
sudo mv soci-snapshotter.service /etc/systemd/system/
sudo systemctl daemon-reload
sudo systemctl enable --now soci-snapshotter
sudo systemctl status soci-snapshotter
If you install Docker on latest Amazon Linux, it is very likely that SOCI plugin
is included but still ensure that you have the following lines in your
containerd config at /etc/containerd/config.toml:
# ...
[proxy_plugins]
  [proxy_plugins.soci]
    type = "snapshot"
    address = "/run/soci-snapshotter-grpc/soci-snapshotter-grpc.sock"
Obviously if you don't have this file you might not even have containerd installed. You can proceed with the following commands:
$ sudo yum install docker
$ sudo systemctl enable --now docker
$ sudo systemctl enable --now containerd
$ sudo ctr plugins ls | grep soci
Generating an index
Now, we use Docker to build the image and for SOCI we need to have the image in containerd store (Docker and ctr use different places to store images despite they are compatible in practice). The are three possibilities to do that:
- build the image with another tool like BuildAh,
- export it to tarball from Docker and import with ctr,
- pull from ECR with ctr.
I decided to go with the last option because it so easy and foolproof with no
need to store additional tar. The authentication for ECR is a bit different
because ctr does not store the credentials like Docker so you have to specify
them in an argument.
$ ECR_PASSWORD=$(aws ecr get-login-password --region eu-west-2)
$ sudo ctr image pull --user "AWS:$ECR_PASSWORD" 123456789012.dkr.ecr.eu-west-2.amazonaws.com/sample/nginx:2412011229
$ sudo ctr i ls
REF                                                                  TYPE                                       DIGEST                                                                  SIZE      PLATFORMS   LABELS 1
12345689012.dkr.ecr.eu-west-2.amazonaws.com/sample/nginx:2412011229 application/vnd.oci.image.manifest.v1+json sha256:f2cf117facb0075a6977f463923baea68305a6913f0a41a8b672c4822813ade8 720.2 MiB linux/arm64 -
Now we can create the index. Normally the minimum layer size for indexing is 10 MB but I decided to lower it to 2. Once the image is in local containerd store, just run the following command and three more for verification.
$ sudo soci create --min-layer-size 2097152 12345689012.dkr.ecr.eu-west-2.amazonaws.com/sample/nginx:2412011229
$ sudo soci index list
DIGEST                                                                     SIZE    IMAGE REF                                                               PLATFORM          MEDIA TYPE                                    CREATED
sha256:342219668da34dcc20c328e1f21e9d27f57dc5598c2a95a29718361cc2bbda80    1868    12345689012.dkr.ecr.eu-west-2.amazonaws.com/sample/nginx:2412011229     linux/arm64/v8    application/vnd.oci.image.manifest.v1+json    5s ago
$ sudo soci ztoc list # pick a random digest for the below command
$ sudo soci ztoc info sha256:104e0df268aa5c96f12e86d44bb59b537ebe1d50a0be15adf125dd9b38ef07a3
The last step is to push this index into ECR. This is also very straightforward
and you can do it directly from soci. After that in AWS you should see both
the image and Soci Index. The image itself doesn't change, only a new artifact
is uploaded to ECR without a tag.
$ ECR_PASSWORD=$(aws ecr get-login-password --region eu-west-2)
$ sudo soci push --user AWS:$ECR_PASSWORD 12345689012.dkr.ecr.eu-west-2.amazonaws.com/sample/nginx:2412011229

Startup times with SOCI
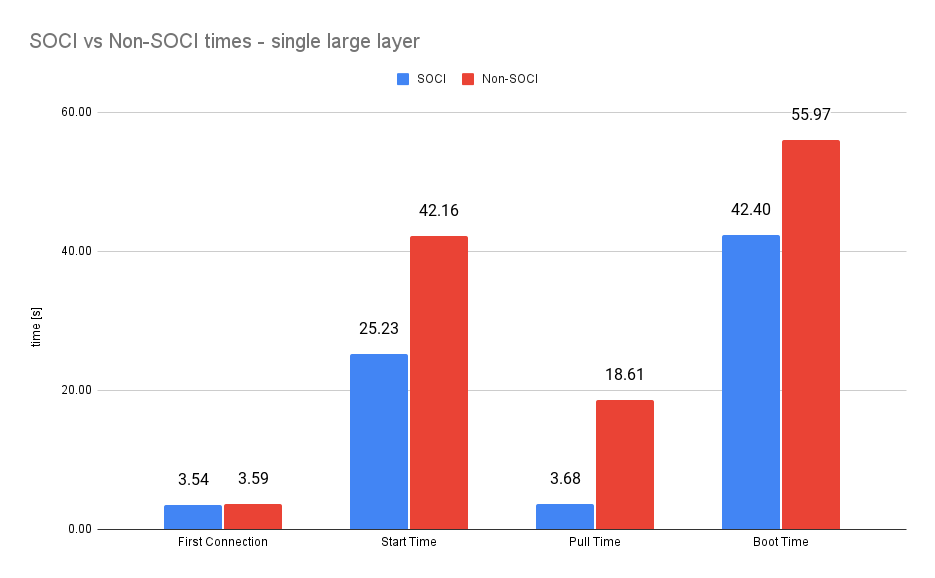
The times improved significantly. The connection time did not change much but pull time is down 80%, start time 40% and boot time 24%.
However, as we have one large file in the image that we access at boot time,
what if we only needed to access a bit of large layers and leave others at rest,
being ready to be accessed when needed? I created another Dockerfile that will
have some random Parquet files from Hugging Face. I will only hash the test set
and leave training data alone. What is more, I will make sure that Docker does
not optimize layers anyhow by running a stat command on each file and saving
the output.
# Build stage for Go application
FROM golang:1.21-alpine AS builder

WORKDIR /app
COPY hasher/ .
RUN CGO_ENABLED=0 GOOS=linux GOARCH=arm64 go build -o hasher

FROM nginx:alpine-slim

COPY --from=builder /app/hasher /usr/local/bin/hasher
RUN chmod +x /usr/local/bin/hasher

RUN apk add --no-cache curl

COPY 62-generate-one-hash.sh /docker-entrypoint.d/62-generate-one-hash.sh
COPY default.conf /etc/nginx/conf.d/default.conf

RUN chmod +x /docker-entrypoint.d/62-generate-one-hash.sh

# Create a lot of layers to fragment the image a bit
COPY test-00000-of-00001.parquet /usr/share/nginx/html/
RUN stat /usr/share/nginx/html/test-00000-of-00001.parquet > /usr/share/nginx/html/test-00000-of-00001.parquet.stat

COPY train-00000-of-00009.parquet /usr/share/nginx/html/
RUN stat /usr/share/nginx/html/train-00000-of-00009.parquet > /usr/share/nginx/html/train-00000-of-00009.parquet.stat

COPY train-00001-of-00009.parquet /usr/share/nginx/html/
RUN stat /usr/share/nginx/html/train-00001-of-00009.parquet > /usr/share/nginx/html/train-00001-of-00009.parquet.stat

COPY train-00002-of-00009.parquet /usr/share/nginx/html/
RUN stat /usr/share/nginx/html/train-00002-of-00009.parquet > /usr/share/nginx/html/train-00002-of-00009.parquet.stat
#!/bin/sh
# Process only the test parquet in the nginx html directory
for file in /usr/share/nginx/html/test*; do
    if [ -f "$file" ]; then
        hasher "$file" >> "/tmp/hashes.txt"
        echo "" >> "/tmp/hashes.txt"
        echo "Generated hashes for $file"
    fi
done

# Get the container ARN "TaskARN":"arn:aws:ecs:eu-west-2:123456789012:task/demo-cluster/0123abcd0123abcd0123abcd"
curl -X GET ${ECS_CONTAINER_METADATA_URI_V4}/task | grep -oE "TaskARN\":\"arn:aws:ecs:${AWS_DEFAULT_REGION}:[0-9]+:task/[a-z0-9\\-]+/[a-z0-9]+" | cut -d':' -f 2- | tr -d '"' >> "/tmp/hashes.txt"
echo -n " Finished at " >> "/tmp/hashes.txt"
date >> "/tmp/hashes.txt"
echo "" >> "/tmp/hashes.txt"

# Move the hash files to nginx html directory
mv /tmp/hashes.txt /usr/share/nginx/html/
I also updated the script to easily download files from Hugging Face if they do not exist yet. The script below contains the list of files I chose to make it also around 700 MB (3 x 200 MB + 100 MB).
#!/bin/bash

# You can alternatively use $(terraform output -raw) but this is easier to read
source infrastructure/outputs.env
ECR_REGION=$(echo $ECR_REPO_URL | cut -d '.' -f 4)

TAG=$(date "+%y%m%d%H%M")

# download some files from huggingface to make image larger
HF_FILES=(\
 "https://huggingface.co/datasets/HuggingFaceTB/smoltalk/resolve/main/data/all/test-00000-of-00001.parquet" \
 "https://huggingface.co/datasets/HuggingFaceTB/smoltalk/resolve/main/data/all/train-00000-of-00009.parquet" \
 "https://huggingface.co/datasets/HuggingFaceTB/smoltalk/resolve/main/data/all/train-00001-of-00009.parquet" \
 "https://huggingface.co/datasets/HuggingFaceTB/smoltalk/resolve/main/data/all/train-00002-of-00009.parquet" \
)

for file in "${HF_FILES[@]}"; do
    if [ ! -f "image/${file##*/}" ]; then
        wget $file -O "image/${file##*/}"
    fi
done

aws ecr get-login-password --region $ECR_REGION | docker login --username AWS --password-stdin $ECR_REPO_URL
docker build -f image/Dockerfile.v2 -t $ECR_REPO_URL:$TAG image
docker push $ECR_REPO_URL:$TAG
echo "Pushed $ECR_REPO_URL:$TAG"

echo "$TAG" > infrastructure/tag.txt
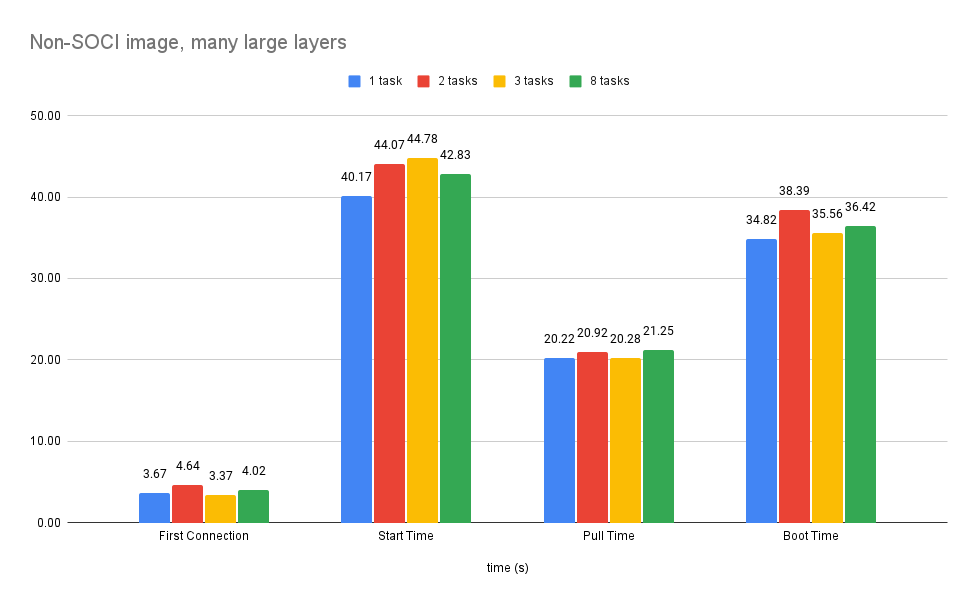
With that setup the gains are even more significant. Start time and pull time are still similar but the boot time increased by 46% compared to the non-SOCI image.
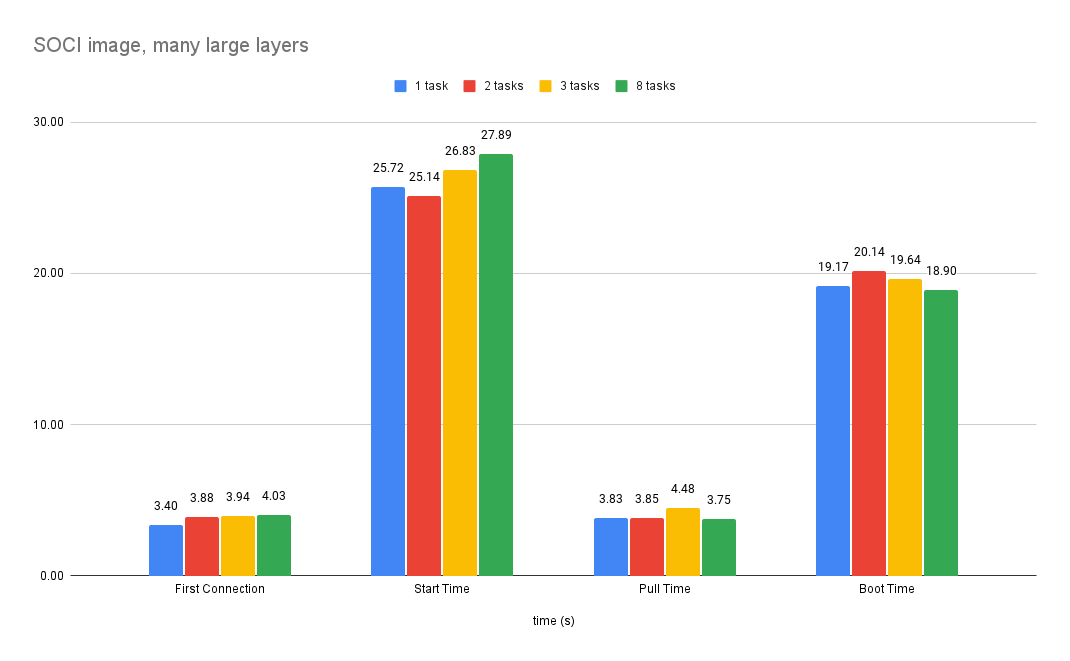
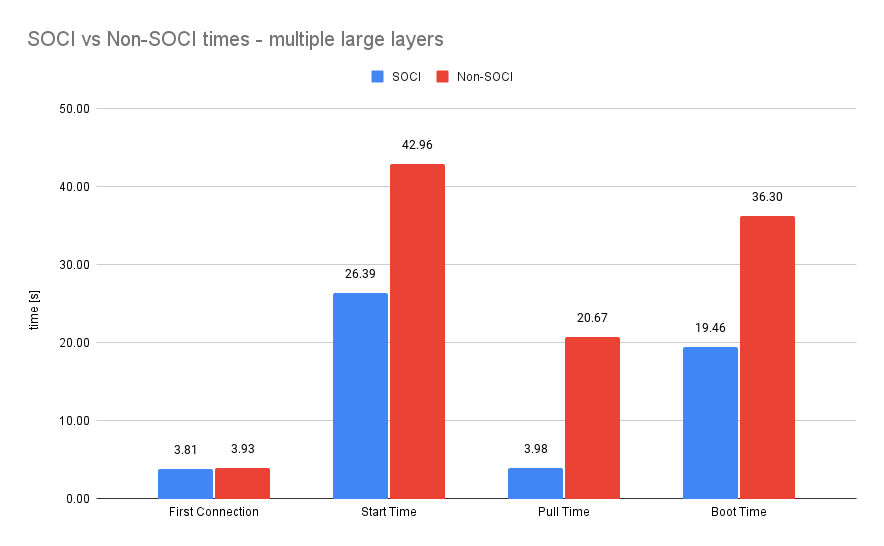
Summary
With that experiment, it is proven that SOCI images can very significantly improve the time to start ECS tasks. The creation of the index is very simple and doesn't require so much setup. There is even a serverless flow created by AWS based on EventBridge and Lambda that can do it for your in the background for each image you push to ECR. You can find it here: https://aws-ia.github.io/cfn-ecr-aws-soci-index-builder/