S3: Presigned URL upload with tags
02 May 2025
S3 native feature of presigned URL is great - you can save on compute costs as
everything will be handled by AWS for you. However, there's not much you can set
when generating the URL, basically just Content-Type and
Content-Disposition. But to set tags on the object, you need another call to
the service. What if we wanted to store for example a description of a photo in
the tag? We have 256 bytes for that so there's some space and compared to a
standard implementations with the database, tags are free 😁.
I've created such post already on my blog in 2023. However, I wanted to improve the solution as previously I used Redis cache to store some temporary data. It is much more convenient to use DynamoDB with item expiration for this as then we keep everything fully serverless. (Or ElastiCache Serverless but DynamoDB is more cost effective for this use case.) The architecture is presented below:
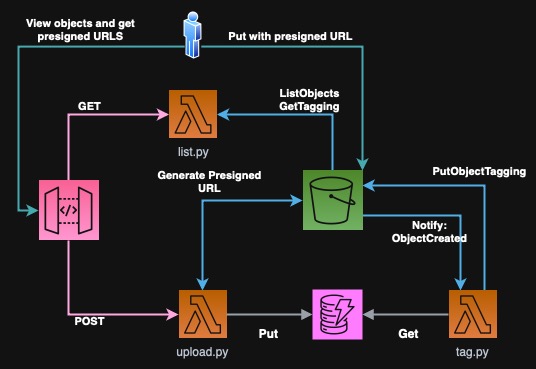
Here we have an API Gateway that accepts POST and GET requests and forwards them to the respective Lambda function. For GET request we call the "List" function that returns the formatted list of all objects in the bucket. For POST request we create a presigned URL from S3 service and store title temporarily in DynamoDB with TTL. Next, the user uploads the file directly to S3 with the given URL. After that, we will use S3 notifications to trigger another Lambda function to set the tags on the object.
The complete project is in this repository: https://github.com/ppabis/s3-presigned-upload-tagging
Creating the bucket and DynamoDB table
First we need to build the bucket to hold our images. I will use OpenTofu to
deploy the base infrastructure. I use hashicorp/aws ~> 5.0 provider. Create a
terraform.tfvars file that will hold the name of the bucket and then continue
with the following bucket.tf file:
variable "bucket_name" {
  type        = string
  description = "Name of the S3 bucket"
}

resource "aws_s3_bucket" "images" {
  bucket        = var.bucket_name
  force_destroy = true
}
However, as our application will be a public website and the images will be provided as links, we need to also enable public access in this S3 bucket and set a policy that will allow reading.
resource "aws_s3_bucket_public_access_block" "images" {
  bucket              = aws_s3_bucket.images.id
  block_public_policy = false
}

resource "aws_s3_bucket_policy" "bucket-policy" {
  depends_on = [aws_s3_bucket_public_access_block.images]
  bucket     = aws_s3_bucket.images.id
  policy     = <<-EOF
  {
    "Version": "2012-10-17",
    "Statement": [ {
        "Effect": "Allow",
        "Principal": "*",
        "Action": "s3:GetObject",
        "Resource": "${aws_s3_bucket.images.arn}/*"
      } ]
  }
  EOF
}

resource "aws_s3_bucket_cors_configuration" "allow-all-origins" {
  bucket = aws_s3_bucket.images.id
  cors_rule {
    allowed_headers = ["*"]
    allowed_methods = ["GET"]
    allowed_origins = ["*"]
    max_age_seconds = 600
  }
}
Next you can continue with the dynamodb.tf file. Here we will create a table
that will hold temporary data for the Lambda functions. I will use
pay-per-request billing because this is just a demo and we won't have many
requests. hash_key is the primary key of our objects which we will populate
with S3 key names (generated UUID and extension). The expireAt field must be
a number with Unix timestamp that will tell DynamoDB when to delete the item.
variable "table_name" {
  type        = string
  description = "Name of the DynamoDB table"
}

resource "aws_dynamodb_table" "items" {
  name         = var.table_name
  billing_mode = "PAY_PER_REQUEST"
  hash_key     = "uid"

  attribute {
    name = "uid"
    type = "S"
  }

  ttl {
    attribute_name = "expireAt"
    enabled        = true
  }
}
IAM Lambda
In order for our Lambda functions to perform operations on S3 and DynamoDB, we
need to create an IAM role with some permissions. In our diagram, we see that we
need three Lambda functions. For simplicity I will pack all the permissions to
one role and reuse it for all functions. For production use cases, you should
define separate roles and permissions for each function. First let's create a
role that can be assumed by Lambda service and add LambdaBasicExecution policy
so that we can collect logs.
data "aws_iam_policy_document" "LambdaAssumeRole" {
  statement {
    actions = ["sts:AssumeRole"]
    principals {
      type        = "Service"
      identifiers = ["lambda.amazonaws.com"]
    }
  }
}

resource "aws_iam_role" "LambdaPhotosRole" {
  name               = "LambdaPhotosRole"
  assume_role_policy = data.aws_iam_policy_document.LambdaAssumeRole.json
}

resource "aws_iam_role_policy_attachment" "LambdaBasicExecutionRole" {
  role       = aws_iam_role.LambdaPhotosRole.name
  policy_arn = "arn:aws:iam::aws:policy/service-role/AWSLambdaBasicExecutionRole"
}
Now we have to add our custom policy to the function. We could easily go with
S3FullAccess and DynamoDBFullAccess but this is not a good practice.
Instead, I will just write several minimal permissions that we need. Also the
policy will be directly attached to the role (inline) without defining a managed
policy.
We will need the possibility to list the objects in the bucket, get object's
details (tags) and put the object and it's tags. Even though the function will
never call PutObject itself, when we generate the presigned URL, the
permissions given via this link are based on the principal generating the URL.
What is more we want to be able to get items from DynamoDB, put new ones and
delete ones that are not needed anymore.
data "aws_iam_policy_document" "LambdaPhotosPermissions" {
  statement {
    actions   = ["s3:ListBucket", "s3:GetBucketLocation"]
    resources = [aws_s3_bucket.images.arn]
  }
  statement {
    actions   = ["s3:GetObject", "s3:GetObject*", "s3:PutObject", "s3:PutObject*"]
    resources = ["${aws_s3_bucket.images.arn}/*"]
  }
  statement {
    actions   = ["dynamodb:GetItem", "dynamodb:PutItem", "dynamodb:DeleteItem"]
    resources = [aws_dynamodb_table.items.arn]
  }
}

resource "aws_iam_role_policy" "LambdaPhotosPermissions" {
  role   = aws_iam_role.LambdaPhotosRole.name
  policy = data.aws_iam_policy_document.LambdaPhotosPermissions.json
}
Creating the Lambda functions
Our Lambda functions will only require boto3 package that is included in AWS
runtime. However, we still need hashicorp/archive ~> 2.0 provider to create a
ZIP file with the code to upload. However, let's start with the basic list.py
function that will just list all objects in the bucket along with their tags.
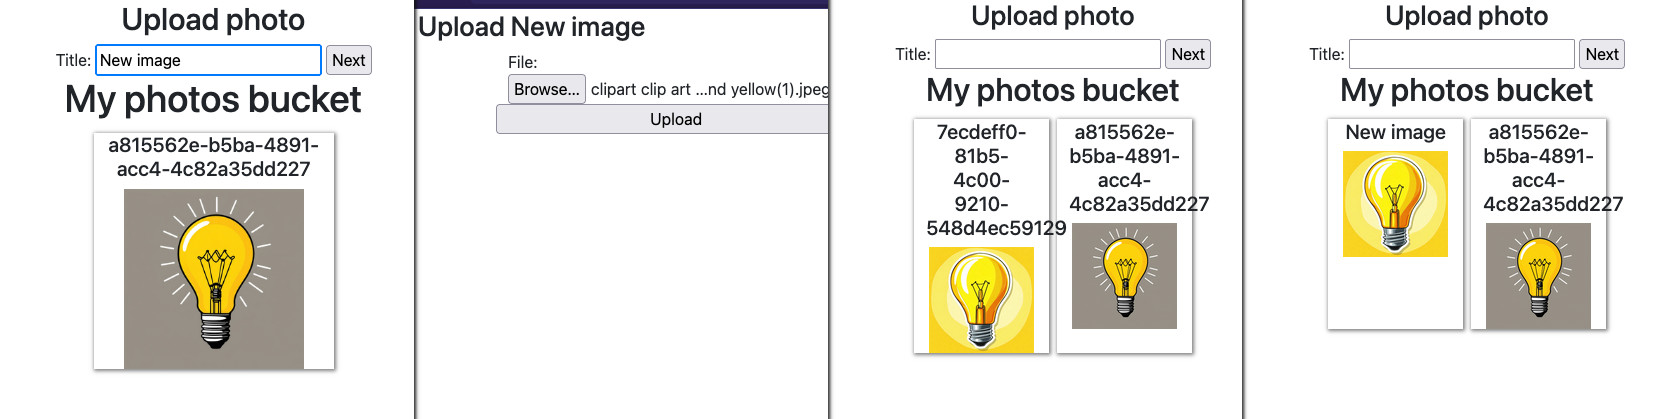
First, I define a simplified template for the HTML page that will show the photos and prepare a form that will be used to create temporary title and give the user a presigned URL to upload.
import boto3, os

s3 = boto3.client('s3')
bucket_name = os.environ['BUCKET_NAME']

HTML_TEMPLATE = """
<!DOCTYPE html>
<html>
    <head> <title>My photos bucket</title> </head>
    <body>
        <h2>Upload photo</h2>
        <form action="" method="post">
            <label for="title">Title:</label>
            <input type="text" name="title">
            <input type="submit" value="Next">
        </form>
        <div> {list_items} </div>
    </body>
</html>
"""
Next, I will create a function that will help me read Title tag from the S3
object. If no Title tag is specified, we just show the key. I know that this
function seems complicated but it's just how the API works 😖. First we check
if the object even exists and has any tags (TagSet). Then we filter the tags
by a predicate: all the tags that have Key field equal to Title. If the
filtered list has no elements, that means that Title tag was not set so we
return the object key.
def get_object_title_tag(key):
    # Will return either the tag "Title" or the key name if no tag is found
    response = s3.get_object_tagging(Bucket=bucket_name, Key=key)
    if response and ('TagSet' in response):
        title_tag = list( filter(lambda t: t['Key'] == 'Title', response['TagSet']) )
        return title_tag[0]['Value'] if len(title_tag) > 0 else key
    return key
Now we can simply list all objects in the bucket. Each image will have a title in HTML tag and show a thumbnail of the image.
def get_list_items():
    response = s3.list_objects_v2(Bucket=bucket_name)
    if 'Contents' not in response:
        return "<h3>No photos yet</h3>"

    return "\n".join( [
        """<div style="display: inline-block">
            <h5>{title}</h5>
            <img src="{bucket_url}/{key}" style="max-width: 200px; max-height: 200px;">
        </div>"""
        .format(
            title      = get_object_title_tag(item['Key']),
            bucket_url = f"https://{bucket_name}.s3.amazonaws.com",
            key        = item['Key']
        )
        for item in response['Contents']
    ] )


def lambda_handler(event, context):
    return {
        'headers'    : { 'Content-Type': 'text/html' },
        'statusCode' : 200,
        'body'       : HTML_TEMPLATE.format(list_items=get_list_items())
    }
I saved this code in list.py in a new directory called lambdas. For
simplicity we will pack full contents of this directory into a ZIP file and use
it for all Lambda functions. We will just control which file to run using
the entry point. In production, you should pack all Lambda's separately. Also
for simplicity, I will use Terraform's for_each to create all the functions in
one shot.
data "archive_file" "zip" {
  type        = "zip"
  source_dir  = "${path.module}/lambdas"
  output_path = "${path.module}/lambdas.zip"
}

data "aws_region" "current" {}

resource "aws_lambda_function" "lambda" {
  for_each = toset(["list", "tag", "upload"])

  function_name    = "photos-lambda-${each.key}"
  role             = aws_iam_role.LambdaPhotosRole.arn
  handler          = "${each.key}.lambda_handler"
  runtime          = "python3.12"
  filename         = data.archive_file.zip.output_path
  source_code_hash = data.archive_file.zip.output_base64sha256
  environment {
    variables = {
      BUCKET_NAME = aws_s3_bucket.images.bucket
    }
  }
}
Connecting the function to API Gateway
You can technically run this Lambda from AWS Console or the command line but it will not generate nice HTML, rather some JSON with embedded HTML response. To make this an actual application, we will use API Gateway that will serve us the pages and accept new uploads.
We start by defining the empty gateway resource. Then we need to create a
method. For listing the photos, we can just use GET with / path. This method
will require an AWS integration. Set authorized to NONE to allow yourself to
open the page via the browser. Don't get confused by the POST method in the
integration - this is the method you give to AWS and InvokeFunction is
accessed with POST.
variable "api_name" {
  type        = string
  description = "Name of the API Gateway"
}

resource "aws_api_gateway_rest_api" "api" {
  name = var.api_name
}

resource "aws_api_gateway_method" "get" {
  rest_api_id   = aws_api_gateway_rest_api.api.id
  resource_id   = aws_api_gateway_rest_api.api.root_resource_id
  http_method   = "GET"     # Method you as the user call in the browser
  authorization = "NONE"
}

resource "aws_api_gateway_integration" "get-list" {
  rest_api_id = aws_api_gateway_rest_api.api.id
  resource_id = aws_api_gateway_rest_api.api.root_resource_id
  http_method = aws_api_gateway_method.get.http_method

  integration_http_method = "POST"  # Method to call on AWS side
  type                    = "AWS_PROXY"
  uri                     = aws_lambda_function.lambda["list"].invoke_arn
}
But this is not all! API Gateway requires you to create stages and deployments.
This is mostly used for different versions of the API or environments. We will
just have one called prod. Each stage should also be separately deployed.
resource "aws_api_gateway_stage" "prod" {
  rest_api_id = aws_api_gateway_rest_api.api.id
  stage_name  = "prod"
  deployment_id = aws_api_gateway_deployment.prod.id
}

resource "aws_api_gateway_deployment" "prod" {
  rest_api_id = aws_api_gateway_rest_api.api.id
  depends_on = [ aws_api_gateway_integration.get-list ]
  variables = {
    "deployed_version" = "1" # Change this to force deployment, otherwise you have to do it manually
  }
}

output "api-gateway" {
  value = "${aws_api_gateway_deployment.prod.invoke_url}prod/"
}
Another thing to remember is to allow API Gateway to call the Lambda function. I
will define both permissions for list and future upload in one go.
resource "aws_lambda_permission" "api" {
  for_each      = toset(["list", "upload"])
  function_name = aws_lambda_function.lambda[each.key].function_name
  source_arn    = "${aws_api_gateway_rest_api.api.execution_arn}/*/*/*"
  principal     = "apigateway.amazonaws.com"
  action        = "lambda:InvokeFunction"
}
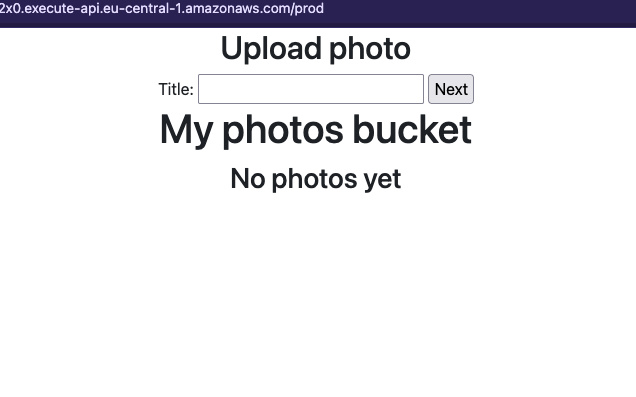
You can use api-gateway output to access the page. It should show for now no
photos. You can upload some to the bucket manually and add Title tag to one of
the objects to test the behavior.
Lambda for uploads
Currently the form on the main page does not do anything. It leads to the same
API Gateway URL as currently open but calls a POST method. Our gateway does
not react yet to this method so we need to implement it. Also add dependency to
the deployment for easier infrastructure updates.
resource "aws_api_gateway_method" "post" {
  rest_api_id   = aws_api_gateway_rest_api.api.id
  resource_id   = aws_api_gateway_rest_api.api.root_resource_id
  http_method   = "POST"
  authorization = "NONE"
}

resource "aws_api_gateway_integration" "post-upload" {
  rest_api_id = aws_api_gateway_rest_api.api.id
  resource_id = aws_api_gateway_rest_api.api.root_resource_id
  http_method = aws_api_gateway_method.post.http_method

  integration_http_method = "POST"
  type                    = "AWS_PROXY"
  uri                     = aws_lambda_function.lambda["upload"].invoke_arn
}

resource "aws_api_gateway_deployment" "prod" {
  ...
  depends_on = [
    aws_api_gateway_integration.get-list,
    aws_api_gateway_integration.post-upload
  ]
  ...
}
However, even with the code above, the method leads to a defined Lambda function
that on the contrary leads to nowhere as we did not create upload.py file, so
the function invoke will result in 500 error. Let's define this function now.
First we need to import some needed libraries we will use. Then we can load all
the needed environment variables - bucket name, DynamoDB table and URL to
redirect after upload.
import boto3, uuid, os, re, time
from urllib.parse import parse_qs

BUCKET_NAME = os.environ['BUCKET_NAME']
TABLE_NAME = os.environ['TABLE_NAME']
REDIRECT = os.environ['REDIRECT']
s3 = boto3.client('s3')
dynamo = boto3.resource('dynamodb').Table(TABLE_NAME)
Now I will define some helper functions. First one will clean up the title that is submitted in the form so that we add only valid characters to the title (alphanumeric, hyphen and space). If the title is empty, we will set it to "Untitled".
def clean_title(title):
    t = re.sub(r'[^a-zA-Z0-9\-\s]', '', title)
    return t if t else "Untitled"
In the next function we will create a form with presigned URL and store all the details in DynamoDB. The object key will be just a newly generated UUID.
First we need to parse the incoming form from the previous page with the title
using parse_qs library function. Then we generate the presigned URL that
that returns many fields. Firstly, there is the target URL to which the form has
to be submitted. But it also needs us to pass some hidden fields that we
construct in HTML. These fields are for example the key of the object,
redirect fields that instruct S3 server to send us back to the main page and
STS tokens and signature that are used to authorize the upload and all the other
fields that we give. The Conditions field is required for every field but here
we allow any value to be provided. After that we store the UUID and title in
DynamoDB that will be later read by another Lambda function.
HTML_TEMPLATE="""<html>
    <head> <title>Upload {title}</title> </head>
    <body>
        <h2>Upload {title}</h2>
        <form action="{url}" method="post" enctype="multipart/form-data">
            {hidden_inputs}
            <label for="file">File:</label>
            <input type="file" id="file" name="file"> <br>
            <input type="submit" name="submit" value="Upload">
        </form>
    </body>
</html>"""

def create_upload_form(event):
    body = parse_qs(event['body'])
    title = clean_title(body['title'][0])
    uid = str(uuid.uuid4())
    print(f"Title: {title}, UUID: {uid}")

    upload_form_fields = s3.generate_presigned_post(
        BUCKET_NAME,
        uid,
        ExpiresIn=600,
        Fields={"redirect": REDIRECT, "success_action_redirect": REDIRECT},
        Conditions=[
            ["starts-with", "$success_action_redirect", ""],
            ["starts-with", "$redirect", ""]
        ]
    )

    dynamo.put_item( Item={ 'uid': uid, 'title': title, 'expireAt': int(time.time()) + 600 } )

    hidden_inputs = [
        f'<input type="hidden" name="{key}" value="{value}">'
        for (key, value) in upload_form_fields['fields'].items()
    ]

    return HTML_TEMPLATE.format(
        title=title,
        url=upload_form_fields['url'],
        hidden_inputs="\n".join(hidden_inputs)
    )


def lambda_handler(event, context):
    return {
        'statusCode': 201,
        'headers': { 'Content-Type': 'text/html' },
        'body': create_upload_form(event)
    }
In the last step we need to update the environment variables of the Lambda
functions. Go back to this place and add the TABLE_NAME and REDIRECT
variables. The redirect one is constructed different than the output URL we have
seen before because of dependency cycles in Terraform. However, the values
provided make it equal.
data "aws_region" "current" {}

resource "aws_lambda_function" "lambda" {
  for_each = toset(["list", "tag", "upload"])
  ...
  environment {
    variables = {
      BUCKET_NAME = aws_s3_bucket.images.bucket
      TABLE_NAME  = aws_dynamodb_table.items.name
      REDIRECT = "https://${aws_api_gateway_rest_api.api.id}.execute-api.${data.aws_region.current.name}.amazonaws.com/prod"
    }
  }
}
Such function can be saved as lambdas/upload.py and applied to the
infrastructure. We have already added permissions for API Gateway to call this
function so the upload should work already. However, after upload, the title
will stay empty, or rather we default to the object key which is a random UUID.
Lambda for tagging and S3 notifications
It's time to create the last Lambda function that will update the tags on the
object. It will be triggered by S3 notification after the image is uploaded. In
file tag.py define such function:
import boto3, os

TABLE_NAME = os.environ['TABLE_NAME']
dynamo = boto3.resource('dynamodb').Table(TABLE_NAME)
s3 = boto3.client('s3')

def get_from_dynamo(key):
    response = dynamo.get_item( Key={'uid': key} )
    return response['Item']['title'] if 'Item' in response else "Untitled"

def update_tagging(record):
    key = record['s3']['object']['key']
    bucket = record['s3']['bucket']['name']
    title = get_from_dynamo(key)

    print(f"Updating tagging for {bucket}/{key} to {title}")
    s3.put_object_tagging( Bucket=bucket, Key=key, Tagging={ 'TagSet': [ { 'Key': 'Title', 'Value': title } ] } )
    dynamo.delete_item( Key={'uid': {'S': key}} )


def lambda_handler(event, context):
    print(event)
    for record in event['Records']:
        if 's3' in record:
            update_tagging(record)
        else:
            print(f"Unexpected record: {record}")
    return { 'statusCode': 200, 'body': 'OK' }
First we will get the bucket and object key in the event. Then we need to find in DynamoDB the entry for this object. If it doesn't exist, we default to "Untitled". After that we can set the tag on the object and delete the entry from DynamoDB.
We also have to add permissions to the Lambda function to allow it to be triggered by S3 and then add the notification to the bucket.
resource "aws_lambda_permission" "s3" {
  statement_id  = "AllowExecutionFromS3"
  action        = "lambda:InvokeFunction"
  function_name = aws_lambda_function.lambda["tag"].function_name
  principal     = "s3.amazonaws.com"
  source_arn    = aws_s3_bucket.images.arn
}
resource "aws_s3_bucket_notification" "bucket_notification" {
  bucket = aws_s3_bucket.images.id
  lambda_function {
    lambda_function_arn = aws_lambda_function.lambda["tag"].arn
    events              = ["s3:ObjectCreated:*"]
  }
  depends_on = [ aws_lambda_permission.s3 ]
}
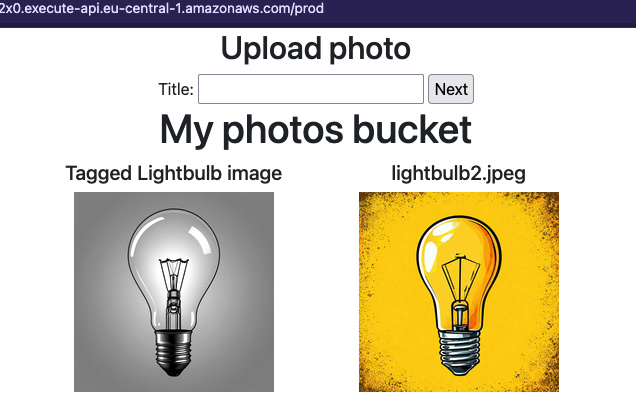
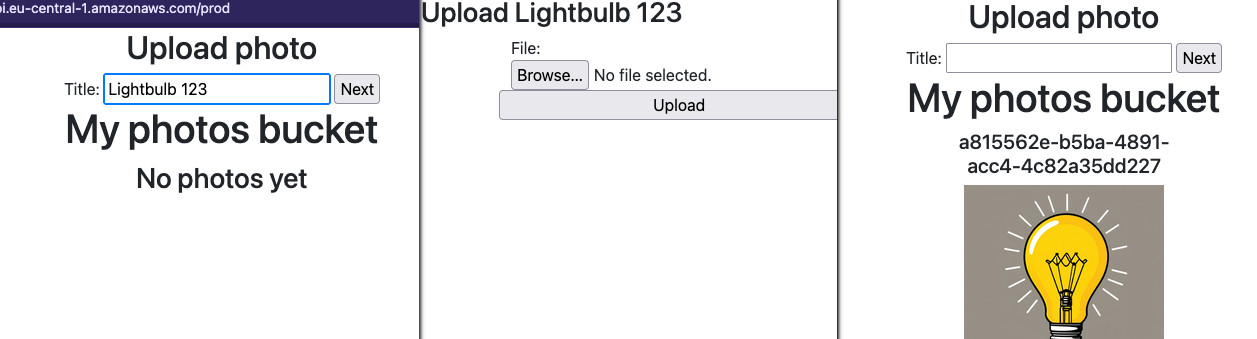
Now after you upload the image, it should show up on the page and the title can be a little delayed, as the notification is asynchronous. Refresh the page to see if the title was applied.