AWS NAT Instance from scratch - cheap and simple
3 June 2025
As the third approach to creating a new NAT instance on AWS, I want to show you how to cleanly and simply create a NAT instance that will use the latest Amazon Linux 2023 AMI. This can help you save a lot of money compared to using NAT Gateways if your traffic is not too high. For large-scale production applications the advantages of a NAT Gateway still apply. However, AWS dropped support for their NAT instance image and what we can do is to rely on third party solutions or just create it ourselves from scratch as the process is very easy. Today, we will build a Terraform module that will be reusable in many environments.
The complete code is available on GitHub.
nat_instance directory contains the pure module, test_infra created a test
infrastructure with many subnets, one with VPC Endpoints, one with S3 Gateway,
so that different options are covered.
Infrastructure
Our module will be constructed from five resources:
- aws_instance - the EC2 instance itself,
- aws_eip - the Elastic IP that will be used in the outside Internet,
- two aws_network_interface - one used on the outside world and the other on
private subnets,
- security_group - allowing access from any private subnet and egress to
anywhere.
I will also create optional IAM role and policies that will allow you to debug the instance using AWS Systems Manager Session Manager.
I assume that to save on costs, we will use the smallest possible instance and agree to costs of cross-AZ traffic. I also assume that the module will be manually connected to appropriate subnets and route tables. What we do here is a minimal setup. I will show how to use the module at the end of the post where we will test multiple instances in many different subnets.
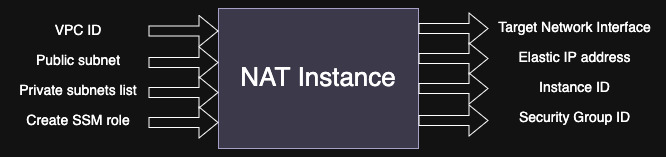
We will start by defining inputs and outputs to the module. First, we need to know which subnets we will hide behind the NAT. Even though subnets are more precise, we also need VPC ID of them to put the security group into. Next we will need to know in which public subnet to place the NAT instance. Lastly, we will provide variable that will conditionally create the IAM role and policies. Let's create all these variables first.
variable "vpc_id" {
  description = "VPC ID to create the NAT instance in"
  type        = string
}

variable "public_subnet" {
  description = "Public subnet ID to place the NAT instance in"
  type        = string
}

variable "private_subnets" {
  description = "IDs of private subnets that will be routed though the instance"
  type        = list(string)
  validation {
    condition     = length(var.private_subnet) > 0
    error_message = "You must provide at least one private subnet ID"
  }
}

variable "create_ssm_role" {
  description = "Create an IAM role for SSM to debug the instance"
  type        = bool
  default     = false
}
As for output we will definitely need the private network interface ID to route our traffic towards it in the route tables. It would be also useful to report instance ID for debugging, Elastic IP address and security group ID if we want some extra rules. For now I will put dummy values in the outputs, we will fill them out along the way.
output "target_network_interface" {
    description = "Add 0.0.0.0/0 routes to this network interface in your route tables"
    value       = "dummy"
}

output "instance_id" {
    description = "Instance ID of the NAT instance (use for SSM debugging)"
    value       = "dummy"
}

output "elastic_ip" {
    description = "Elastic IP address of the NAT instance (maybe you need some allowlists?)"
    value       = "dummy"
}

output "security_group_id" {
    description = "Security group ID of the NAT instance (if extra rules are needed)"
    value       = "dummy"
}
So based on this thought experiment we can draw the following diagram of the "black box" NAT instance module as well as the detailed diagram of the components of the instance itself:
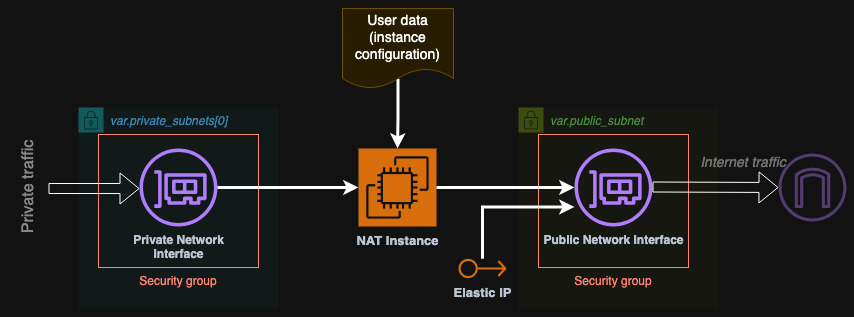
We will start with the implementation of the simplest components first: elastic IP and security group. The security group will allow access from any private subnets to any port on the NAT instance and of every protocol. On the other hand the instance will not be accessible from the public subnet but it will be able to initiate egress traffic to anywhere. We need to resolve the private subnets first to get their CIDR blocks that will be allowed to access the NAT instance. We will also allow access from the security group to itself.
resource "aws_eip" "elastic_ip" {
  instance = aws_instance.nat_instance.id    # We will create it soon
}

data "aws_subnet" "private_subnet" {
  for_each = toset(var.private_subnets)
  id       = each.value
}

resource "aws_security_group" "security_group" {
  vpc_id      = var.vpc_id
  description = "Security group for NAT instance"
  name        = "NATInstanceSecurityGroup"

  egress {
    from_port        = 0
    to_port          = 0
    protocol         = "-1"
    cidr_blocks      = ["0.0.0.0/0"]
    ipv6_cidr_blocks = ["::/0"]
  }

  ingress {
    from_port = 0
    to_port   = 0
    protocol  = "-1"
    self      = true
  }

  ingress {
    from_port   = 0
    to_port     = 0
    protocol    = "-1"
    cidr_blocks = [for subnet in data.aws_subnet.private_subnet : subnet.cidr_block]
  }
}
Now is the time for network interfaces. Because EC2 creates one ENI by default, we can just define one resource for the private one. The default one will be our public interface. Because we know that the user had to provide at least one private subnet (why would you create a NAT instance otherwise?), we can safely use the first one as the place for our ENI. What is very important is to disable the source-destination check. That way packets that are destined to the Internet will not be ignored by this ENI.
resource "aws_network_interface" "private_eni" {
  subnet_id         = var.private_subnets[0]
  security_groups   = [aws_security_group.security_group.id]
  source_dest_check = false     # Important flag
  attachment {
    device_index = 1
    instance     = aws_instance.nat_instance.id    # We will create it soon
  }
}
Now is the time for the instance itself (including public ENI). We will use the
latest Amazon Linux 2023 AMI and use the smallest and cheapest t4g.nano class.
The AMI can be resolved from publicly available SSM Parameters. Adding the
security group will attach to the public ENI. In case we need to debug the
instance I will also conditionally add the IAM instance profile. Ignoring AMI
changes will prevent destroying the instance when running another
tofu plan and the new AMI was released.
data "aws_ssm_parameter" "AL2023" {
  name = "/aws/service/ami-amazon-linux-latest/al2023-ami-kernel-6.1-arm64"
}

resource "aws_instance" "nat_instance" {
  ami                         = data.aws_ssm_parameter.AL2023.value
  instance_type               = "t4g.nano"
  vpc_security_group_ids      = [aws_security_group.security_group.id]
  subnet_id                   = var.public_subnet
  iam_instance_profile        = var.create_ssm_role ? aws_iam_instance_profile.ssm_role[0].name : null
  lifecycle { ignore_changes = [ami] }

  user_data = templatefile(
    "${path.module}/user_data.yml",
    {
      private_subnets : data.aws_subnet.private_subnet[*].cidr_block,
      primary_subnet : data.aws_subnet.private_subnet[0].cidr_block
    }
  )
}
However, as you can see above, I also added a user_data field. Because what
we have defined so far was the easy part. Now comes the core of the instance:
configuration inside Linux.
Configuration of the instance to act as a NAT Gateway
The user data script that we will supply will not be a simple Bash script. We
will use cloud-init syntax to make the changes be applied every reboot of the
instance. This way we can dynamically attach more subnets and remove some of
them if we want to without recreating the whole instance again. By default,
simple Bash scripts run only once during instance creation. However, in
Terraform, changes to user data always reboot the instance. cloud-init is a
different approach that allows us to set a flag that the script should be run
every time. In this user data, I will do two things: create the script as a
local file and execute it. Let's first go step by step through all the commands
we have to run in order to have a working NAT instance.
In the first part, I will do just three basic things: update the system, install
iptables-services and enable IP forwarding in the kernel settings which I will
also apply immediately.
#!/bin/bash
yum update -y
yum install -y iptables-services
echo "net.ipv4.ip_forward=1" > /etc/sysctl.d/90-nat.conf
sysctl --system
The next step is to determine the network interface names. I will do it using
some ip and grep commands. AWS adds aliases to the ENIs, even though we are
using the same Amazon Linux 2023, just a year ago the names were a bit
differently formatted, so be sure to check from time to time if the syntax
changes. The second interface is dynamically attached so it might happen that we
have to wait for it.
ETH0_NAME=$(ip addr | grep device-number-0 | grep -oE 'device-number-.*$')
# Find the private interface name
for i in {1..10}; do
  ETH1_NAME=$(ip addr | grep device-number-1 | grep -oE 'device-number-.*$')
  [[ -n "$ETH1_NAME" ]] && break
  sleep 3
done
# Find the real interfaces ids
ETH0=$(ip -4 addr show $ETH0_NAME | grep -oP 'ens[0-9]+' | head -n1)
ETH1=$(ip -4 addr show $ETH1_NAME | grep -oP 'ens[0-9]+' | head -n1)
echo "Devices: public: $ETH0_NAME ($ETH0) and private: $ETH1_NAME ($ETH1)"
Using these interface names, we can now set up IPTables rules. First I will clear all the settings and set it up anew because if the script is run multiple times, it's better to start from scratch. Saving the settings is not necessary as we run it on every boot but won't hurt.
iptables -F
iptables -t nat -F
iptables -P FORWARD ACCEPT
iptables -t nat -A POSTROUTING -o $ETH0 -j MASQUERADE
iptables -A FORWARD -i $ETH0 -o $ETH1 -m state --state RELATED,ESTABLISHED -j ACCEPT
iptables -A FORWARD -i $ETH1 -o $ETH0 -j ACCEPT
systemctl enable --now iptables
service iptables save
The most difficult part is setting up the routes on the second interface. Just
like with the IPTables, I will delete the old configuration and write a new from
scratch. Here we will use the Terraform's templates to dynamically list all the
required routes to add. We will skip the primary private subnet as it is already
there. For example if our primary subnet is 10.10.1.0/24 we will skip adding
this route but for example subnet 10.10.2.0/24 should be routed to gateway
10.10.1.1 (the primary subnet's first host).
rm -rf /etc/systemd/network/70-$ETH1.network.d
mkdir -p /etc/systemd/network/70-$ETH1.network.d
cat <<EOF > /etc/systemd/network/70-$ETH1.network.d/routes.conf
%{~for cidr in setsubtract(private_subnets, [primary_subnet])}
[Route]
Destination=${cidr}
Gateway=${cidrhost(primary_subnet, 1)}
GatewayOnlink=yes
%{~endfor}
EOF
networkctl reload
Such complete script will be saved to file /usr/local/bin/nat_instance.sh.
Then we will run it with bash in runcmd. Be careful with the indentation of
the loop in the template.
#cloud-config
repo_update: true
repo_upgrade: all

cloud_final_modules:
  - [write-files, always]
  - [scripts-user, always]

write_files:
  - path: /usr/local/bin/nat_instance.sh
    permissions: '0755'
    content: |-
      #!/bin/bash
      yum update -y
      yum install -y iptables-services
      echo "net.ipv4.ip_forward=1" > /etc/sysctl.d/90-nat.conf
      ... # removed for brevity
      cat <<EOF >> /etc/systemd/network/70-$ETH1.network.d/routes.conf
%{~for cidr in setsubtract(private_subnets, [primary_subnet])}
      [Route]
      Destination=${cidr}
      Gateway=${cidrhost(primary_subnet, 1)}
      GatewayOnlink=yes
%{~endfor}
      EOF
      networkctl reload

runcmd:
  - [bash, /usr/local/bin/nat_instance.sh]
After you apply the new infrastructure, you can check the mentioned files if everything is correct. For example check:
cat /etc/systemd/network/70-ens5.network.d/routes.conf,cat /etc/sysctl.d/90-nat.conf,cat /etc/sysconfig/iptables,ip r,iptables -L,iptables -t nat -L.
Try rebooting the instance and check again those files and commands. Then try adding a subnet or removing one and see again if it updates (changing user data will reboot the instance). When using the instance for the first time even with default settings, I recommend rebooting it either way to ensure all configuration is applied correctly.
Summary
Implementing a NAT instance is not a difficult task. You need to remember about the routes inside that need to be refreshed when the structure of the VPC changes. This unfortunately leads to reboots if the instance is doing this via user data. However, if you implement a daemon that would query the subnets from time to time (for example using tags), you can dynamically update the routes without reboots. In this example we rely on Terraform's templating engine to create a list of routes to add. In either case the kernel setting and the IPTables rules will remain the same, unless you swap the network cards.