AWS Session Manager but in Azure? Introducing Azure Bastion
10 June 2025
In Azure there's no Systems Manager, that's pretty obvious when you know that it's an AWS product. However, as both clouds are very large providers, Azure should offer something similar, right? As our focus is Session Manager, there's no direct equivalent that works in the same way. However, Microsoft offers us Azure Bastion - a managed service that creates a web interface for a jumpbox that supports both SSH and RDP. This is not the same as Session Manager as you still need keys or passwords but as Azure beginner, I will try to replicate this pattern as closely as possible. The setup I want to convert from AWS to Azure is shown below.
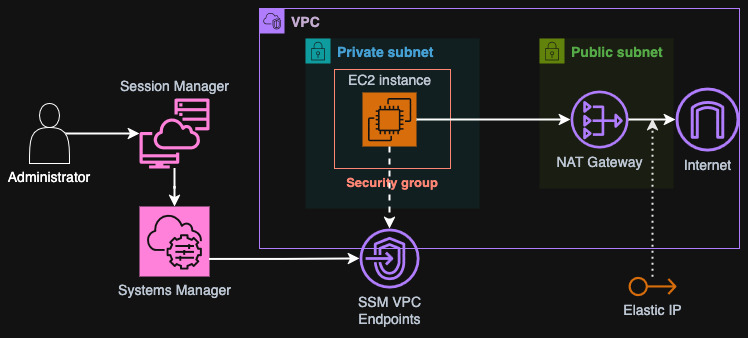
Our goal is to create a secure environment, where the instance is in a private network (subnet) and is only accessible by managed services within Azure. What is more I want the instance to be able to access the internet without any restrictions. We will do some more modifications along the way.
The repository for this article is available on GitHub.
Yes, I know I can just install SSM Agent on the VM in Azure but then you still need AWS to manage it😄.
Base infrastructure
Before we can create a virtual machine, we need some networking infrastructure. In Azure all the resources are created in Resource Groups (no equivalent in AWS). However, Virtual Networks, Subnets and NAT Gateways are almost the same thing as VPCs and, well, Subnets and NAT Gateways (subnets in Azure span all AZs contrary to AWS but for our setup it doesn't matter). So, in a new Resource Group I will define just that. I will obviously need a provider with correct parameters.
terraform {
  required_providers {
    azurerm = {
      source  = "hashicorp/azurerm"
      version = "~> 4.0"
    }
  }
}

variable "subscription_id" {
  type    = string
  default = "00000000-0000-0000-0000-000000000000"
}

provider "azurerm" {
  features {}
  subscription_id                 = var.subscription_id
  resource_provider_registrations = "none"
}
We will use a lot of providers in the next steps so I will just give you them
here in advance. Replace the above file providers.tf with the following
content that will install all the needed imports: azurerm, azuread, tls,
local and random. Apply with tofu init.
terraform {
  required_providers {
    azurerm = {
      source  = "hashicorp/azurerm"
      version = "~> 4.0"
    }

    azuread = {
      source  = "hashicorp/azuread"
      version = "~> 3.0"
    }

    tls = {
      source  = "hashicorp/tls"
      version = "~> 4.0"
    }

    local = {
      source  = "hashicorp/local"
      version = "~> 2.0"
    }

    random = {
      source  = "hashicorp/random"
      version = "~> 3.0"
    }
  }
}

variable "subscription_id" {
  type    = string
  default = "00000000-0000-0000-0000-000000000000"
}

provider "azurerm" {
  features {}
  subscription_id                 = var.subscription_id
  resource_provider_registrations = "none"
}

data "azurerm_client_config" "current" {}

provider "azuread" {
  tenant_id = data.azurerm_client_config.current.tenant_id
}
In order to get your subscription ID, you need to either go to the Azure Portal and find it or use CLI. Either way you have to log in using CLI, so you can use the same tool for getting your subscription ID.
$ az login
$ az account list
[
  {
    "cloudName": "AzureCloud",
    ...
    "tenantId": "da0b4838-3e14-4b7f-a4d4-07468e1ec986",
    ...
  }
]
After you have authenticated and specified the subscription_id variable in
terraform.tfvars, we can continue to build our main networking setup. It will
be pretty simple, even with the NAT Gateway, as another fact about Azure
compared to AWS is that you don't need to specify routing rules to enable it -
just attach it to a subnet and you are good to go! However, you need to also get
a Public IP for the NAT Gateway - equivalent to Elastic IP. However, these seven
resources should be pretty self-explanatory if you worked with AWS for some
shorter time already. I will use the germanywestcentral region as it is the
closest to me.
resource "azurerm_resource_group" "rg" {
  name     = "default-rg"
  location = "germanywestcentral"
}

resource "azurerm_virtual_network" "vnet" {
  name                = "vnet-default"
  location            = azurerm_resource_group.rg.location
  resource_group_name = azurerm_resource_group.rg.name
  address_space       = ["10.180.0.0/16"]
}

resource "azurerm_subnet" "private" {
  name                 = "private"
  resource_group_name  = azurerm_resource_group.rg.name
  virtual_network_name = azurerm_virtual_network.vnet.name
  address_prefixes     = ["10.180.0.0/24"]
}

resource "azurerm_public_ip" "nat" {
  name                = "nat-ip"
  location            = azurerm_resource_group.rg.location
  resource_group_name = azurerm_resource_group.rg.name
  allocation_method   = "Static"
}

resource "azurerm_nat_gateway" "nat" {
  name                = "nat"
  location            = azurerm_resource_group.rg.location
  resource_group_name = azurerm_resource_group.rg.name
}

resource "azurerm_nat_gateway_public_ip_association" "nat" {
  nat_gateway_id       = azurerm_nat_gateway.nat.id
  public_ip_address_id = azurerm_public_ip.nat.id
}

resource "azurerm_subnet_nat_gateway_association" "nat" {
  subnet_id      = azurerm_subnet.private.id
  nat_gateway_id = azurerm_nat_gateway.nat.id
}
The first virtual machine
Now as we have the network, we can place an instance. I chose Ubuntu as the OS
which we will use and because it's a Linux instance, we need to specify an SSH
key for it. I will make it unique so that I don't have to upload my own private
SSH key to Azure (you will see later). For that I will need hashicorp/tls and
hashicorp/local providers.
resource "tls_private_key" "ssh_key" {
  algorithm = "RSA"
  rsa_bits  = 3072
}

resource "local_sensitive_file" "ssh_key_file" {
  filename = "${path.module}/ssh_key.pem"
  content  = tls_private_key.ssh_key.private_key_openssh
}
Our key will be saved to our project path into file ssh_key.pem. It is a
unique key but make it a habit to be careful with the keys and store them
securely.
Speaking of a virtual machine, in AWS EC2 you don't have to define
network interfaces, one will be created by default. In Azure it's different, you
need to create a network interface (NIC) before creating the VM. In the VM block
you also must specify the operating system disk parameters, username for the
admin and, as previously mentioned, an SSH key. In place of an AMI we can use
source_image_id but Azure's Terraform provider adds a special block that we
can use to save on a data source call - storage_image_reference.
resource "azurerm_network_interface" "vm1_nic" {
  name                = "vm1-nic"
  location            = azurerm_resource_group.rg.location
  resource_group_name = azurerm_resource_group.rg.name
  ip_configuration {
    name                          = "nic-ip"
    subnet_id                     = azurerm_subnet.private.id
    private_ip_address_allocation = "Dynamic"
  }
}

resource "azurerm_virtual_machine" "vm1" {
  name                          = "vm1"
  location                      = azurerm_resource_group.rg.location
  resource_group_name           = azurerm_resource_group.rg.name
  network_interface_ids         = [azurerm_network_interface.vm1_nic.id]
  vm_size                       = "Standard_B1s"
  delete_os_disk_on_termination = true
  storage_image_reference {
    publisher = "Canonical"
    offer     = "ubuntu-24_04-lts"
    sku       = "server"
    version   = "latest"
  }
  storage_os_disk {
    name          = "vm1-os-disk"
    create_option = "FromImage"
    caching       = "ReadWrite"
    disk_size_gb  = 30
  }
  os_profile {
    admin_username = "azureuser"
    computer_name  = "vm1"
  }
  os_profile_linux_config {
    disable_password_authentication = true
    ssh_keys {
      key_data = tls_private_key.ssh_key.public_key_openssh
      path     = "/home/azureuser/.ssh/authorized_keys"
    }
  }
}
Azure Bastion
Now we should be able to apply our infrastructure and a new virtual machine
should be created in Azure. So far we won't be able to connect to it. If we want
the access, similar to AWS Session Manager, we need a bastion host. However,
it's not the same technology as AWS provides, because Azure Bastion is just a
simple pass-through for SSH and RDP. You need a public IP to expose it without
VPNs or similar. What is very important to note is that you need to create
Azure Bastions in a subnet that must be named AzureBastionSubnet.
resource "azurerm_public_ip" "bastion" {
  name                = "bastion-ip"
  location            = azurerm_resource_group.rg.location
  resource_group_name = azurerm_resource_group.rg.name
  allocation_method   = "Static"
  sku                 = "Standard"
}

resource "azurerm_subnet" "bastion" {
  name                 = "AzureBastionSubnet"
  resource_group_name  = azurerm_resource_group.rg.name
  virtual_network_name = azurerm_virtual_network.vnet.name
  address_prefixes     = ["10.180.1.0/24"]
}

resource "azurerm_bastion_host" "bastion" {
  name                = "bastion"
  location            = azurerm_resource_group.rg.location
  resource_group_name = azurerm_resource_group.rg.name
  ip_configuration {
    name                 = "bastion-ip"
    public_ip_address_id = azurerm_public_ip.bastion.id
    subnet_id            = azurerm_subnet.bastion.id
  }
}
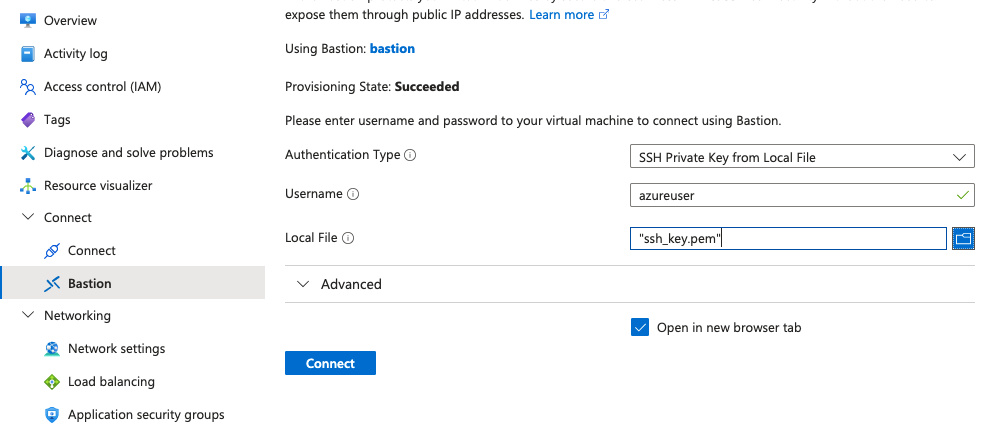
Bastion will take some minutes to create (AFAIK be default it creates two of
them for high-availability). Now if you go to Azure Portal, locate your VM and
click on it, you should be able to find a tab "Connect" on the left. One of the
options will be "Bastion". Select it, type azureuser (or some other if you
used a different one), from the dropdown select SSH with keys and in the file
selector find the SSH key that Terraform created (ssh_key.pem). You should see
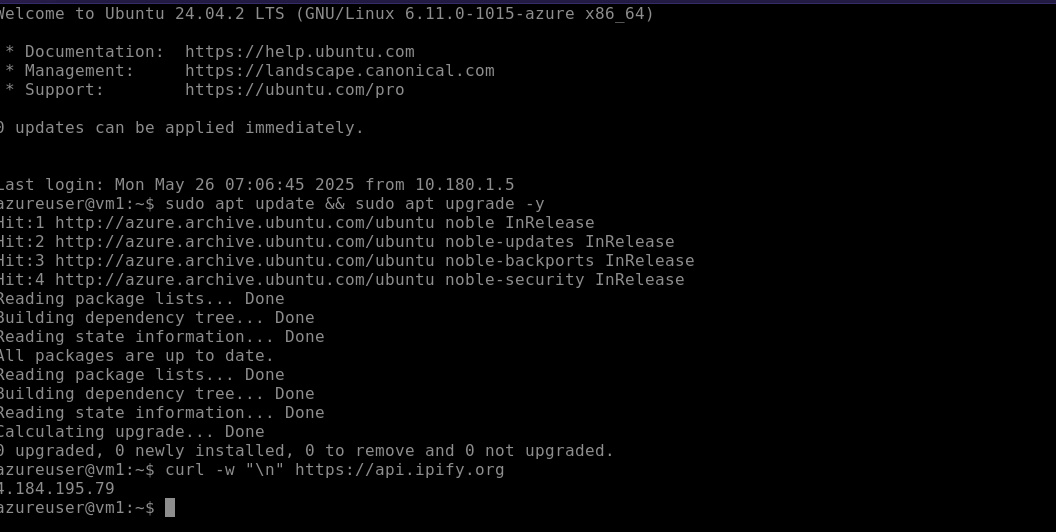
a new browser tab with the terminal. You can test also NAT Gateway connectivity
by trying to update the system with sudo apt update && sudo apt upgrade. Also
use curl -w "\n" https://api.ipify.org and compare the public IP to the one of
the NAT Gateway.
Making things a bit more secure
Obviously, our setup is far from perfect. Currently anyone can try Azure Bastion's IP (but as long as Microsoft keeps things secure, nobody else can use our Bastion to even connect to their own VMs). Another thing is that any other VM on our network can try port 22 of our particular VM although as of now it's alone, but thinking for the future, we don't want infected virtual machines to try bruteforcing its siblings. Another issue is that we use the private key that we keep on our system. If another administrator from our team wanted to access it, it would be very insecure to trade private keys with them. One option is to add more users on the target VM, but we want to never lose access to the first admin in case of a need to troubleshoot.
There's a lot to unpack here, so let's tackle first the networking issue.
Currently our instance can be reached on port 22 by anyone in the VNET. It would
be more appropriate if we limited it to the Bastion host only. Assuming that the
subnet AzureBastionSubnet will only ever be used for Bastions, we can create
the following Network Security Group (NSG), similar to AWS Security Groups. Here
we specify that only Bastion subnet can access inbound on port 22 but the NSG
allows outbound traffic to anywhere so that we can for example update the
system (via NAT Gateway). At the end we associate this NSG with the NIC of our
VM.
resource "azurerm_network_security_group" "vm_nsg" {
  name                = "vm-nsg"
  location            = azurerm_resource_group.rg.location
  resource_group_name = azurerm_resource_group.rg.name

  security_rule {
    name                       = "ingress-from-bastion"
    priority                   = 500
    direction                  = "Inbound"
    access                     = "Allow"
    protocol                   = "Tcp"
    destination_port_range     = "22"
    source_port_range          = "*"
    source_address_prefixes    = azurerm_subnet.bastion.address_prefixes
    destination_address_prefix = "*"
  }

  # Allow all outbound
  security_rule {
    name                       = "all-egress"
    priority                   = 500
    direction                  = "Outbound"
    access                     = "Allow"
    protocol                   = "*"
    source_address_prefix      = "*"
    source_port_range          = "*"
    destination_address_prefix = "*"
    destination_port_range     = "*"
  }
}

# Associate NSG with VM's NIC
resource "azurerm_network_interface_security_group_association" "vm_nsg_association" {
  network_interface_id      = azurerm_network_interface.vm1_nic.id
  network_security_group_id = azurerm_network_security_group.vm_nsg.id
}
Unfortunately, it's pretty verbose as default values in this provider are not
* but just empty strings that are an invalid configuration. Anyway,
compared to AWS SGs, Azure's NSGs can also be connected to entire subnets. For
AzureBastionSubnet we unfortunately can't create any arbitrary NSG, just as
we need to name the subnet appropriately. I will follow
this guide on Microsoft Learn
to create a valid NSG for Bastion. We will need connectivity from GatewayManager
and AzureLoadBalancer. Default NSGs allow already connectivity from and to
anywhere in the VirtualNetwork, so I will skip those two points. I will also
assume that the Bastion is secure and allow it to connect outbound to anywhere
on either the Internet or our private network. The only part I want to modify
is the Internet inbound. I will change this to a prefix of my home IP, so that
only users with not only authentication to Azure but also with allowed IP can
use the Bastion. In the code below I also used for_each to make it shorter as
a lot of values are repeated. Dynamic block will create three ingress rules for
each of the sources I described above. source_address_prefix not only accepts
CIDR ranges but also names of predefined prefix lists.
variable "allowed_subnet" {
  type = string
}

resource "azurerm_network_security_group" "bastion_nsg" {
  name                = "bastion-nsg"
  location            = azurerm_resource_group.rg.location
  resource_group_name = azurerm_resource_group.rg.name

  dynamic "security_rule" {
    for_each = {
      "public-ip" = {
        prefix   = var.allowed_subnet
        priority = 150
      }
      "gateway-manager" = {
        prefix   = "GatewayManager"
        priority = 160
      }
      "azure-load-balancer" = {
        prefix   = "AzureLoadBalancer"
        priority = 170
      }
    }

    content {
      name                       = "ingress-${security_rule.key}"
      priority                   = security_rule.value.priority
      direction                  = "Inbound"
      access                     = "Allow"
      protocol                   = "Tcp"
      source_address_prefix      = security_rule.value.prefix
      source_port_range          = "*"
      destination_address_prefix = "*"
      destination_port_range     = "443"
    }
  }

  # Egress to everywhere
  security_rule {
    name                       = "all-egress"
    priority                   = 100
    direction                  = "Outbound"
    access                     = "Allow"
    protocol                   = "Tcp"
    source_address_prefix      = "*"
    source_port_range          = "*"
    destination_address_prefix = "*"
    destination_port_range     = "*"
  }
}

# Associate NSG with Bastion subnet
resource "azurerm_subnet_network_security_group_association" "bastion_nsg_association" {
  subnet_id                 = azurerm_subnet.bastion.id
  network_security_group_id = azurerm_network_security_group.bastion_nsg.id
}
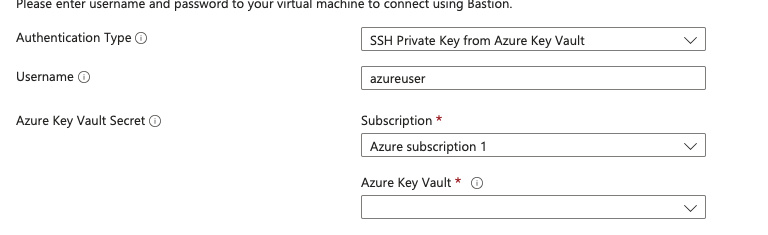
With the networking part we are done. You can apply the changes and test again if you can still connect to the VM via Bastion. Now we will focus on that file upload field with the private key. As I mentioned, it's not secure share such keys, they should not be kept in project files and especially they should never leave your machine. In the dropdown you tried before there's an option for "SSH Private Key from Azure Key Vault".
We will create just that. First, define a new Azure Key Vault. It's a container
for the keys and secrets, something similar to AWS Secrets Manager and KMS
combined. Because in Azure, Key Vaults have to have a globally unique name (like
S3 buckets in AWS), I will use hashicorp/random provider to generate a random
string suffix. For some reason this time we also need tenant_id and the
sku_name is lowercase 🙄.
resource "random_string" "keyvault_name" {
  length  = 8
  special = false
  upper   = false
}

data "azurerm_client_config" "current" {}

resource "azurerm_key_vault" "bastion_keyvault" {
  name                       = "bastion-kv-${random_string.keyvault_name.result}"
  location                   = azurerm_resource_group.rg.location
  resource_group_name        = azurerm_resource_group.rg.name
  sku_name                   = "standard"
  tenant_id                  = data.azurerm_client_config.current.tenant_id
  soft_delete_retention_days = 7
  purge_protection_enabled   = false
}
By default Key Vaults do not allow anyone to do anything with them. We need to
associate access policies. One will be for our user to write secrets into it and
another for the Bastion to read them. In order to get the Bastion's object ID
(ARN-like string?), I will need another provider 😖 - hashicorp/azuread.
resource "azurerm_key_vault_access_policy" "bastion_keyvault_access_policy" {
  key_vault_id       = azurerm_key_vault.bastion_keyvault.id
  tenant_id          = data.azurerm_client_config.current.tenant_id
  object_id          = data.azurerm_client_config.current.object_id
  secret_permissions = ["Get", "List", "Set", "Delete", "Recover", "Backup", "Restore", "Purge"]
}

data "azuread_service_principal" "bastion_service_principal" {
  display_name = "Azure Bastion"
}

resource "azurerm_key_vault_access_policy" "bastion_service_principal_access_policy" {
  key_vault_id       = azurerm_key_vault.bastion_keyvault.id
  tenant_id          = data.azurerm_client_config.current.tenant_id
  object_id          = data.azuread_service_principal.bastion_service_principal.object_id
  secret_permissions = ["Get", "List"]
}
Now as we got the permissions to put secrets into the Vault and that Bastion
will be able to read them, we can store our SSH private key there (and delete
the local_sensitive_file.ssh_key_file resource that saved it to the file).
resource "azurerm_key_vault_secret" "bastion_key" {
  name         = "vm1-key"
  value        = tls_private_key.ssh_key.private_key_pem
  key_vault_id = azurerm_key_vault.bastion_keyvault.id
  depends_on   = [ azurerm_key_vault_access_policy.bastion_keyvault_access_policy ]
}

Apply the infrastructure and test again. You should be able to connect to the
VM using the Bastion and SSH key from the Key Vault. If you want even more
security, you can harden it even more. I said before that we want only Bastion
to be able to access port 22 of our VM. However, I also said that by default any
connectivity within the Virtual Network is allowed. This means that the problem
still exists - any VM can reach our VM on port 22. Compared to AWS, Azure
NSGs allow Deny rules as well, so we can put them on the lower priority than the
Bastion rule. To azurerm_network_security_group.vm_nsg add the following rule.
Remember that priority should be lower (the number hight 😵💫) than the rule for
the Bastion. In our case Bastion has Allow on 500, so it will be evaluated
earlier but other VMs will have Deny on 600.
  security_rule {
    name                       = "no-ingress-from-other-vms"
    priority                   = 600
    direction                  = "Inbound"
    access                     = "Deny"
    protocol                   = "Tcp"
    destination_port_range     = "22"
    source_port_range          = "*"
    source_address_prefixes    = azurerm_subnet.private.address_prefixes
    destination_address_prefix = "*"
  }
Summary
We have created a secure environment with a virtual machine in a private subnet on Azure that is only accessible via the Bastion host. What is more the SSH key is stored in a Key Vault where Access Policies allow only privileged users to read or use the private key. Although this setup is not as secure and as convenient as AWS Session Manager, it should be enough for most use cases. With our setup we not only lock the access to VM for our own IP but also require authentication to Azure. Azure Agent that is running on the VM is also not as featureful as SSM Agent. With Bastion Premium tier you can also enable session logging but instead of getting text logs, you get a video recording of the entire session. With a diagram below you can see the entire setup we created in this article.
