From CloudFormation to Terraform with Terraformer
26 June 2025
Someone decided to use CloudFormation as the IaC tool of choice, once in the
past. Why? Nobody knows why 🤷. It's cool that it managed the state for me and I
don't need to worry about someone stealing it or managing permissions or doing
backups. But we want to be true professionals now and use Terraform (because
everyone uses it, so it must be good, right?). Let's say you are stuck with
CloudFormation and you have so many things that are dependent on each other that
it becomes increasingly frustrating to maintain. There's light at the end of the
tunnel - you can indeed migrate to Terraform but this journey will be long and
painful. Just as going to the gym, you first tear your muscles to make them grow
anew. Today, we will go through the process of moving from CloudFormation to
Terraform and to make it easier (totally 🤣) we will use a tool called
Terraformer - a Terraform code generator that queries AWS API and writes .tf
files. In the examples, I will use OpenTofu so assume that the two are
interchangeable.
An important thing to note is that this tool is pretty much abandoned. There was
a recent release on March 27th but the previous version was released in 2023!
The states generated by the tool are pretty much unusable in modern day (as you
need to upgrade from 0.12 version of Terraform - a feature removed from
OpenTofu). We will just use the tool to get some initial code that we will patch
with plan's and validate's suggestions.
The repository with the exercise you can clone from GitHub.
Example architecture
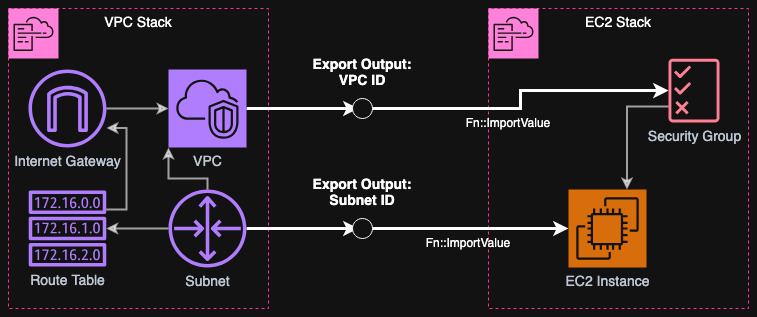
First we will create an example architecture that is problematic to migrate from CloudFormation to Terraform. Namely, we assume that there's an underlying stack that has some exported outputs and these are imported by another stack. As the target we want to migrate the first stack to Terraform and this makes it trickier. In my example, I will assume that the first stack is VPC with a subnet, internet gateway, etc. and the seconds stack is an EC2 instance that is in the subnet and security group tied to the VPC.
Let's define our stacks as CloudFormation templates. I will apply first the VPC one deploy it to my account (using AWS CLI but you can use Console).
AWSTemplateFormatVersion: '2010-09-09'
Description: 'VPC with public subnet, internet gateway, and routes'

Resources:
  VPC:
    Type: AWS::EC2::VPC
    Properties:
      CidrBlock: 10.100.0.0/16
      EnableDnsSupport: true
      EnableDnsHostnames: true

  PublicSubnet:
    Type: AWS::EC2::Subnet
    Properties:
      VpcId: !Ref VPC
      CidrBlock: 10.100.1.0/24
      AvailabilityZone: !Select [0, !GetAZs '']
      MapPublicIpOnLaunch: true

  InternetGateway:
    Type: AWS::EC2::InternetGateway

  AttachGateway:
    Type: AWS::EC2::VPCGatewayAttachment
    Properties:
      VpcId: !Ref VPC
      InternetGatewayId: !Ref InternetGateway

  PublicRouteTable:
    Type: AWS::EC2::RouteTable
    Properties:
      VpcId: !Ref VPC

  PublicRoute:
    Type: AWS::EC2::Route
    DependsOn: AttachGateway
    Properties:
      RouteTableId: !Ref PublicRouteTable
      DestinationCidrBlock: 0.0.0.0/0
      GatewayId: !Ref InternetGateway

  SubnetRouteTableAssociation:
    Type: AWS::EC2::SubnetRouteTableAssociation
    Properties:
      SubnetId: !Ref PublicSubnet
      RouteTableId: !Ref PublicRouteTable


Outputs:
  VpcId:
    Value: !Ref VPC
    Export:
      Name: !Sub ${AWS::StackName}-VpcId

  PublicSubnetId:
    Value: !Ref PublicSubnet
    Export:
      Name: !Sub ${AWS::StackName}-PublicSubnetId
As you see above, I have defined some outputs that are exported. These will be imported by the second stack below. The second stack is just an EC2 instance. I don't need to connect to it or use it anyhow - I just want some resource that is blocking the deletion or modification of imported resources.
AWSTemplateFormatVersion: '2010-09-09'
Description: 'EC2 instance with security group in VPC'

Parameters:
  VpcStackName:
    Type: String
    Description: Name of the VPC stack to import values from

Resources:
  SecurityGroup:
    Type: AWS::EC2::SecurityGroup
    Properties:
      GroupDescription: Security group for EC2 instance
      VpcId: !ImportValue
        Fn::Sub: ${VpcStackName}-VpcId
      SecurityGroupEgress:
        - IpProtocol: -1
          FromPort: -1
          ToPort: -1
          CidrIp: 0.0.0.0/0

  EC2Instance:
    Type: AWS::EC2::Instance
    Properties:
      ImageId: ami-083b72f9e766cbb7c  # eu-central-1 Amazon Linux 2023 ARM64 AMI
      InstanceType: t4g.nano
      SubnetId: !ImportValue
        Fn::Sub: ${VpcStackName}-PublicSubnetId
      SecurityGroupIds:
        - !Ref SecurityGroup
Now deploy the stacks using AWS CLI or Console. First, you need the VPC stack and the next one is EC2 stack where you provide the name of the VPC stack as a parameter. Below I do it using AWS CLI:
aws cloudformation deploy \
 --template-file vpc.yaml \
 --stack-name example-vpc \
 --region eu-central-1

aws cloudformation deploy \
 --template-file ec2.yaml \
 --stack-name example-ec2 \
 --parameter-overrides VpcStackName=example-vpc \
 --region eu-central-1
As you now try to for example remove the outputs from the first stack, or do some modification that for example will replace the subnet or VPC, it will fail.
Preparing for migration
As the first step, I suggest getting list of all the resources and their "physical" addresses (such as ARNs, IDs) and storing it in a file so that you don't lose track of them. Next thing is to also dump all the outputs to a file. I will use AWS CLI for that, but if you prefer copy-pasting from the Console - your choice 🙄 (you can always use CloudShell!)
aws cloudformation describe-stack-resources \
 --stack-name example-vpc \
 --region eu-central-1 \
 --query 'StackResources[*].[LogicalResourceId,PhysicalResourceId]' \
 --output table > example-vpc-resources.txt

aws cloudformation describe-stacks \
 --stack-name example-vpc \
 --region eu-central-1 \
 --query 'Stacks[0].Outputs' \
 --output table > example-vpc-outputs.txt
After we have everything copied, we will perform some updates to the VPC stack. I assume that your stack is not drifted. If a drift is detected, first make sure that the stack is in sync. In case it might be drifted but it's out of scope of the CloudFormation drift detection, then it's your choice whether you want to take the risk of ⛓️💥 breaking something.
In the VPC stack, we need to mark all the resources with
DeletionPolicy: Retain and UpdateReplacePolicy: Retain. That way, when we
remove them in the future, they will be just disassociated from CloudFormation
and not really deleted. Afterwards, apply the changes to the stack, nothing
should fail if you don't have drifts. The following example is cut for brevity.
...
Resources:
  VPC:
    Type: AWS::EC2::VPC
    DeletionPolicy: Retain
    UpdateReplacePolicy: Retain
    ...
  PublicSubnet:
    Type: AWS::EC2::Subnet
    DeletionPolicy: Retain
    UpdateReplacePolicy: Retain
    ...
  InternetGateway:
    Type: AWS::EC2::InternetGateway
    DeletionPolicy: Retain
    UpdateReplacePolicy: Retain
    ...
  AttachGateway:
    Type: AWS::EC2::VPCGatewayAttachment
    DeletionPolicy: Retain
    UpdateReplacePolicy: Retain
    ...
  PublicRouteTable:
    Type: AWS::EC2::RouteTable
    DeletionPolicy: Retain
    UpdateReplacePolicy: Retain
    ...
  PublicRoute:
    Type: AWS::EC2::Route
    DeletionPolicy: Retain
    UpdateReplacePolicy: Retain
    ...
  SubnetRouteTableAssociation:
    Type: AWS::EC2::SubnetRouteTableAssociation
    DeletionPolicy: Retain
    UpdateReplacePolicy: Retain
    ...
Deploy the VPC stack again using AWS CLI or Console. Next step is to replace all the outputs with constants from the dump we did earlier. Fortunately, CloudFormation does only string comparison when checking for changes in outputs, so it won't complain. After you do this, apply the stack again.
...
Outputs:
  VpcId:
    Value: vpc-06789abcdef123456 # Replace with the actual VPC ID
    Export:
      Name: !Sub ${AWS::StackName}-VpcId

  PublicSubnetId:
    Value: subnet-01234567abc123cdf # Replace with the actual Subnet ID
    Export:
      Name: !Sub ${AWS::StackName}-PublicSubnetId
Now, as you have everything in a safe state, where there are no references in
outputs to the resources in the stack and that nothing is marked for deletion,
you can proceed to the next step - removal of all the resources from the stack.
However 🥸! You can't do this because CloudFormation requires at least one
resource in the stack! My suggestion is to use a placeholder resource of type
AWS::IoT::Thing (someone at AY used it as a placeholder 😅).
AWSTemplateFormatVersion: '2010-09-09'
Description: 'VPC with public subnet, internet gateway, and routes'

Resources:
  Placeholder:
    Type: AWS::IoT::Thing
    DeletionPolicy: Retain
    UpdateReplacePolicy: Retain
    Properties:
      ThingName: !Sub ${AWS::StackName}-Placeholder

Outputs:
  VpcId:
    Value: vpc-06789abcdef123456 # Replace with the actual VPC ID
    Export:
      Name: !Sub ${AWS::StackName}-VpcId

  PublicSubnetId:
    Value: subnet-01234567abc123cdf # Replace with the actual Subnet ID
    Export:
      Name: !Sub ${AWS::StackName}-PublicSubnetId
Yes, this is now a complete vpc.yaml stack. Apply it again to CloudFormation
and it should succeed.
Proceeding import with Terraformer
We have a list of resources that were previously associated with the stack and we can theoretically manually create a compatible Terraform code and just import everything. But there's a (Google Cloud's 😉) tool for that - Terraformer. It is not perfect, doesn't support all the resources or relations but is a good first step to get some code ready. Our example stack is pretty small. If you have a stack with 300 resources, then well, you have a different problem 🥲 (and moving to Terraform won't solve your company's tech culture).
Create a new directory for the Terraform code. Create a main.tf file and add
the AWS provider to it. Below I provide you an example with local backend.
Afterwards, in this directory initialize Terraform (or OpenTofu).
terraform {
  required_providers {
    aws = {
      source = "hashicorp/aws"
      version = "~> 5.0"
    }
  }
}

provider "aws" {
  region = "eu-central-1"
}
tofu init # or terraform init
In case you use OpenTofu, you need to also run the following command because
Terraformer has hardcoded the provider repository to registry.terraform.io. As
of OpenTofu 1.9.0 and AWS provider 5.100.0, it is working just fine.
ln -s .terraform/plugins/registry.opentofu.org .terraform/plugins/registry.terraform.io
It's time to call the tool. If you use an AWS profile, you need to specify it
as --profile flag - the AWS_PROFILE environment variable doesn't work
(despite it was merged here 🤷♂️).
terraformer import aws -r vpc,subnet,route_table # --profile optional_profile_name
You can ignore the errors at the end of the output. You should now see a new
directory called generated. However, as we didn't specify any filter, the tool
generated code for all the VPCs, Subnets and Route Tables we have in the
region! Remove the generated directory and let's try setting the filters. For
VPC the name of the field is id and for others vpc_id. It all depends on the
resource type you are importing.
$ terraformer import aws -r vpc,subnet,route_table \
 --filter="Type=vpc;Name=id;Value=vpc-06789abcdef123456" \
 --filter="Type=subnet;Name=vpc_id;Value=vpc-06789abcdef123456" \
 --filter="Type=route_table;Name=vpc_id;Value=vpc-06789abcdef123456"
You can move the generated code from generated/vpc/vpc.tf to the root
directory. For route_table there are also associations with subnets. By
default they are not filtered, but if you want to filter them, you can use
Type=route_table_association;Name=subnet_id;Value=subnet-01234567abc123cdf. If
you want to match multiple values, use a colon, for example
Type=subnet;Name=vpc_id;Value=vpc-06789abcdef123456:vpc-1234567890abcdef.
However, in my opinion, it's easier to just go through the list of resources and
delete what's unnecessary.
mv generated/aws/route_table/route_table.tf .
mv generated/aws/route_table/route_table_association.tf .
mv generated/aws/vpc/vpc.tf .
mv generated/aws/subnet/subnet.tf .
rm -r generated
If you try to plan now, you will see a lot of errors. First of all, Terraformer
uses data sources from each state file. We can simply replace it with IDs from
the values. I will do it using sed command and explain you the regex. From
example
${data.terraform_remote_state.vpc.outputs.aws_vpc_tfer--vpc-0123456abcdef_id}
we must match only vpc-0123456abcdef - this will be our \1. We look for the
lines that start with ${data.terraform_remote_state. and end with } - we
match any characters before two hyphens --. Afterwards, we look for
-- and then match any characters that are not _ using [^_]* - this will
become our \1. Whenever we find _ with anything that follows, we discard it.
😵💫 At least it works on my Mac 😌. For Linux, replace -i '' with just -i.
find . -depth 1 -name '*.tf' -exec sed -i '' 's/\${data\.terraform_remote_state\..*\-\-\([^_]*\)\(_[^}]*\)}/\1/g' {} \;
Now if you run tofu plan you will still see some errors. For example:
"map_customer_owned_ip_on_launch": all of `customer_owned_ipv4_pool,map_customer_owned_ip_on_launch,outpost_arn` must be specified
This seems like the harder part where you have to go through all of the places
which need fixing. For the example above, simply delete the line: false is
default. Similarly delete ipv6_netmask_length and
enable_lni_at_device_index. Try to make the code as such that the plan
succeeds.
Importing resources to Terraform state
As you have the working code, you can import all the resources. There are many
approaches to this: you can generate a script that will use tofu import or you
can use import block. I will go with the latter approach and will make a
script using Bash.
First, I wll search through all the .tf files and look for Terraform resource
lines. Then I will parse each line and extract the resource type, name and ID
from the name. Lastly, I will add the import block of each resource to
imports.tf file.
#!/bin/bash
echo "" > imports.tf

RESOURCES=$(find . -depth 1 -name '*.tf' -exec grep -E '^resource .* {' {} \;)

IFS=$'\n'
for resource in $RESOURCES; do
  TYPE=$(echo "$resource" | sed 's/resource "\(.*\)" "tfer--.*".*/\1/g')
  NAME=$(echo "$resource" | sed 's/resource ".*" "\(tfer--.*\)".*/\1/g')
  ID=$(echo "$NAME" | sed 's/^tfer--//g')
  echo -e "import {\n  to = ${TYPE}.${NAME}\n  id = \"${ID}\"\n}\n" >> imports.tf
done
Now if you tofu plan you should get a list of resources to import rather than
create. There might be some more errors (for example route table associations),
so you need to fix them accordingly. After you see only Plan: 5 to import, 0
to add, 0 to change, 0 to destroy., you can proceed to apply. After you have
all the resource imported, try again planning and adapting until you have no
changes: No changes. Your infrastructure matches the configuration.
Renaming resources
To change resource addresses in Terraform you have to manipulate the state. You
can do it in the command line or use a new moved block, just like with
imports. I suggest using the latter solution as it is more readable to review.
Before we do that, we need to also delete imports.tf (or comment it out) as in
the next step, the resources references will disappear. I will use Bash to
rename each resource automatically and generate moved.tf file. First, I will
parse the resources.txt file which we have created before. I will match all
two-column lines with grep and then remove all trailing whitespace and pipe
characters. I will first save the ID and then the logical name. Then I will find
all resources in the .tf files that have tfer-- in their name and extract
their type and ID. For each resource, I will then check if the ID can be looked
up in the previously parsed CloudFormation resource dump. If this check
succeeds, we can then proceed to rename the resource in the file and move it to
the new name using moved block. The script will also add a comment at the top
of resource block with the old ID so we can reference it later.
#!/bin/bash
NAMES_IDS=$(grep -E '^\|(?:\s+.*\s+\|){2}' example-vpc-resources.txt)
NAMES_IDS=$(echo "$NAMES_IDS" | sed -E 's/\|[[:blank:]]+([^[:blank:]]+)[[:blank:]]+\|[[:blank:]]+([^[:blank:]]+)[[:blank:]]+\|/\2 \1/g')

echo "" > moved.tf

for f in *.tf; do
  # Get all resource IDs found in this Terraform file, extract the ID and type
  RESOURCES=$(grep -oE '^resource ".*" ".*" {' $f)
  RESOURCE_IDS=($(echo "$RESOURCES" | grep -oE '"tfer--.*"' | tr -d \" | cut -d- -f3-))
  RESOURCE_TYPES=($(echo "$RESOURCES" | cut -d' ' -f2 | tr -d \"))
  # Iterate over all resources using integer index
  i=0
  while [ $i -lt ${#RESOURCE_IDS[@]} ]; do
    res_id=${RESOURCE_IDS[$i]}
    res_type=${RESOURCE_TYPES[$i]}
    # If the specified resource ID is in the dump
    if echo "$NAMES_IDS" | grep -qE "^$res_id "; then
      RES_NAME=$(echo "$NAMES_IDS" | grep -E "^$res_id " | cut -d' ' -f2)
      echo "Found $res_id -> $RES_NAME"
      sed -i '' -E "s#^(resource \".*\" )\"tfer\-\-${res_id}\"#// ${res_id}\n\1\"${RES_NAME}\"#g" $f
      echo -e "moved {\n  from = ${res_type}.tfer--${res_id}\n  to = ${res_type}.${RES_NAME}\n}\n" >> moved.tf
    fi
    i=$((i + 1))
  done
done
Afterwards you run this script, try planning again and see if the only changes
are the renames. Then apply and you can delete the moved.tf file.
Matching properties
Currently, the resources have hardcoded properties. For example, the subnet has VPC's ID instead of referencing it in Terraform. We will create yet another script that will do just that! I want to note that it might not be perfect and some things might not be replaced correctly (if anything here works well at all!).
First, I need to collect all the resource lines from the *.tf files. I will
also print the line above the resource line, assuming it contains the comment.
Then we will use sed to extract the ID from the comment line, the resource
type and name into format such as vpc-0123456789::aws_vpc.VPC. As the last
step we will filter again with grep so that only lines with such format are
considered. This will be done for all the *.tf files at once.
As now we have the list of resources with their IDs, we will go for each
resource-id-address line and for each Terraform file. sed will replace all
the occurrences of lines in the following format: argument = "string value".
If the string value matches the ID, we will replace it with the address
without quotes and the property to reference (hardcoded id in this scenario).
#!/bin/bash
RESOURCES_WITH_COMMENTS=$(grep -B1 -ohE '^resource ".*" ".*" {' *.tf)
RES_ID_TO_ADDR=$(echo "$RESOURCES_WITH_COMMENTS" | sed -E '/^\/\/ .*/N;s/^\/\/ (.*)\nresource "(.*)" "(.*)" {/\1::\2.\3\n/g')
RES_ID_TO_ADDR=($(echo "$RES_ID_TO_ADDR" | grep -oE '^.*::.*\..*$'))

for res_id_addr in ${RES_ID_TO_ADDR[@]}; do
  ID=$(echo "$res_id_addr" | cut -d':' -f1)
  ADDR=$(echo "$res_id_addr" | cut -d':' -f3-)
  find . -depth 1 -name '*.tf' -exec sed -i '' -E "s/([[:blank:]]*.+[[:blank:]]*=[[:blank:]]*)\"$ID\"/\1$ADDR.id/g" {} \;
done
Save it as match_properties.sh, chmod +x and run. This is not a final version
as we have hardcoded the id property. This isn't always the case for all
resources, just a random guess in this example.
As the last step, we can make a pipeline out of all the scripts we just used.
You can create a migrate.sh script to do just that. I will start from the
point where you have already generated code with Terraformer and moved all the
files that you want to the root directory. I will use the files generated by
.sh scripts to mark which stages were done and leave them empty if the apply
succeeds. You need to rerun this script multiple times until you have no errors
and the plan shows no changes (also check if there were no changes in the
meantime when you were applying 😨).
#!/bin/bash
set -e
find . -depth 1 -name '*.tf' -exec sed -i '' 's/\${data\.terraform_remote_state\..*\-\-\([^_]*\)\(_[^}]*\)}/\1/g' {} \;
tofu validate
[ ! -f imports.tf ] && bash import.sh
tofu apply
echo "" > imports.tf
[ ! -f moved.tf ] && bash rename.sh
tofu apply
echo "" > moved.tf
bash match_properties.sh
tofu plan
Summary
If you follow this tutorial exactly, there are still some things to do. First of all we didn't import the Internet Gateway - I leave it to you as an exercise 😉. Also there's the default route table that can be deleted from Terraform code and state. Also not all relations between resources. Don't even get me started on resources that are identified with ARN.
And there you have it 🥳!
Now you know that you should choose your IaC tool wisely before you start doing
anything as migrating from one to another will make your blood boil 😡. Another
option is to go from the CloudFormation YAML side using tools like cf2tf or
CloudFormation_To_Terraform but in either case, you have to: free the
resources from the CloudFormation stack, freeze the outputs and import to
Terraform - this last step is the hardest one. Or if you like doing YOLO on
production, just hook up your favorite LLM with an MCP server and let it do
anything but don't blame anyone when it buys u-24tb1.224xlarge for three years
reservation all upfront because someone used transparent font on their blog
prompting it to do it (not me 🙄).