Protect your instances from attackers! Install Portsentry
16 July 2025
I learned about Portsentry from a book called "Practical Linux System
Administration" by Kenneth Hess. It is a very simple yet useful tool to detect
port scans or malicious bots trying to gather information about our publicly
exposed instances (or even private ones given they got infected). Portsentry
simply listens on given TCP and UDP ports and on any connection attempt, blocks
the IP address on the routing table level and inside /etc/hosts.deny file. But
you can also configure it to use IPTables or run an external script (see the
last section).
In the instructions below, I assume that you use the same infrastructure setup as I pushed to this GitHub repository: https://github.com/ppabis/portsentry-experiments. Refer to the README.md file to learn how to configure it for yourself.
Our infrastructure 🛜
I will create two instances at first: the red team instance and the blue team instance. The red one will be used to scan the blue instance that will contain many services as well as Portsentry installed. For simplicity, I will give them both public IP addresses to install necessary software but the security group will allow only egress traffic to the internet. Between the two instances, there will be no security group restrictions - all ports, all protocols are allowed. The red instance will have SSH access open and will be able to forward connect to the blue instance's SSH. You can also use Systems Manager Session Manager if you want to. I also configured a second red instance, exact clone of the first one that we will use to recover access on the blue instance. However, you are free to use it also for attacks and spawn yet another one for fixes.
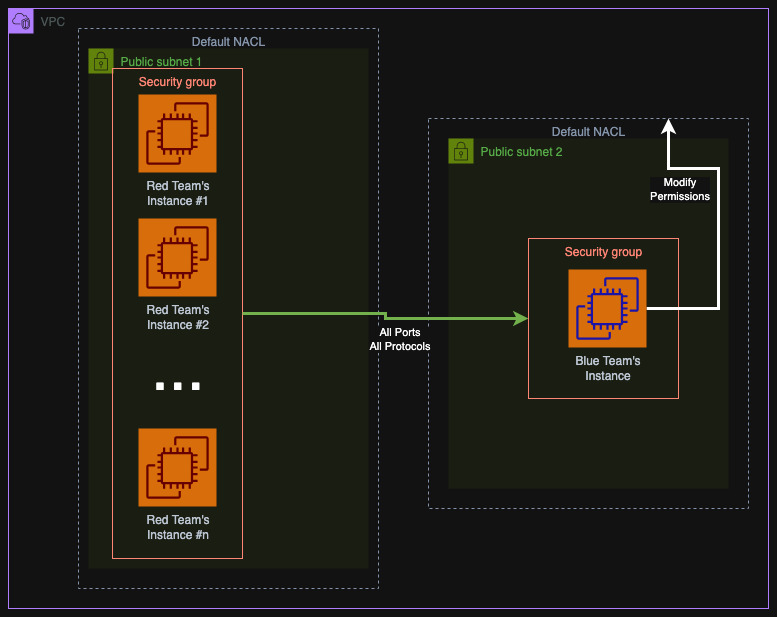
On the blue instance I will install Portsentry and Docker. We will use the latter to create several sample services such as IMAP, FTP, HTTP easily. The following user data script will bootstrap the blue instance.
#!/bin/bash
hostnamectl set-hostname blue-team

# Install portsentry
export DEBIAN_FRONTEND=noninteractive
apt update
apt install portsentry -y

# Install Docker
apt install ca-certificates curl gnupg lsb-release -y
curl -fsSL https://download.docker.com/linux/debian/gpg | gpg --dearmor -o /usr/share/keyrings/docker-archive-keyring.gpg
echo "deb [arch=$(dpkg --print-architecture) signed-by=/usr/share/keyrings/docker-archive-keyring.gpg] https://download.docker.com/linux/debian $(lsb_release -cs) stable" \
 > /etc/apt/sources.list.d/docker.list
apt update
apt install docker-ce docker-ce-cli containerd.io docker-buildx-plugin docker-compose-plugin -y
systemctl enable --now docker
The red instance will have some clients that can be useful to test the blue's services. The following user data script will bootstrap the red instance with Nmap, FTP and Telnet clients.
#!/bin/bash
hostnamectl set-hostname red-team
apt update
apt install nmap ftp telnet -y
After the instances are up, connect to the red instance with SSH (or Session
Manager). To later connect to the blue instance with SSH, you can use SSH Agent
forwarding. Add you key to the SSH agent using ssh-add, typing the passphrase
and then connect to the red instance with -A flag. This will allow you to
forward the key when chain connecting to the blue instance, without needing to
transfer your private key to the red instance. Use public IP of the red instance
and private IP of the blue instance.
$ ssh-add ~/.ssh/id_ed25519
Passphrase for /home/user/.ssh/id_ed25519:
$ ssh -A admin@3.4.5.6
$ [admin@red-team]$ ssh admin@10.0.0.6
$ [admin@blue-team]$
🧪 Test services
Portsentry should be already installed on the blue instance. However, for now we
want to disable it using systemctl stop portsentry. Exit current SSH sessions
and upload the following docker-compose.yml file to the blue instance. To do
this first copy it with scp to red one and then from red to blue (or use
scp -J, for example:
scp -J admin@3.4.5.6 compose.yml admin@10.0.0.5:compose.yml).
networks:
  services-network:
    driver: bridge

volumes:
  ftp_data:

services:
  # HTTP Web Server (Apache)
  http:
    image: httpd:2.4
    container_name: http-service
    ports:
      - "80:80"
      - "443:443"
    restart: unless-stopped
    networks: [services-network]

  # FTP Server (Alpine FTP Server)
  ftp:
    image: delfer/alpine-ftp-server:latest
    container_name: ftp-service
    ports:
      - "21:21"
    environment:
      - USERS=ftpuser|ftppass|/home/ftpuser|1001|1001
      - ADDRESS=0.0.0.0
      - MIN_PORT=30000
      - MAX_PORT=30009
    volumes:
      - ftp_data:/home/ftpuser
    restart: unless-stopped
    networks: [services-network]

  # SMTP Server (Postfix)
  smtp:
    image: boky/postfix:latest
    container_name: smtp-service
    ports:
      - "25:25"
      - "587:587"
    environment:
      - ALLOWED_SENDER_DOMAINS=localhost
      - HOSTNAME=localhost
    restart: unless-stopped
    networks: [services-network]

  # IMAP Server (Dovecot)
  imap_pop3:
    image: dovecot/dovecot:latest
    container_name: imap-pop3-service
    ports:
      - "143:31143"
      - "993:31993"
      - "110:31110"
      - "995:31995"
    restart: unless-stopped
    networks: [services-network]
After you have this file on the blue instance, use Docker Compose to start all of them.
$ head -n5 docker-compose.yml
networks:
  services-network:
    driver: bridge

volumes:
  ftp_data:

$ sudo docker compose up -d
If you keep Portsentry active, this compose file will fail with the message
failed to bind host port for 0.0.0.0:143:172.18.0.3:143/tcp: address already in use.
This is because Portsentry has port 143 on its list in default configuration.
Just stop it with systemctl as we discussed earlier and try running docker
compose again. The images should be pulled from the repositories and the
containers started. Check the output of docker ps to verify if everything is
working correctly.
$ sudo docker ps
CONTAINER ID   IMAGE                             COMMAND                  CREATED         STATUS                   NAMES
73c06035ae36   delfer/alpine-ftp-server:latest   "/sbin/tini -- /bin/…"   4 minutes ago   Up 4 minutes             ftp-service
6bd89f2736e7   dovecot/dovecot:latest            "/usr/bin/tini -- /d…"   4 minutes ago   Up About a minute        imap-pop3-service
df87f53890ff   boky/postfix:latest               "/bin/sh -c /scripts…"   4 minutes ago   Up 4 minutes (healthy)   smtp-service
9e9d3dafce1b   httpd:2.4                         "httpd-foreground"       4 minutes ago   Up 4 minutes             http-service
Exit current SSH session to go back to the red team's instance. Try connecting to some services such as HTTP, SMTP, FTP, to prove that there's no firewalls between the instances and real services are actually accessible.
$ curl http://10.0.0.6
<html><body><h1>It works!</h1></body></html>

$ ftp ftp://ftpuser:ftppass@10.0.0.6
220 Welcome Alpine ftp server https://hub.docker.com/r/delfer/alpine-ftp-server/
230 Login successful.
ftp> quit

$ telnet 10.0.0.6 25
Connected to 10.0.0.6.
220 localhost ESMTP Postfix (Debian/GNU)
HELO host
250 localhost
EXIT
Scanning with Nmap 🔍
One of the common things that attackers do is to scan the target for open ports
and especially guess the services running on them. They use tools like nmap to
perform wide scans. We will now test this on our red instance to get a list of
all the things that run on the blue one.
$ nmap -sV -p1-1024 10.0.0.6
Starting Nmap 7.93 ( https://nmap.org ) at 2025-07-09 10:59 UTC
Nmap scan report for ip-10-0-0-6.eu-west-2.compute.internal (10.0.0.6)
Host is up (0.00068s latency).
Not shown: 1017 closed tcp ports (conn-refused)
PORT    STATE SERVICE  VERSION
21/tcp  open  ftp      vsftpd 2.0.8 or later
22/tcp  open  ssh      OpenSSH 9.2p1 Debian 2+deb12u6 (protocol 2.0)
25/tcp  open  smtp     Postfix smtpd
80/tcp  open  http     Apache httpd 2.4.63 ((Unix))
143/tcp open  imap     Dovecot imapd
587/tcp open  smtp     Postfix smtpd
993/tcp open  ssl/imap Dovecot imapd
As you can see, Nmap not only sees the ports but actual software that is running on them. This is a problem as if any of these services has a vulnerability it can be exploited. Even if you put firewall rules to restrict the addresses that can access these services, there is still a chance that an internal device is infected and acts as a proxy.
⚔️ Configuring Portsentry
Portsentry is a tool that can instantly block any IP that touches specific ports. These services won't be running on our blue machine anymore (except of SSH). Portsentry will pretend to be FTP or IMAP server by claiming their ports and acting on the first packet received.
First, you need to stop all the services that you have created with Docker. Then proceed to edit the Portsentry configuration.
$ sudo docker compose down -v
$ sudo nano /etc/portsentry/portsentry.conf
Locate the line that starts with TCP_PORTS (but not with # as these are
comments). Here you can specify the ports that Portsentry will monitor. I will
add all of the services that we had in the Docker Compose file and nothing else.
Also find BLOCK_TCP and BLOCK_UDP and set them to 1.
TCP_PORTS="21,25,80,110,143,443,587,993,995"
BLOCK_TCP="1"
BLOCK_UDP="1"
We need to keep port 22 open as we want to be able to still SSH to the instance. Now as you activate Portsentry on the blue instance with this config, try using for example FTP. Before that you should verify that SSH is still working as expected. If you try to SSH after FTP, it should fail.
[admin@blue-team] $ sudo systemctl enable --now portsentry
[admin@blue-team] $ exit
[admin@red-team] $ ssh -T admin@10.0.0.6 # Should respond, use Ctrl+C to exit
[admin@red-team] $ ftp ftp://ftpuser:ftppass@10.0.0.6
Connected to 10.0.0.6.
421 Service not available, remote server has closed connection.
ftp: Can't connect or login to host `10.0.0.6:ftp'
[admin@red-team] $ ssh admin@10.0.0.6 # This will timeout
Recovering access 🗝️
I will use another machine for the red team I have created in the infrastructure to recover the first one that was blocked. As you know, SSH access is permitted so if I don't make any false moves, I should still be able to access the machine and fix it. But before we do it, let's check what happened.
$ ssh -A admin@3.5.6.7
[admin@red-team-2] $ ssh admin@10.0.0.6
[admin@blue-team] $
Let's view all the logs that Portsentry has created. They are located in
/var/lib/portsentry/. The two interesting ones are portsentry.blocked.tcp
and portsentry.history. The first one contains the log of blocks, and the
other general log of every activity. You need root access to read them so use
sudo. Another file worth looking is /etc/hosts.deny.
sudo cat /var/lib/portsentry/portsentry.blocked.tcp
1750675284 - 06/23/2025 10:41:24 Host: 10.0.0.12/10.0.0.12 Port: 21 TCP Blocked

$ sudo cat /var/lib/portsentry/portsentry.history
1750675284 - 06/23/2025 10:41:24 Host: 10.0.0.12/10.0.0.12 Port: 21 TCP Blocked

$ sudo cat /etc/hosts.deny
ALL: 10.0.0.12 : DENY
So let's analyze then another change that Portsentry made to the system, namely
route tables. Our red host is now unreachable when you look at ip r.
$ ip r
default via 10.0.0.1 dev ens5 proto dhcp src 10.0.0.6 metric 100
unreachable 10.0.0.12 scope host
In order to fix this, we need to remove this unreachable route as well as the
entry in hosts.deny file. The following commands will remove the faulty route
and all entries from our network in hosts.deny. Afterwards, if we try to SSH
again from the first red instance, it should work! Also remove any records from
portsentry.blocked.tcp because it acts as a source of truth for it. If you
leave the record there, Portsentry will not block the IP again as it will think
it's already blocked.
sudo ip r d unreachable 10.0.0.12
sudo sed -i 's/^ALL: 10.*DENY$//g' /etc/hosts.deny
sudo sh -c 'echo "" > /var/lib/portsentry/portsentry.blocked.tcp'
$ ssh -A admin@3.4.5.6
[admin@red-team] $ ssh admin@10.0.0.6
[admin@blue-team] $
So let's do another test on the first red instance - simple port scanning with Nmap. I will not even try to guess the service names, just simple port check. First, two safe to check ports, and then a range that should be guarded by Portsentry and ban our instance from performing any further actions.
$ nmap -p22 10.0.0.6
PORT   STATE SERVICE
22/tcp open  ssh

$ nmap -p12345 10.0.0.6
PORT      STATE  SERVICE
12345/tcp closed netbus

$ nmap -p23-80 10.0.0.6
Host is up (0.00070s latency).
Not shown: 28 closed tcp ports (conn-refused), 28 filtered tcp ports (no-response)
PORT   STATE SERVICE
25/tcp open  smtp
80/tcp open  http

$ nmap -p22-80 10.0.0.6
Note: Host seems down. If it is really up, but blocking our ping probes, try -Pn
Nmap done: 1 IP address (0 hosts up) scanned in 3.03 seconds
As you can see, the first scan actually worked and showed that the two ports are open. However, despite that fact, the ports are guarded by Portsentry. With the current mode of Nmap, the instance was banned either way. If you want to just scan the ports without triggering Portsentry, you can use the following command:
$ sudo nmap -Pn -sS -pT:80 10.0.0.6
Host is up (0.00070s latency).
PORT   STATE SERVICE
80/tcp open  http
$ sudo nmap -Pn -sS -pT:80 10.0.0.6
Host is up (0.00071s latency).
PORT   STATE SERVICE
80/tcp open  http
With simple TCP SYN scan, there's no issues at all. However, as soon as you try to connect there or try to guess the service version, Portsentry will activate the alarm and block the IP. Ideally, you should enable Portsentry on all the unused (smaller than 1024) ports on your instance.
$ sudo nmap -Pn -sS -sV -pT:80 10.0.0.6
Host is up (0.00070s latency).
PORT   STATE SERVICE    VERSION
80/tcp open  tcpwrapped

$ sudo nmap -Pn -sS -sV -pT:80 10.0.0.6
Host is up.
PORT   STATE    SERVICE VERSION
80/tcp filtered http

$ sudo nmap -Pn -sS -sV -pT:80,T:22 10.0.0.6
Host is up.
PORT   STATE    SERVICE VERSION
22/tcp filtered ssh
80/tcp filtered http
As you can see, we can still detect that the port is there but now we can't do anything with it. Even SSH is now not resolvable. With a good security policy, where you expose Portsentry to almost all the first 1024 ports, and select a random one for SSH, you can make sure that guessing the right port is almost impossible by the attacker and that they will hit Portsentry immediately.
🎁 Bonus: Blocking on AWS NACL level
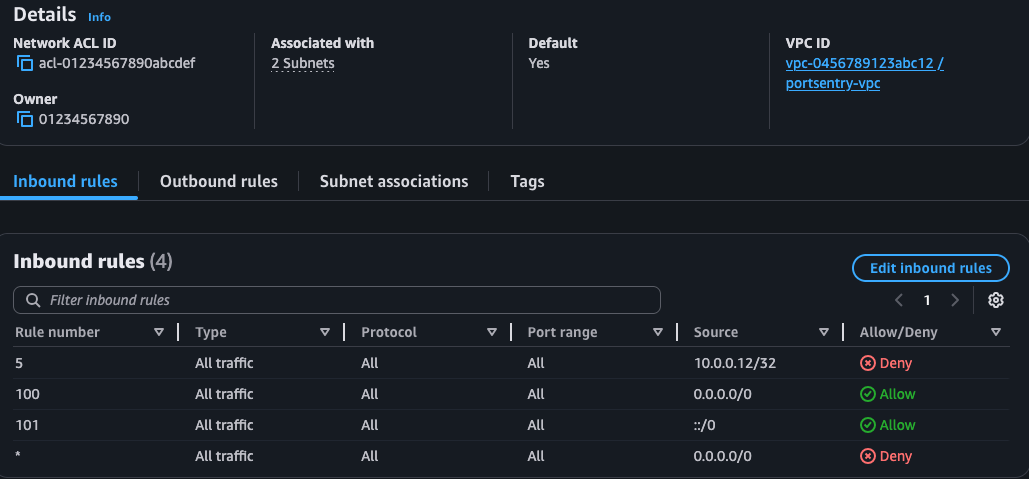
An amazing feature of Portsentry is that it can also execute an external script when it detects an attack. I will use a simple Python script that will add bad IPs to the AWS Network Access Control List (NACL). I will use default NACL in this example (so I have around 99 places available to block CIDR ranges). The full script you can find here: NACL blocking script.
I will give my instance possibility to list NACLs and modify the default one. You can adapt the permissions for yourself so that it is more restrictive and secure. Ideally, you should create a separate NACL. If you use the repository I have shared, the IAM role is already created for you.
Download the Portsentry script that I have created to block the IPs on AWS NACL (when you use Terraform infrastructure, it will be downloaded in user data). You still need to edit some variables inside the script, namely the NACL ID and the region (somehow Debian can't infer it automatically). Do this on the blue instance.
$ sudo apt install python3-boto3 -y
$ sudo curl -L "https://raw.githubusercontent.com/ppabis/portsentry-experiments/refs/heads/main/block_via_nacl.py" -o /usr/local/bin/block_via_nacl.py
$ sudo chmod +x /usr/local/bin/block_via_nacl.py
$ sudo nano /usr/local/bin/block_via_nacl.py
# Change NACL_ID and REGION
Then add the following line to the Portsentry configuration file
/etc/portsentry/portsentry.conf to execute this script when Portsentry detects
an attack, and restart Portsentry using sudo systemctl restart portsentry.
...
KILL_RUN_CMD="/usr/bin/python3 /usr/local/bin/block_via_nacl.py $TARGET$"
...
After that, unblock the first red instance and try scanning again. Then let's view the logs and validate that the script was executed. Go to the second red instance, jump to the blue instance with SSH and look at the systemd logs of Portsentry.
$ journalctl -xe -u portsentry.service
Jul 12 06:46:49 blue-team portsentry[20000]: attackalert: Connect from host: 10.0.0.12/10.0.0.12 to TCP port: 21
Jul 12 06:46:49 blue-team portsentry[20000]: attackalert: Host 10.0.0.12 has been blocked via wrappers with string: "ALL: 10.0.0.12 : DENY"
Jul 12 06:46:49 blue-team portsentry[20000]: attackalert: Host 10.0.0.12 has been blocked via dropped route using command: "/sbin/route add -host 10.0.0.12 reject"
Jul 12 06:46:49 blue-team portsentry[20000]: attackalert: External command run for host: 10.0.0.12 using command: "/usr/bin/python3 /usr/local/bin/block_via_nacl.py 10.0.0.12"
Jul 12 06:46:49 blue-team portsentry[20000]: attackalert: Connect from host: 10.0.0.12/10.0.0.12 to TCP port: 25
Jul 12 06:46:49 blue-team portsentry[20000]: attackalert: Host: 10.0.0.12 is already blocked. Ignoring
The script will add the IP to the Network Access Control List as you see on the screenshot below. There's not much space in the default NACL, so you should consider creating a separate one where "allow all" rule is down below at number 30000 or something like that.
Even if I use second red instance to SSH to the blue one and then unblock the IP of the attacking red instance, I will still not be able to connect because the instances are in different subnets. This method doesn't work inside the same subnet though. In the infrastructure I have created, the blue team uses a different subnet than the red team.
[admin@blue-team] $ sudo sh -c 'echo "" > /var/lib/portsentry/portsentry.blocked.tcp' \
 && sudo ip r d unreachable 10.0.0.12 scope host \
 && sudo sudo sh -c 'echo "" > /etc/hosts.deny'
[admin@red-team] $ ssh -A admin@10.0.0.6 # times out
Either way, it is smarter to filter private networks in the script, so we are not locked out and a malicious actor won't somehow block our instances from doing anything, for example using spoofed packets. I leave this exercise for you to implement 🙂↕️.
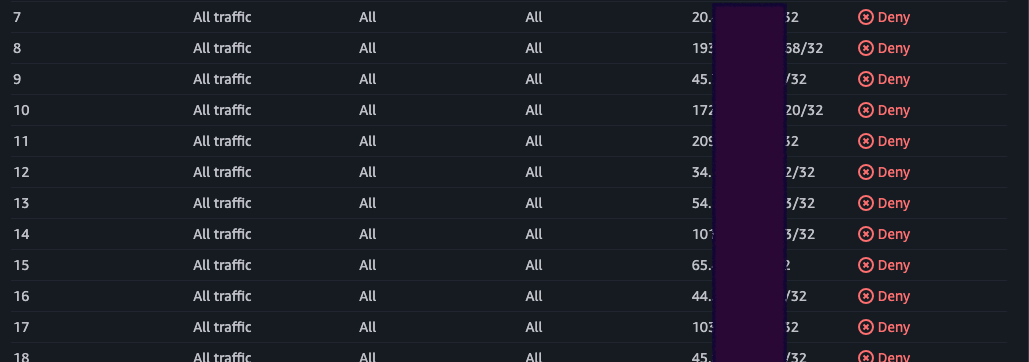
I will now edit the security groups of the blue instance for an hour or two to see how many public IPs we are able to catch. I will open some ports such as 80, pretending to be a simple web server. Both web crawlers and lower level attackers should be caught into this honeypot, creating a nice list of malicious IPs. We can reuse the same NACL for our other infrastructure to protect it. If you decide to use some random port for actual HTTP access by the load balancer, for example 38080 and open it only to the ALB's security group, you can create a nice protection mechanism. Ideally, put all common ports behind Portsentry with this script configured and open only these ports of this instance to the Internet with its own public IP. Outside world can only infer the AWS region you are using, not whether the two are somehow related. Then the same NACL can filter your other infrastructure, even if you host actual mail, web or FTP service.
After a while, I caught a bunch of IPs that tried reaching my blue instance on
different ports: FTP, SMTP and obviously HTTP. For privacy reasons and to not
necessarily mark these IPs as malicious (because they can be shared by multiple
users), I replaced parts of them with 0s. They were of course also added to my
NACL.
1752319545 - 07/12/2025 11:25:45 Host: 20.0.0.17/20.0.0.17 Port: 25 TCP Blocked
1752319633 - 07/12/2025 11:27:13 Host: 193.0.0.168/193.0.0.168 Port: 80 TCP Blocked
1752320230 - 07/12/2025 11:37:10 Host: 45.0.0.111/45.0.0.111 Port: 443 TCP Blocked
1752320243 - 07/12/2025 11:37:23 Host: 172.0.0.220/172.0.0.220 Port: 443 TCP Blocked
1752320554 - 07/12/2025 11:42:34 Host: 209.0.0.18/209.0.0.18 Port: 443 TCP Blocked
1752320981 - 07/12/2025 11:49:41 Host: 34.0.0.122/34.0.0.122 Port: 443 TCP Blocked
1752321786 - 07/12/2025 12:03:06 Host: 54.0.0.113/54.0.0.113 Port: 80 TCP Blocked
1752322131 - 07/12/2025 12:08:51 Host: 101.0.0.203/101.0.0.203 Port: 80 TCP Blocked
1752322360 - 07/12/2025 12:12:40 Host: 65.0.0.212/65.0.0.212 Port: 995 TCP Blocked
1752322704 - 07/12/2025 12:18:24 Host: 44.0.0.120/44.0.0.120 Port: 443 TCP Blocked
1752323513 - 07/12/2025 12:31:53 Host: 103.0.0.61/103.0.0.61 Port: 21 TCP Blocked
1752323519 - 07/12/2025 12:31:59 Host: 45.0.0.232/45.0.0.232 Port: 443 TCP Blocked
1752323625 - 07/12/2025 12:33:45 Host: 20.0.0.137/20.0.0.137 Port: 80 TCP Blocked
1752324530 - 07/12/2025 12:48:50 Host: 45.0.0.7/45.0.0.7 Port: 80 TCP Blocked
1752327494 - 07/12/2025 13:38:14 Host: 45.0.0.131/45.0.0.131 Port: 80 TCP Blocked
1752328262 - 07/12/2025 13:51:02 Host: 103.0.0.1/103.0.0.1 Port: 443 TCP Blocked