CodePipeline, CodeBuild, and multiple environments in ECS
13 October 2025
If you are in the industry and want to conform to the DevOps principles, you must know what CI/CD is and enable developers to test their code as in a real environment as well as allow them to reproducibly deploy their application to the cloud in an automated and less error-prone way. Enough talking, let's go beyond the theory and see some practical example.
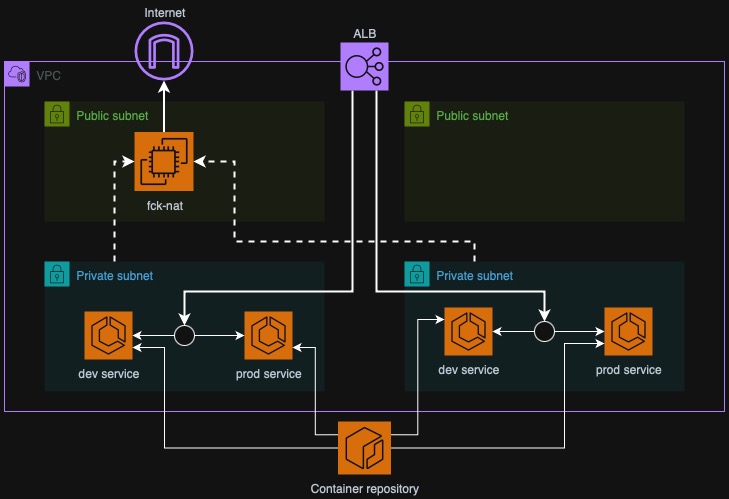
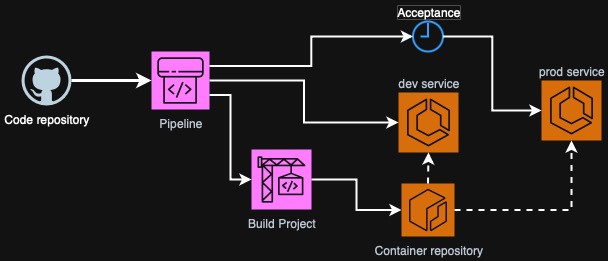
As you can see on the diagram above, we have two ECS environments represented
here as two ECS services. You can also make a stronger separation by deploying to
different VPCs or even accounts but for the sake of simplicity we will just have
two services dev and prod in the same ECS Cluster.
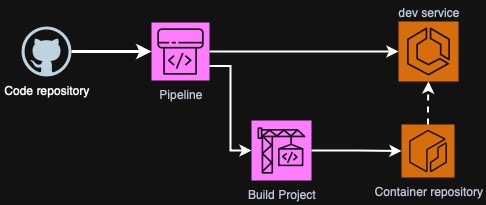
Also on the diagram we have a CodeBuild project that will build a Dockerfile and push directly to ECR as well as a CodePipeline pipeline that will clone source code from GitHub, run CodeBuild job, deploy to development ECS service and contain another manual step (approval) that will trigger another action - deployment to production.
Basic setup
I won't describe everything here. As the base infrastructure we will deploy a VPC, a fck-nat instance (to save on NAT Gateway and VPC Endpoints costs) and all ECS necessities. We will also have ECR repository created. To preview our application, I will also create an Application Load Balancer. For now, all the services will be scaled to 0, so that it won't try to pull inexistent image from ECR.
You can find complete Terraform code of the above here: stage 1 of the project on GitHub.
Pushing example Nginx
To test if everything works smoothly, I will build an Nginx container locally on my laptop. I will use AWS CLI credentials to authenticate. In the same Terraform repository I will get the output for the ECR repository URL and push.
$ REPOSITORY_URL=$(tofu output -raw ecr_repository_url):latest
$ REGISTRY_URL=$(echo "$REPOSITORY_URL" | cut -d'/' -f1)
$ aws ecr get-login-password --region eu-west-3 | docker login --username AWS --password-stdin $REGISTRY_URL
$ docker tag nginx:1.29 $REPOSITORY_URL:latest
$ docker push $REPOSITORY_URL:latest
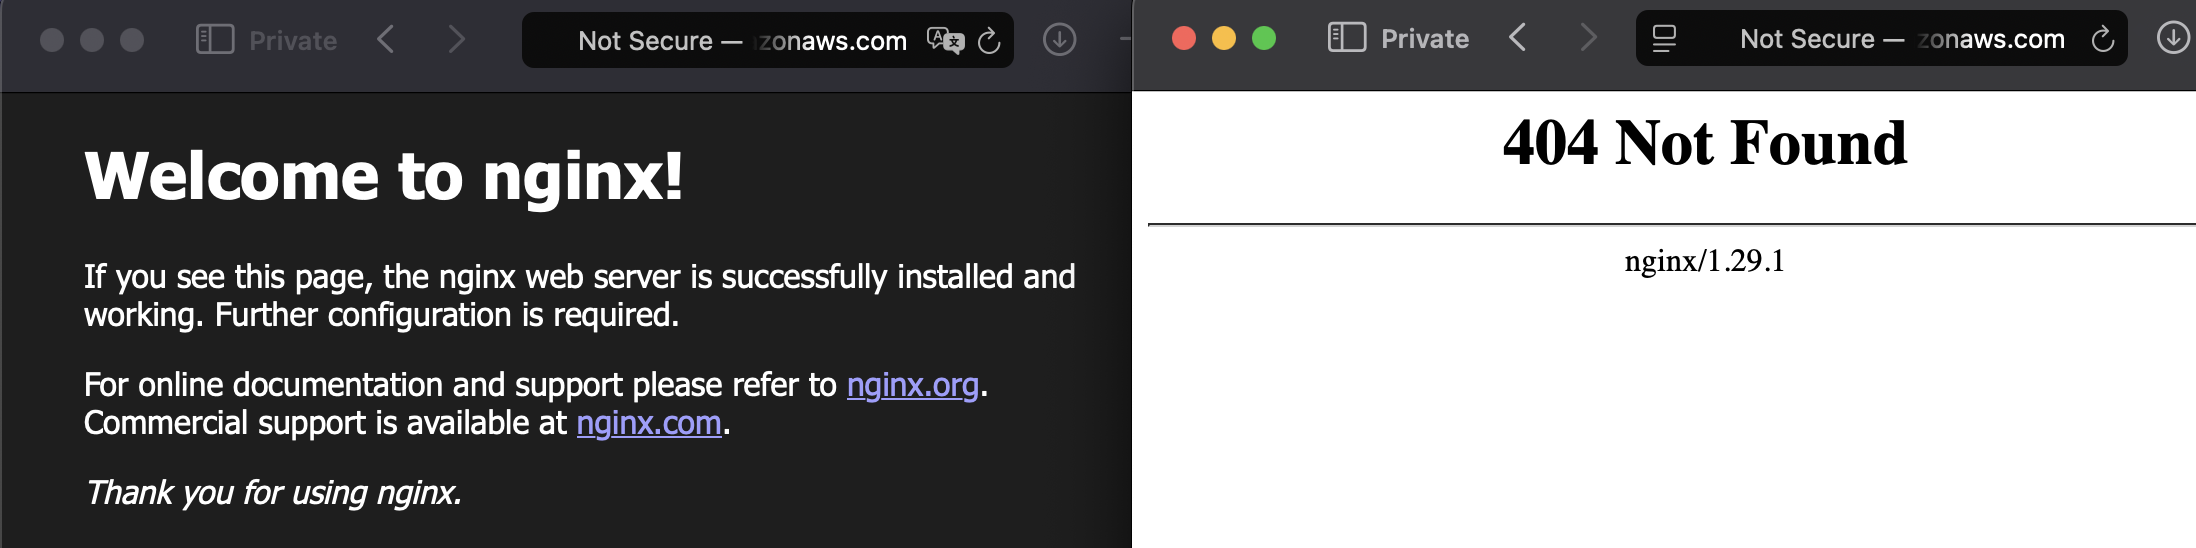
Now we can scale the services to 1 task. We should see Nginx welcome page if we
navigate to the ALB DNS name. For the dev environment, I chose /dev path. This
will be also reflected in Nginx so it will for now throw a 404 error but it's
expected. The most important is if the service started and if there is
connectivity. In ecs.tf change desired_count to 1 and wait a bit for the
deployment to succeed.
By doing this we could test the connectivity and if everything is configured correctly for future deployments.
Creating CodeConnection
You will need to create a new repository for your app code. It can be GitHub, GitLab or BitBucket, doesn't matter. I will use GitHub in the example.
CodeConnection (formerly CodeStar connection) is an authorization of AWS to use
your GitHub account. Even if you create this resource with Terraform, CLI or
CloudFormation, you still need to go through the authorization flow with the
browser (once). Let's create one in Terraform and go through the process of
granting least privilege to AWS (so only repositories we have to). In the new
file called codestar.tf write the following:
resource "aws_codeconnections_connection" "github" {
  name          = "gh-connection"
  provider_type = "GitHub"
}
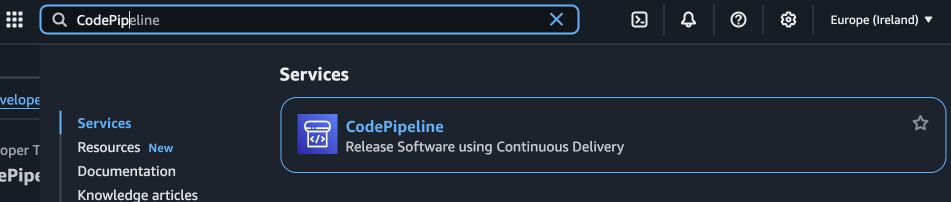
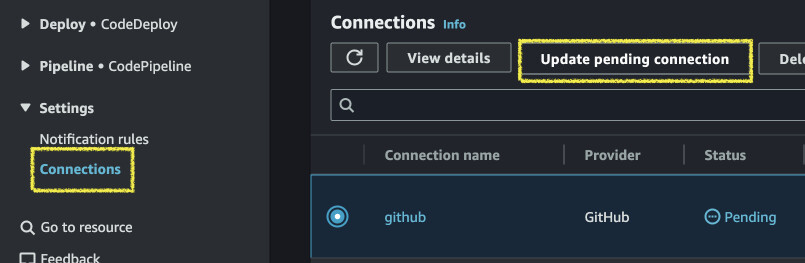
Apply the change with Terraform and go to AWS Console, search for any Code* services (CodePipeline for example). In the left panel go down to Settings > Connections. In the pending one click "Update a pending connection". Press "Install a new app" and you will be prompted to log in to GitHub.
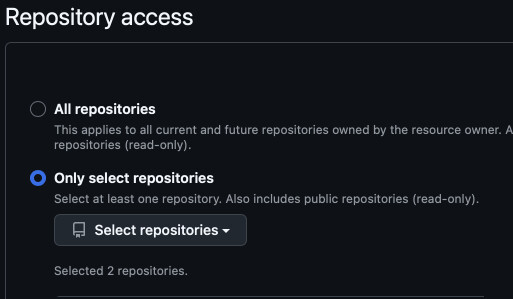
You will be presented with AWS Connector settings. In Repository access select "Only select repositories" and add your app repo to the list.
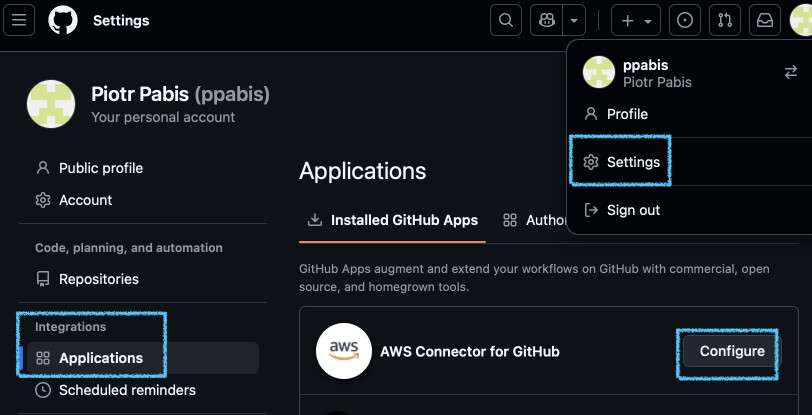
If you want to add more repositories later, you can go to your GitHub account settings > Integrations > Applications and configure AWS Connector from there.
Creating the pipeline
Now as you already have the connection, you can use it to define the
CodePipeline. In a new file codepipeline.tf we will start drafting it. Do not
deploy it yet, as you need at least source and build phases to be able to deploy
it. We will also need a role and an S3 bucket to store the artifacts.
Define them as well.
resource "aws_codepipeline" "main" {
  name     = "demo-pipeline"
  role_arn = aws_iam_role.codepipeline_role.arn

  artifact_store {
    location = aws_s3_bucket.codepipeline_staging.bucket
    type     = "S3"
  }

  # Stage 1: Source - Pull code from GitHub
  stage {
    name = "Source"

    action {
      name             = "Source"
      category         = "Source"
      owner            = "AWS"
      provider         = "CodeStarSourceConnection"
      version          = "1"
      output_artifacts = ["source_output"]

      configuration = {
        ConnectionArn    = aws_codestarconnections_connection.github.arn
        FullRepositoryId = "ppabis/demo-app"
        BranchName       = "main"
        DetectChanges    = true
      }
    }
  }

  # ... Next steps will follow
}
I will load the policies from JSON files to make the Terraform structure more readable. You can see all the defined policies here (also for CodeBuild): policies on GitHub.
resource "aws_s3_bucket" "codepipeline_staging" {
  bucket        = "pipeline-99819188-makeitunique"
  force_destroy = true
}

# IAM Role for CodePipeline
resource "aws_iam_role" "codepipeline_role" {
  name               = "demo-codepipeline-role"
  assume_role_policy = templatefile("policies/assume_codepipeline.json", {
    service_name = "codepipeline"
  })
}

resource "aws_iam_role_policy" "codepipeline_policy" {
  name   = "demo-codepipeline-policy"
  role   = aws_iam_role.codepipeline_role.id
  policy = templatefile("policies/codepipeline.json", {
    bucket_name = aws_s3_bucket.codepipeline_staging.id
  })
}
CodeBuild instance to build Docker images
Next we will create a CodeBuild project that will build and push the Docker
image. It is possible to limit it to the VPC (and use your own Elastic IP for
example due to DockerHub limits) but I will just use a public instance for
simplicity. I will also create IAM role and a log group so that we see what is
happening during the build. In codebuild.tf write:
# IAM Role for CodeBuild
resource "aws_iam_role" "codebuild_role" {
  name = "demo-codebuild-role"
  assume_role_policy = templatefile("policies/assume.json", {
    service_name = "codebuild"
  })
}

resource "aws_iam_role_policy" "codebuild_policy" {
  name = "demo-codebuild-policy"
  role = aws_iam_role.codebuild_role.id
  policy = templatefile("policies/codebuild.json", {
    bucket_name = aws_s3_bucket.codepipeline_staging.id
  })
}

# CloudWatch Log Group for CodeBuild
resource "aws_cloudwatch_log_group" "codebuild" {
  name              = "/aws/codebuild/demo-build-push"
  retention_in_days = 7
}

# CodeBuild project for building and pushing Docker image
resource "aws_codebuild_project" "build_and_push" {
  name          = "demo-build-push"
  description   = "Build Docker image and push to ECR"
  service_role  = aws_iam_role.codebuild_role.arn
  build_timeout = 30

  artifacts { type = "CODEPIPELINE" }
  source { type = "CODEPIPELINE" }

  environment {
    compute_type                = "BUILD_GENERAL1_SMALL"
    image                       = "aws/codebuild/amazonlinux-aarch64-standard:3.0"
    type                        = "ARM_CONTAINER"
    privileged_mode             = true
    image_pull_credentials_type = "CODEBUILD"

    environment_variable {
      name  = "ECR_REPOSITORY_URL"
      value = aws_ecr_repository.demo_app.repository_url
    }
  }

  logs_config {
    cloudwatch_logs {
      group_name  = aws_cloudwatch_log_group.codebuild.name
      stream_name = "build-logs"
    }
  }
}
Now we can attach the build project to the pipeline as the next step after
source. We will control the process from the app repository using
buildspec.yml that we will define later. I will also add another step that
will read imagespec.json that will contain changes for ECS service and deploy
it to ECS. Add the following to your existing codepipeline.tf:
resource "aws_codepipeline" "main" {
  name     = "demo-pipeline"
  # ... previous steps

  # Stage 2: Build - Build Docker image and push to ECR
  stage {
    name = "Build"

    action {
      name             = "Build"
      category         = "Build"
      owner            = "AWS"
      provider         = "CodeBuild"
      version          = "1"
      input_artifacts  = ["source_output"]
      output_artifacts = ["build_output"]

      configuration = {
        ProjectName = aws_codebuild_project.build_and_push.name
      }
    }
  }

  # Stage 3: Deploy - Deploy to ECS
  stage {
    name = "Deploy"

    action {
      name            = "Deploy"
      category        = "Deploy"
      owner           = "AWS"
      provider        = "ECS"
      version         = "1"
      input_artifacts = ["build_output"]

      configuration = {
        ClusterName = aws_ecs_cluster.cluster.cluster_name
        ServiceName = aws_ecs_service.dev.service_name
        FileName    = "imagespec.json"
      }
    }
  }
}
You can deploy this Terraform configuration. It will fail but it is expected as
we have no buildspec.yml defined anywhere.
Creating demo app
In your demo app repository create a sample app that will be deployed into the
service. For now it will be just a Dockerfile with Nginx and some sample HTML
page. I will also alias /dev to the root so that the same container can be
used with multiple paths in ALB.
FROM public.ecr.aws/nginx/nginx:1.29
COPY index.html /usr/share/nginx/html/index.html
COPY nginx.conf /etc/nginx/conf.d/default.conf
server {
    listen       80;
    server_name  _;

    location / {
        root   /usr/share/nginx/html;
        index  index.html index.htm;
    }

    location /dev/ {
        alias  /usr/share/nginx/html/;
        index  index.html index.htm;
    }

    error_page   500 502 503 504  /50x.html;
    location = /50x.html {
        root   /usr/share/nginx/html;
    }
}
I will also create a buildspec.yml in the root of the repository. This will
enable us to control the flow of the build in the CodeBuild project. First we
need to log in to the ECR registry using Docker and then we can build and push
the images. At the last step, we need to produce a change that will be deployed
to ECS service.
version: 0.2
phases:
  pre_build:
    commands:
      - echo Logging in to Amazon ECR...
      - export AWS_REGION=$(echo $ECR_REPOSITORY_URL | cut -d '.' -f 4)
      - aws ecr get-login-password | docker login --username AWS --password-stdin $ECR_REPOSITORY_URL
      - IMAGE_TAG=$(echo $CODEBUILD_RESOLVED_SOURCE_VERSION | cut -c 1-7)
  build:
    commands:
      - docker build -t $ECR_REPOSITORY_URL:$IMAGE_TAG .
      - docker tag $ECR_REPOSITORY_URL:$IMAGE_TAG $ECR_REPOSITORY_URL:latest
      - docker push $ECR_REPOSITORY_URL:latest
      - docker push $ECR_REPOSITORY_URL:$IMAGE_TAG
  post_build:
    commands:
      - printf '[{"name":"web","imageUri":"%s"}]' $ECR_REPOSITORY_URL:$IMAGE_TAG > imagespec.json
artifacts:
  files:
    - imagespec.json
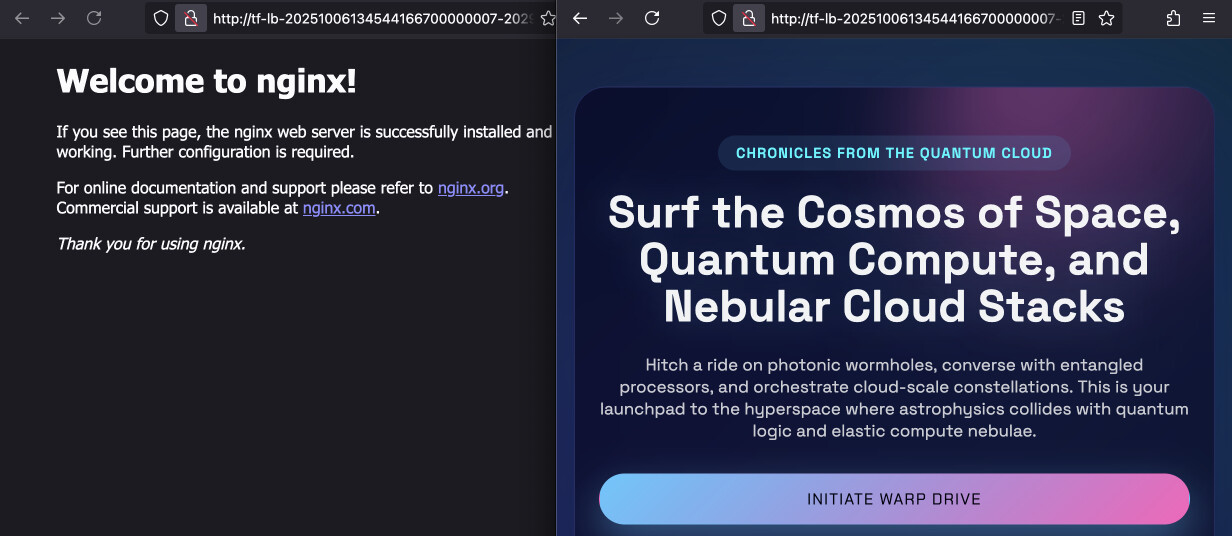
After you push the changes, a new build should be triggered. If not, try to go
to the AWS Console, find the pipeline in CodePipeline and retry or try pressing
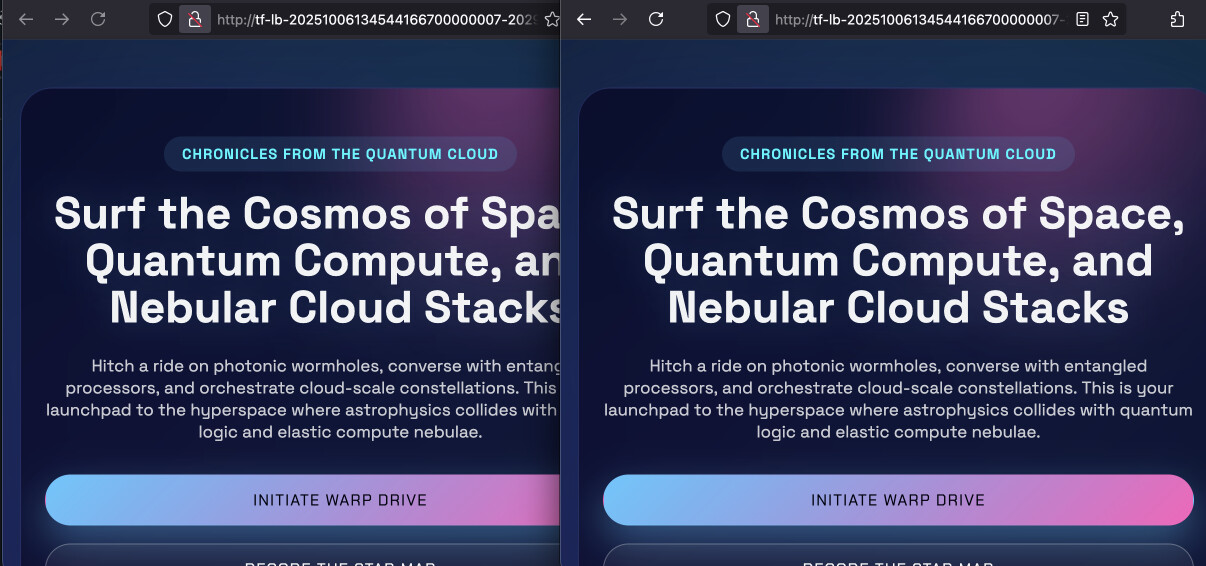
"Release change". If you now go to the ALB's URL under /dev, you should see
some HTML page. On the left you see deafult Nginx page of the production service
and on the right some vibe-coded futuristic page.
Pipeline for production deployments
For now the pipeline pushes only to dev. I will create a new stage and actions that will run only if someone accepts the development build and deploy it to production service. This stage will have two actions: manual approval with run order of 1 and another deployment with run order of 2. This makes the second actiond dependent on the first and lets us save on unneccessary extra stages.
resource "aws_codepipeline" "main" {
  name     = "demo-pipeline"
  # ... Previous stages
  stage {
    name = "Acceptance"

    action {
      name      = "ApproveProduction"
      category  = "Approval"
      owner     = "AWS"
      provider  = "Manual"
      version   = "1"
      run_order = 1
    }

    action {
      name            = "DeployProduction"
      category        = "Deploy"
      owner           = "AWS"
      provider        = "ECS"
      version         = "1"
      input_artifacts = ["build_output"]
      run_order       = 2

      configuration = {
        ClusterName = module.ecs.cluster_name
        ServiceName = module.ecs.services["prod"].name
        FileName    = "imagespec.json"
      }
    }
  }
}
If you now go to the console and press "Release change" the pipeline will run again. It will rebuild the image, deploy to development but the last stage will wait for your acceptance.
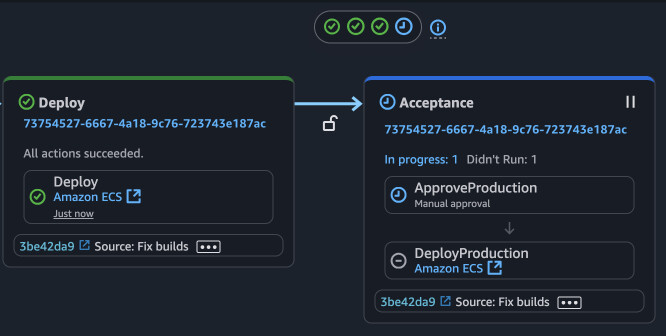
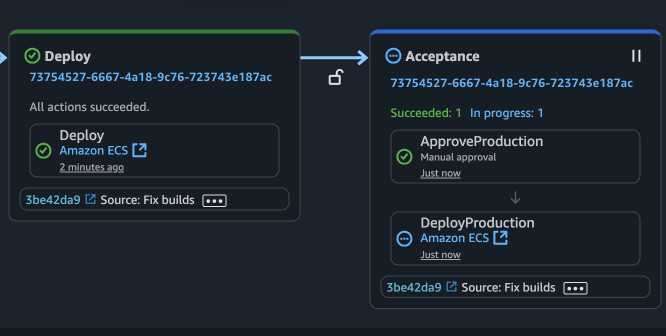
You can press on the action with the blue clock and select either "Accept" or "Reject". In the comment box you can state reasons for either choice. This info will be saved for the current pipeline run. Afterwar the acceptance, another deployment job will be run and you should see the same page on development and production.
The completed repository is available on the master branch on GitHub: ppabis/ECS-CodePipeline-TwoEnvironments. Example app is also public: ppabis/demo-app.