Personal token factory: OpenClaw in AWS but Nvidia GB10 at home
10 April 2026
Even though Nemotron 3 Super is still free on OpenRouter, the agreement is that you donate all your exchanges to Nvidia for training. A paid version is available also quite cheaply ($0.10/M input, $0.50/M output.) I still decided to utilize my ASUS GX10 (aka DGX Spark aka GB10) as the token source for my agent hosted at AWS. But the trick here is the following: I don't want to open my home network to the outside Internet! Another rule: I don't want to pay for any public IPv4 address to AWS. Will I be able to achieve that? That's actually simple! Let me guide you today how I achieved that setup.
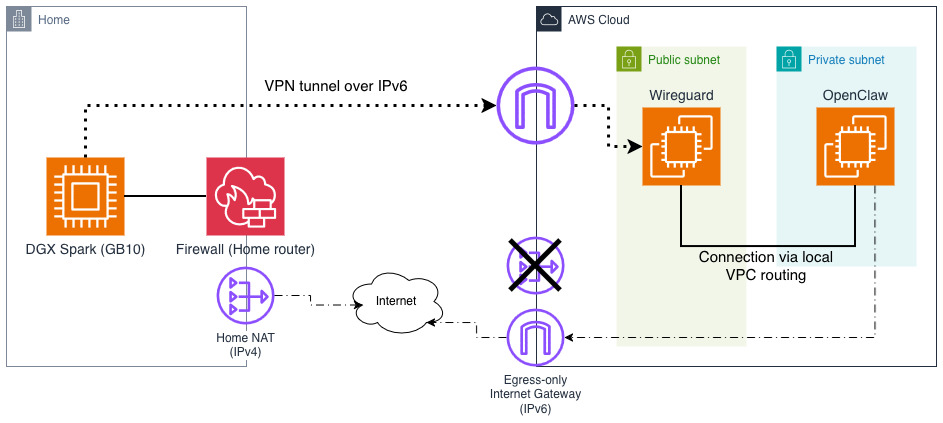
Above you can see that I plan to tunnel both home and AWS networks using Wireguard. I could potentially make this site-to-site but to make it simpler and safer for my home devices, I will only connect to Wireguard server (listener) on AWS side with DGX Spark as a client. I will do it over IPv6. At the bottom you can see that my home devices have normal connectivity to both IPv6 and IPv4 Internet but on AWS side I am relying solely on IPv6 (although internally VPC still uses private IPv4 range). There will be some issues with that but we will fix them later.
Companion GitHub repo: github.com/ppabis/wireguard-openclaw-dgx
Setting up VPC and Wireguard server
I have created a simple VPC using a module with range 10.189.80.0/21 with IPv6
enabled. It has Internet Gateway in public subnets and egress only Internet
Gateway for IPv6 outbound connectivity. I disabled NAT gateway on purpose, we
will cover this issue later. Instances in public subnet will be reachable over
IPv6 from the outside - this is where we will place our Wireguard server.
OpenClaw will remain inside the private subnet.
data "aws_availability_zones" "available" {
  state = "available"
}

module "vpc" {
  source  = "terraform-aws-modules/vpc/aws"
  version = "~> 6.6.0"

  name = "my-vpc"
  cidr = "10.189.80.0/21"

  azs             = slice(data.aws_availability_zones.available.names, 0, 3)
  public_subnets  = ["10.189.80.0/24", "10.189.81.0/24", "10.189.82.0/24"]
  private_subnets = ["10.189.83.0/24", "10.189.84.0/24", "10.189.85.0/24"]

  enable_dns_hostnames = true
  enable_dns_support   = true
  enable_nat_gateway   = false

  enable_ipv6                                    = true
  public_subnet_assign_ipv6_address_on_creation  = true
  private_subnet_assign_ipv6_address_on_creation = true
  public_subnet_ipv6_prefixes                    = [0, 1, 2]
  private_subnet_ipv6_prefixes                   = [3, 4, 5]

  private_subnet_tags = { type = "private" }
  public_subnet_tags  = { type = "public" }
}
Creating Wireguard server instance
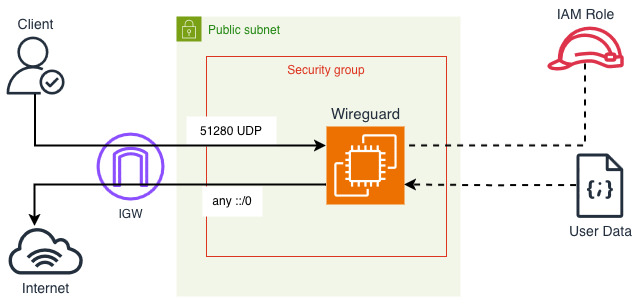
First of all, I will create an EC2 instance with latest Amazon Linux 2023. It
includes WireGuard already in the repositories and the update servers work over
IPv6. I will run my WireGuard server on port 51280 so that's what I will open
on the security group. All egress should also be open. I will attach am IAM role
to it as well, no permissions but it will come handy later. First, define all
the smaller components.
data "aws_ssm_parameter" "al2023_arm64" {
  name = "/aws/service/ami-amazon-linux-latest/al2023-ami-kernel-default-arm64"
}

resource "aws_security_group" "wireguard" {
  name_prefix = "wireguard-sg"
  vpc_id      = module.vpc.vpc_id

  ingress {
    from_port        = 51280
    to_port          = 51280
    protocol         = "udp"
    ipv6_cidr_blocks = ["::/0"]
  }

  egress {
    from_port        = 0
    to_port          = 0
    protocol         = "-1"
    cidr_blocks      = ["0.0.0.0/0"]
    ipv6_cidr_blocks = ["::/0"]
  }
}

data "aws_iam_policy_document" "wireguard_assume_role_policy" {
  statement {
    actions = ["sts:AssumeRole"]
    principals {
      type        = "Service"
      identifiers = ["ec2.amazonaws.com"]
    }
  }
}

resource "aws_iam_role" "wireguard" {
  name               = "wg-ec2-role"
  assume_role_policy = data.aws_iam_policy_document.wireguard_assume_role_policy.json
}

resource "aws_iam_instance_profile" "wireguard" {
  name = "wg-ec2-profile"
  role = aws_iam_role.wireguard.name
}
And finally we can define the EC2 instance. It will be the cheapest and smallest
possible one I can find, which is t4g.nano. AMI ID is pulled from publicly
shared SSM parameter (easier than AMI data source in Terraform). From networking
I'm disabling public IPv4 assignment, forcing at least one IPv6 and disabling
source destination check (more on that later). I didn't define any SSH
connectivity, nor EC2 Instance Connect or Session Manager. The cheapest option
here would be to define a key pair and open 22 on IPv6 to your subnet if you
need debugging.
resource "aws_instance" "wireguard" {
  ami                         = data.aws_ssm_parameter.al2023_arm64.value
  instance_type               = "t4g.nano"
  iam_instance_profile        = aws_iam_instance_profile.wireguard.name
  subnet_id                   = module.vpc.public_subnets[0]
  vpc_security_group_ids      = [aws_security_group.wireguard.id]
  associate_public_ip_address = false
  ipv6_address_count          = 1
  source_dest_check           = false

  user_data = local.user_data

  tags = { Name = "Wireguard" }
  lifecycle { ignore_changes = [ami] }
}

output "ipv6" {
  value = aws_instance.wireguard.ipv6_addresses[0]
}
Installing and configuring Wireguard on the server
How would we install the server if we have no SSH or any other shell access to
the instance? As you see above, I have defined user data. This is a script that
runs on first instance boot... if you just use pure Bash. For our use case, we
want to be able to control instance contents dynamically. For that we will use
cloud-init, which allows for more flexibility regarding user data contents.
We will start with the draft defining "attachments" with both cloud-init's
cloud-config (YAML) as well as standard Bash script that starts on boot. I'm
writing this in a new file called user-data.yaml (although it's not a valid
YAML file).
Content-Type: multipart/mixed; boundary="//"
MIME-Version: 1.0

--//
Content-Type: text/cloud-config; charset="us-ascii"
MIME-Version: 1.0
Content-Transfer-Encoding: 7bit
Content-Disposition: attachment; filename="cloud-config.txt"

#cloud-config
package_update: true

--//
Content-Type: text/x-shellscript; charset="us-ascii"
MIME-Version: 1.0
Content-Transfer-Encoding: 7bit
Content-Disposition: attachment; filename="userdata.txt"

#!/bin/bash
echo "Configuring WireGuard..."
--//--
Side note
If you know cloud-init, you might wonder why I want to use also user data. For
some reason runcmd doesn't always execute when I want it to and bootcmd
happens too early.
As you see we have two sections in this file. First, we have defined cloud-config that will just update packages on startup. Second script will also execute on first boot and just echo a message. Now what we can do is to configure each module to run on every restart. In cloud-config add this (insert between boundaries):
#cloud-config
package_update: true
cloud_final_modules:
  - [scripts-user, always]

cloud_config_modules:
  - [write_files, always]
  - [package_update_upgrade_install, always]
Now all the sections (that we define soon) will run on every instance reboot.
This will give us some flexibility in changing the configuration (although
requiring reboot but how often do you plan to change this 😄). Let us install
required packages: Wireguard itself, iptables for routing capabilities and for
convenience if you need to debug, tmux and htop can come in handy.
packages:
  - wireguard-tools
  - iptables-nft
  - htop
  - tmux
Now let's proceed with Wireguard configuration. As previously stated, I want to
use 10.155.222.0/24 as the subnet and listen on port 51280. The private key
will be a placeholder for safety reasons. When the tunnel is brought up, we are
going to enable IP forwarding in the kernel and allow forwards between wg0
Wireguard's interface and ens5 (primary network card in AL2023 at least). The
router address (sever) will be the first one in the subnet 10.155.222.1.
write_files:
  - path: /etc/wireguard/wg0.conf
    content: |-
      [Interface]
      Address    = 10.155.222.1/24
      ListenPort = 51280
      PrivateKey = _PRIVATE_KEY_

      # Enable routing + NAT for WG clients to reach VPC
      PostUp   = sysctl -w net.ipv4.ip_forward=1
      PostUp   = iptables -A FORWARD -i wg0 -o ens5 -j ACCEPT
      PostUp   = iptables -A FORWARD -i ens5 -o wg0 -j ACCEPT

      PostDown = iptables -D FORWARD -i wg0 -o ens5 -j ACCEPT
      PostDown = iptables -D FORWARD -i ens5 -o wg0 -j ACCEPT
      # End of file
This configuration is not yet usable until we create another part of the user
data attachment. In the Bash script that is going to run on every machine
startup, we are going to generate Wireguard's key pair, if it doesn't exist, and
if it does, we will just replace the _PRIVATE_KEY_ placeholder with sed.
But that's not all! We also need the public key of the server after all to
connect. As I don't want to need any SSH-like connectivity to this server, it
will export the public key to AWS Systems Manager Parameter Store.
--//
Content-Type: text/x-shellscript; charset="us-ascii"
MIME-Version: 1.0
Content-Transfer-Encoding: 7bit
Content-Disposition: attachment; filename="userdata.txt"

#!/bin/bash
set -eo pipefail

echo "Configuring WireGuard..."
# If there's no private key, generate the private key into a file and derive
# the public one also into a file.
if [ ! -f /etc/wireguard/private.key ]; then
  wg genkey | tee /etc/wireguard/private.key | wg pubkey > /etc/wireguard/public.key
fi

# Replace the private key placeholder if it exists in wg0.conf
sed -i "s#_PRIVATE_KEY_#$(cat /etc/wireguard/private.key)#g" /etc/wireguard/wg0.conf

# Export the public key to SSM Parameter Store. Use IPv6 endpoint.
echo "Public key: $(cat /etc/wireguard/public.key)"
export AWS_USE_DUALSTACK_ENDPOINT=true
aws ssm put-parameter --type "String" --overwrite \
 --name "/wireguard/public-key" \
 --value "$(cat /etc/wireguard/public.key)"

# Start the tunnel.
wg-quick up wg0

--//--
Currently if you run the script, the machine will not be able to write into Parameter Store because the IAM role doesn't have such permissions. Add the following policy to the previously defined role.
data "aws_caller_identity" "X" {}
data "aws_region" "X" {}

data "aws_iam_policy_document" "wireguard_ssm_policy" {
  statement {
    actions   = ["ssm:PutParameter"]
    resources = ["arn:aws:ssm:${data.aws_region.X.region}:${data.aws_caller_identity.X.account_id}:parameter/wireguard/public-key"]
  }
}

resource "aws_iam_role_policy" "wireguard_ssm_policy" {
  name   = "wg-ssm-policy"
  role   = aws_iam_role.wireguard.id
  policy = data.aws_iam_policy_document.wireguard_ssm_policy.json
}
As the last part, add the user data local variable. I will use templatefile
because we are going to do some dynamic things later, so it will come in handy.
locals {
  user_data = templatefile("${path.module}/user-data.yaml", {})
}
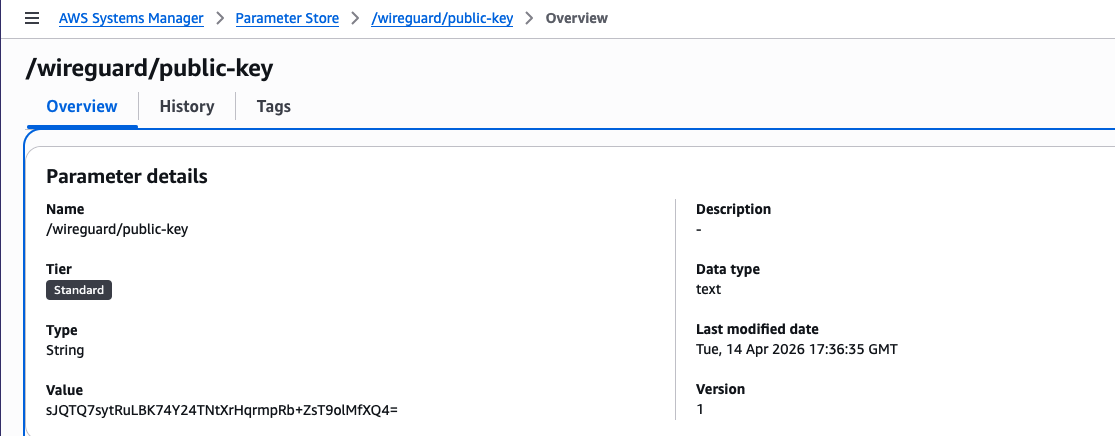
When you now deploy this infrastructure, after some minutes you should get a
public key in SSM Parameter Store under wireguard/public-key. You can use it
to configure the client connections. You can also use the following command to
get the public key value.
aws ssm get-parameter \
 --name /wireguard/public-key \
 --query Parameter.Value \
 --output text
Setting up client
On the client side, so my DGX Spark, I will now SSH and also install Wireguard. I am using default Ubuntu installation. We are going to generate a new private key, get the public key and save the configuration. You need to run the following commands under root.
apt -y install wireguard wireguard-tools
Define some variables that are public key from SSM Parameter store and output
with IPv6 from Terraform. Also configure the path where you want to keep the
configuration. I will use wg1 interface.
WG_SERVER_KEY="sJQTQ7sytRuLBK74Y24TNtXrHqrmpRb+ZsT9olMfXQ4=" # Key from SSM
WG_SERVER_IP="2a05:d012:e21:2345:6789:01ab:cdef:9dd7" # IPv6 from AWS
mkdir -p /etc/wireguard/
WG_CONFIG=/etc/wireguard/wg1.conf
WG_PRIVATE_KEY=$(wg genkey)
WG_PUBLIC_KEY=$(echo $WG_PRIVATE_KEY | wg pubkey)
echo "Public key = $WG_PUBLIC_KEY"
Then generate the configuration. In case you have some firewall, select a port
that you want to use for listening on incoming VPN traffic. Choose a unique
address from the VPN subnet pool. Optionally set the DNS resolver to the AWS VPC
one (second address of subnet's CIDR). AllowedIPs is an unfortunate name but
these are the routes that should go through the VPN - I set them to VPC CIDR and
VPN's internal subnet.
cat > $WG_CONFIG <<EOF
[Interface]
PrivateKey = $WG_PRIVATE_KEY
# Public Key: $WG_PUBLIC_KEY
Address = 10.155.222.3/32
DNS = 10.189.80.2    # Optional
ListenPort = 62910   # You can skip this if you don't have firewall

[Peer]
PublicKey = $WG_SERVER_KEY
AllowedIPs = 10.189.80.0/21, 10.155.222.0/24 # Connectivity to VPC and VPN
PersistentKeepalive = 25
Endpoint = [$WG_SERVER_IP]:51280

EOF
Allowing new client on the Wireguard server
As you get the new public key for your home client, we need to now enable it on
the Wireguard server. As you remember we used templatefile to load the user
data. This will come useful now as we will be able to configure multiple
clients. Let's revisit the write_files section. Modify the end of file, after
iptables commands.
write_files:
  - path: /etc/wireguard/wg0.conf
    content: |-
      [Interface]
      Address    = 10.155.222.1/24
      ListenPort = 51280
      PrivateKey = _PRIVATE_KEY_

      # Enable routing + NAT for WG clients to reach VPC
      PostUp   = sysctl -w net.ipv4.ip_forward=1
      PostUp   = iptables -A FORWARD -i wg0 -o ens5 -j ACCEPT
      PostUp   = iptables -A FORWARD -i ens5 -o wg0 -j ACCEPT

      PostDown = iptables -D FORWARD -i wg0 -o ens5 -j ACCEPT
      PostDown = iptables -D FORWARD -i ens5 -o wg0 -j ACCEPT

      %{~ for peer in peers ~}
      [Peer]
      PublicKey = ${peer.public_key}
      AllowedIPs = ${peer.address}/32
      %{~ endfor ~}

      # End of file
The above for loop will generate multiple clients on the Wireguard server. Now
in the template variables you have to set peers map with public_key and
address keys. Revisit the locals in EC2 instance. Applying this will reboot
the instance.
locals {
  user_data = templatefile("user-data.yaml", {
    peers = [
      {
        address    = "10.155.222.3", # the IP you selected for the client
        public_key = "bxmMoVvXlVVRg7uaTnxI6Vf7wxeI0XWj5d6zREqDkzk=" # the public key of the client
      }
    ]
  })
}
Now if you bring up the there should be a status about latest handshake and some data that is received.
$ sudo wg-quick up wg1
[#] ip link add wg1 type wireguard
[#] wg setconf wg1 /dev/fd/63
[#] ip -4 address add 10.155.222.3/32 dev wg1
[#] ip link set mtu 1420 up dev wg1
[#] ip -4 route add 10.155.222.0/24 dev wg1
[#] ip -4 route add 10.189.80.0/21 dev wg1

$ sudo wg
interface: wg1
  public key: bxmMoVvXlVVRg7uaTnxI6Vf7wxeI0XWj5d6zREqDkzk=
  private key: (hidden)
  listening port: 62910

peer: sJQTQ7sytRuLBK74Y24TNtXrHqrmpRb+ZsT9olMfXQ4=
  endpoint: [2a05:d012:e21:2345:6789:01ab:cdef:9dd7]:51280
  allowed ips: 10.189.80.0/21, 10.155.222.0/24
  latest handshake: 22 seconds ago
  transfer: 92 B received, 180 B sent
  persistent keepalive: every 25 seconds
I have created a test internal application load balancer. It will listen for
CIDR 10.155.222.0 (not VPC CIDR!) on port 80. But before this can be used
you also have to define routes for Wireguard's subnet. This is the reason for
turning off source-destination check on the network card of the EC2 instance.
Without that feature, packets destined for Wireguard (whether requests or
responses) will be accepted by the EC2 instance even if the destination isn't
any of the instance's IPs.
resource "aws_route" "wireguard_tunnel_prefix" {
  for_each = toset(
    concat(
      module.vpc.private_route_table_ids,
      module.vpc.public_route_table_ids
    )
  )

  route_table_id         = each.value
  destination_cidr_block = "10.155.222.0/24"
  network_interface_id   = aws_instance.wireguard.primary_network_interface_id
}
Afterwards I tested with cURL and the connectivity was established! The test IPs are private range as you see below. I even tried DNS and it was also functional through the Wireguard interface - that way we can later set up some private domains or use Cloud Map.
$ curl http://internal-mytest-alb-1234567890.eu-west-3.elb.amazonaws.com
hello world

$ dig +short internal-mytest-alb-1234567890.eu-west-3.elb.amazonaws.com
10.189.83.70
10.189.85.144

$ resolvectl query internal-mytest-alb-1234567890.eu-west-3.elb.amazonaws.com
internal-mytest-alb-1234567890.eu-west-3.elb.amazonaws.com: 10.189.83.70 -- link: wg1
                                                            10.189.85.144 -- link: wg1
Installing LLM server
Now we need to install and configure Ollama. Just follow the instructions on ollama.com to install it, or you can use any other LLM server you wish. Be sure that it is listening on all addresses and not just local host. Create the following override in SystemD (on Ubuntu).
sudo cat > /etc/systemd/system/ollama.service.d/override.conf <<EOF
[Service]
Environment="OLLAMA_HOST=0.0.0.0:11434"
Environment="OLLAMA_CONTEXT_LENGTH=212000"
Environment="OLLAMA_KV_CACHE_TYPE=q8_0"
Environment="OLLAMA_KEEP_ALIVE=2400"
EOF
sudo systemctl enable --now ollama
sudo systemctl restart ollama
You can alternatively run it in Docker. It should be supported on DGX Spark out of the box to use it with the GPU. Choose only one or the other because they occupy the same port in the command below!
docker run -d \
 --gpus=all \
 -v ollama:/root/.ollama \
 -p 11434:11434 \
 --name ollama \
 --restart=unless-stopped \
 ollama/ollama
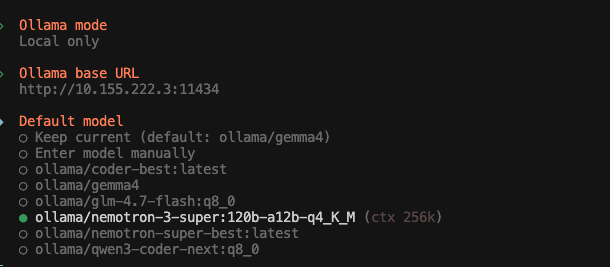
For direct installations, you can just use ollama pull <model> to download the
model in advance. I will use Nvidia's Nemotron 3 Super which was one of the best
medium-sized models when I started writing this post. However, Gemma 4 and Qwen
3.6 were also released so you can experiment with that.
ollama pull nemotron-3-super:120b-a12b-q4_K_M
Connecting from an EC2 instance
I will create another EC2 instance which will be used for OpenClaw or any other
system as you want such as Hermes or just a web app for chatting. I will prepare
the instance first, will use Ubuntu 24.04 and t4g.medium instance. I will also
create a new user data script that will bootstrap some of the required packages.
As we have IPv6 outbound connectivity from private subnet, APT repositories
should work without issues. I will also enable SSH access from Wireguard's
inner subnet so that I can SSH to the instance, but you can alternatively use
IPv6 when moving to public subnet or via SSM Systems Manager if you configure
it, it's up to you.
data "aws_ssm_parameter" "ubuntu_2404" {
  name = "/aws/service/canonical/ubuntu/server/24.04/stable/current/arm64/hvm/ebs-gp3/ami-id"
}

resource "aws_security_group" "agent" {
  name        = "openclaw-agent-sg"
  vpc_id      = data.aws_subnet.agent.vpc_id

  ingress {
    from_port   = 22
    to_port     = 22
    protocol    = "tcp"
    cidr_blocks = ["10.155.222.0/24"]
  }

  egress {
    from_port        = 0
    to_port          = 0
    protocol         = "-1"
    cidr_blocks      = ["0.0.0.0/0"]
    ipv6_cidr_blocks = ["::/0"]
  }
}

resource "aws_instance" "agent" {
  ami           = data.aws_ssm_parameter.ubuntu_2404.value
  instance_type = "t4g.medium"
  user_data     = file("openclaw.yaml")
  tags          = { Name = "openclaw-agent" }

  subnet_id                   = module.vpc.private_subnets[0]
  vpc_security_group_ids      = [aws_security_group.agent.id]
  associate_public_ip_address = false
  ipv6_address_count          = 1

  metadata_options {
    http_endpoint = "enabled"
    http_tokens   = "required"
  }

  root_block_device {
    volume_size           = 20
    volume_type           = "gp3"
    encrypted             = true
    delete_on_termination = true
  }

  lifecycle { ignore_changes = [ami] }
}

output "private_ip" {
  value = aws_instance.agent.private_ip
}
From the system config I will do the following:
- add Node.js APT repository of version 24,
- install Node.js and unattended upgrades,
- enable unattended upgrades,
- enable AWS SSM (optional but useful).
I will also create a separate user for OpenClaw so that it can have its own home directory and permissions. It is also very important to create the default user as this will allow you to SSH to the instance to onboard OpenClaw. If you wish you can also specify SSH keys in here or via AWS key pairs.
#cloud-config
cloud_final_modules:
  - [scripts-user, always]

cloud_config_modules:
  - [write_files, always]
  - [apt_configure, always]
  - [package_update_upgrade_install, always]

hostname: openclaw-agent
create_hostname_file: true

apt:
  sources:
    nodejs:
      keyid: 2F59B5F99B1BE0B4
      keyserver: keyserver.ubuntu.com
      source: deb [signed-by=$KEY_FILE] https://deb.nodesource.com/node_24.x nodistro main

package_update: true
package_upgrade: true
packages:
  - nodejs
  - unattended-upgrades

users:
  - default
  - name: openclaw
    uid: 2200

ssh_authorized_keys:
  - ssh-ed25519 AAAAC3NzaC1lZDI1NTE5AAAAIPgVNNOeuUqMgobgeIIkndXXYekOmC/e5bqty3f0UXDa my-ssh-key

write_files:
  - path: /etc/apt/apt.conf.d/20auto-upgrades
    permissions: "0644"
    owner: root:root
    content: |
      APT::Periodic::Update-Package-Lists "1";
      APT::Periodic::Unattended-Upgrade "1";

runcmd:
  - systemctl enable --now unattended-upgrades || true
  - loginctl enable-linger openclaw || true # Enable SystemD on openclaw's user
Installing OpenClaw - with a caveat 😳
I SSH'd into the instance and Nodejs should already be there based on the
provided user data. So I switched user to the new openclaw one I defined and
started installation with NPM.
ssh ubuntu@$(tofu output -raw private_ip) # replace with your private IP
The authenticity of host '10.189.83.247 (10.189.83.247)' can't be established.
ED25519 key fingerprint is: SHA256:iMfJBU8iSEc5ikspbNKGD8jCAlLGwrOs28lbI4aPw2Q
This key is not known by any other names.
Are you sure you want to continue connecting (yes/no/[fingerprint])? yes
# Inside the machine
sudo su openclaw -l -s /bin/bash
npm install openclaw@latest
...
4564 error A git connection error occurred
4565 error command git --no-replace-objects ls-remote ssh://git@github.com/whiskeysockets/libsignal-node.git
4566 error ssh: connect to host github.com port 22: Connection timed out
4566 error fatal: Could not read from remote repository.
This timeout happens because we don't have public IPv4 connectivity! There are two standard solutions - public IP for the instance or NAT Gateway or...
Hosting tinyproxy on DGX Spark
As we already have connection to other VPN places we can simply use one of the
machines on the network as the exit to IPv4 internet. As a bonus we retain our
residential IP! So let's spin it up in a Docker but for that we need to make
some configuration first in Dockerfile and tinyproxy.conf.
FROM alpine:latest

RUN apk add tinyproxy
COPY tinyproxy.conf /etc/tinyproxy/tinyproxy.conf
EXPOSE 8888
ENTRYPOINT ["/usr/bin/tinyproxy"]
CMD ["-d"]
Port 8888
Timeout 600
MaxClients 100
ViaProxyName "tinyproxy"

User nobody
Group nobody

DefaultErrorFile "/usr/share/tinyproxy/default.html"
StatFile "/usr/share/tinyproxy/stats.html"
LogLevel Info

Allow 127.0.0.1
Allow ::1
Allow 10.155.222.0/24
Allow 10.189.80.0/21
From that config we can easily build the new image for Tinyproxy and set it up so that it starts on boot. Of course then all this connectivity will rely on our local machine being up, so it's only usable for some of IPv4 requirements such as GitHub.
docker build -t local-tinyproxy:latest .
docker run -d \
 --name tinyproxy \
 --restart=unless-stopped \
 -p 8989:8888 \
 local-tinyproxy:latest
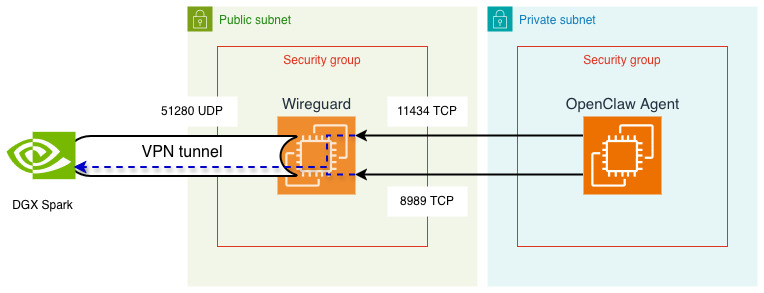
Now we can easily direct the proxy to the new service within Wireguard's
network. However, in order to do this, we need to open the port 8989 (and
11434 for Ollama) on Wireguard's instance. You might ask why is that? So any
packet sent from OpenClaw's instance in that direction will look like this:
- source address:
10.189.83.247(example), - destination address:
10.155.222.3, - source port:
59123(example), - destination port:
8989.
Filtering on AWS security group level cares about source address and destination port rather than anything else. Destination address is taken care by "source-destination" check of the network interface - the feature we just disabled. Let's update our security group.
resource "aws_security_group" "wireguard" {
  name_prefix = "wireguard-sg"
  vpc_id      = module.vpc.vpc_id

  ingress {
    from_port        = 51280
    to_port          = 51280
    protocol         = "udp"
    ipv6_cidr_blocks = ["::/0"]
  }

  ingress {
    from_port        = 11434
    to_port          = 11434
    protocol         = "tcp"
    security_groups  = [aws_security_group.agent]
  }

  ingress {
    from_port        = 8989
    to_port          = 8989
    protocol         = "tcp"
    security_groups  = [aws_security_group.agent]
  }

  egress {
    from_port        = 0
    to_port          = 0
    protocol         = "-1"
    cidr_blocks      = ["0.0.0.0/0"]
    ipv6_cidr_blocks = ["::/0"]
  }
}
Now you can configure NPM and Git to use the proxy and OpenClaw should be able
to install with no issues. You can also test the connectivity with cURL even, if
it responds with 500, this is fine; if 403, this might be a problem with
tinyproxy.conf. If this cURL command shows timeout or "couldn't connect to
server", this can be security groups, routes or other firewall.
curl http://10.155.222.3:8989 -X CONNECT | grep title
# Test results
# <title>500 Unable to connect</title>
npm set https-proxy=http://10.155.222.3:8989
npm set proxy=http://10.155.222.3:8989
git config --global http.proxy http://10.155.222.3:8989
git config --global https.proxy http://10.155.222.3:8989
npm install openclaw@latest
OpenClaw - Onboard!
And we are almost done! The only thing we now need is to follow the onboarding process. Use Ollama provider in local mode, set the correct DGX's IP over Wireguard and choose the model from the list!
export XDG_RUNTIME_DIR=/run/user/$(id -u) # for systemd support
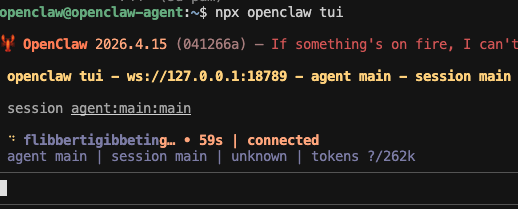
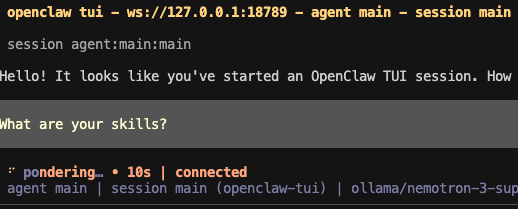
npx openclaw onboard
I will demonstrate usage via TUI rather than any instant messenger here. The first load time for the latest build of OpenClaw took around 1:30 minutes with Nemotron 3 Super (q4). After resetting the session, first message took around 20 seconds (to load 12k context), so most of the time was loading the model into VRAM. Keeping model in memory is controllable on Ollama's side. For each subsequent message, there's some more time needed.
npx openclaw tui
To have some performance comparison, I decided to also try running the agent
on latest Qwen 3.6 35B (qwen3.6:35b-a3b-q8_0). The startup took around 30
seconds and each message takes maybe 10.
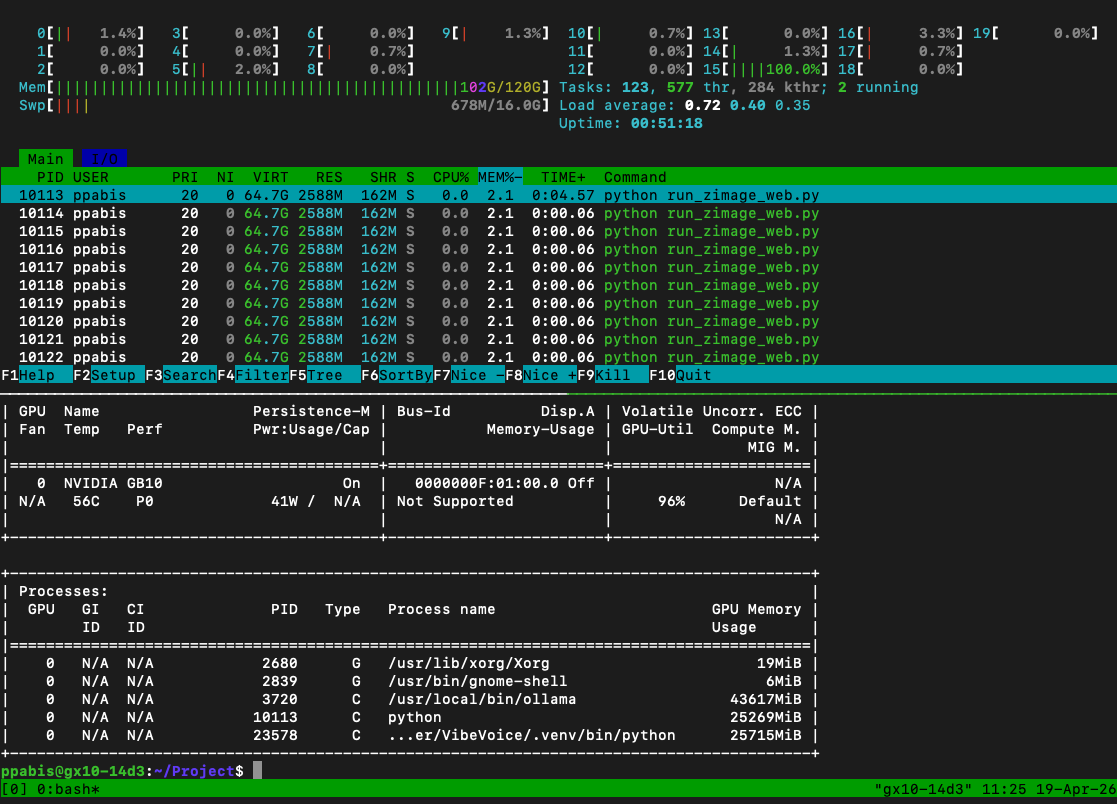
Power usages
I decided to also order a meter that provided how much power the DGX machine draws in different situations. When it's completely idle, it takes around 30W, with the model loaded to memory but unused it's around 40W and during response generation it oscillates around 170W. Let's do some assumptions - when you sleep you don't use OpenClaw at all but you keep DGX Spark on, so it takes 30W for 7 hours. You are a very heavy user, writing to OpenClaw all day, scheduling a lot of tasks basically treating it as a thinking extension which totals to 8 hours of pure generative work. For all the other time it just sits idle but loaded to memory.
- 7 h * 30 W = 210 Wh
- 8 h * 170 W = 1360 Wh
- 9 h * 40 W = 360 Wh
- in total it is about 2 kWh
- assuming price in Germany is 0.5€ for a kilowatt-hour, it is 1€ per day, 30€ per month, just for pure token generation.
Obviously you also have to consider costs for AWS EC2 Instance. For the VPN server, if you commit for a year to EC2 saving plans, you will pay around 25€, for the agent instance, if it's online all year round this is 200€ (but note that OpenClaw is especially heavy compared to other harnesses).

If you use small model like Qwen 35B in Q8, you will still have space in VRAM for some image generator like Z-Image-Turbo, a small TTS model or Whisper Turbo for speech recognition. I managed to easily fit image generation and VibeVoice ASR along with the chatbot model in 100 gigs of RAM.
Cons of this setup
Of course each of such setups comes with a tradeoff. You keep your privacy, you maybe pay less for inference (that's debatable) but that's about it. The best setup is to have GB10 as the primary model provider and fall back on something small on OpenRouter. There's always a possibility to mix multiple models and providers using subagents. For example you want to perform a coding task, you use Sonnet 4.6 but you keep local Qwen 3.6 for orchestration. Such setup is far from highly available. Not only can the machine break, you can have blackout or Internet can be down in your flat. Another tradeoff is speed - most of the medium sized models from OpenAI or Anthropic will nevertheless run faster than any decent model on DGX Spark.
The prefill (loading context) speed is 500 tokens per second for Nemotron 3 Super and token generation is 20 tokens per second. Assuming that in each 15 minute window we have to load 200k context, we can generate 10k tokens, that makes it (within 8 hour daily generation) 6.4 M tokens input and 0.32 M tokens output. Prompt prefill accounts for around 40% of the time spent so from a daily spend, 40 cents will go to input tokens and 60 cents to output tokens. Normalized this is around 0.06€ per million input tokens and 1.88€ per million output tokens.
For Qwen 3.6 the speeds look different: 1150 tokens/s prefill and 39 tokens/s generation. Then in 15 minute window (200k input context) the prefill will account for 20% of the generation time. 80% of the time left will be for token generation and this will produce 28k tokens. So within a day we get 6.4 M input and 0.896 M output tokens, normalized this makes it 0.03€/Mtok input and 0.89€/Mtok output.
Is any of these competitive? It highly depends on your use case and usage patterns; whatever I did above is just napkin maths. Gemma 4 31B over OpenRouter is just $0.13/$0.38 in/out but GPT-5.4 Nano is $0.20/$1.25.