Serverless Picture Gallery on Google Cloud - Part 2
12 January 2026
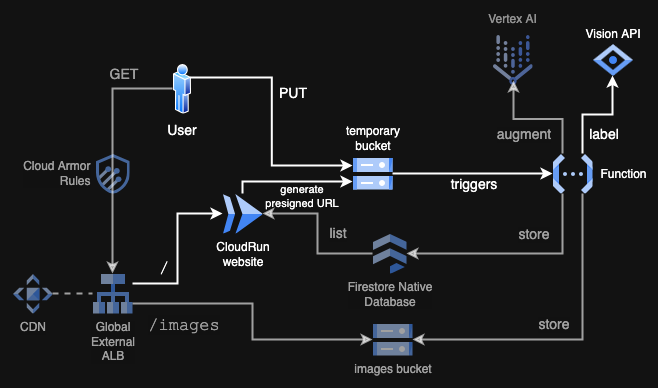
In this episode we will continue the project and implement uploading functionality using presigned URLs generated by Cloud Storage. What is more, on successful uploads we are going to trigger a Cloud Run Function that will pass the uploaded image to Vision API to describe it with labels that initially we will only print to the logs. To see the parts we will be creating, look at the diagram below.
GitHub repository: ppabis/gcp-photos-gallery
Uploads bucket and permissions
First we need a place to upload our images somewhere. For simplicity, we can
create another bucket. I will also add lifecycle policy to this bucket so that
it is being cleaned up every day in case some uploads cause failure in the
function. What is also important is to allow uploading to the bucket from any
domain. Cross Origin Resource Sharing (CORS) will block by default any
interactions that are not coming from the same domain (in that case
storage.googleapis.com), so we need a custom header for this.
resource "google_storage_bucket" "tmp_upload_bucket" {
  name                        = "tmp-upload-${random_string.bucket_name.result}"
  location                    = "EU"
  storage_class               = "STANDARD"
  uniform_bucket_level_access = true
  force_destroy               = true

  lifecycle_rule {
    action    { type = "Delete" }
    condition { age = 1 }
  }

  cors {
    origin          = ["*"]
    method          = ["PUT", "POST"]
    response_header = ["Content-Type"]
    max_age_seconds = 3600
  }
}
As the next step we need to allow our Cloud Run service to write to the bucket as well as generate presigned URLs. Even though we will not be directly writing any data from the container, presigned URLs will inherit the subset of permissions of the creator, in our case Cloud Run's Service Account. As you remember from the previous episode, we have attached an empty Service Account to the service.
resource "google_storage_bucket_iam_member" "sa_storage_creator_tmp" {
  member = "serviceAccount:${google_service_account.cloud_run_sa.email}"
  bucket = google_storage_bucket.tmp_upload_bucket.name
  role   = "roles/storage.objectCreator"
}

# Allow SA to sign URLs
resource "google_service_account_iam_member" "sa_token_creator" {
  service_account_id = google_service_account.cloud_run_sa.name
  role               = "roles/iam.serviceAccountTokenCreator"
  member             = "serviceAccount:${google_service_account.cloud_run_sa.email}"
}
Generating Presigned URLs for direct uploads to the bucket
When we use Presigned URL to PUT or POST an object to the Cloud Storage, we
save on network bandwidth and CPU cycles, as any compute service just throws an
authenticated link to the user (which is some kilobytes long) and then it's just
up to the client to interact with Cloud Storage. We just specify location, token
and then all the bits go directly to the bucket.
Let's define the function for uploading the images in Python. For simplicity, the following function will only process JPG images but in the repository you will find a more sophisticated function for many MIME types.
import datetime, uuid, os
from google.cloud import storage
import google.auth
import google.auth.transport.requests

@app.get("/api/upload-url")
def get_upload_url():
    credentials, project_id = google.auth.default()
    credentials.refresh(google.auth.transport.requests.Request())

    bucket_name = os.environ.get("UPLOAD_BUCKET")
    blob_name = f"{uuid.uuid4()}.jpg"
    blob = storage.Client(credentials=credentials).bucket(bucket_name).blob(blob_name)

    url = blob.generate_signed_url(
        version="v4",
        expiration=datetime.timedelta(minutes=15),
        method="PUT",
        content_type="image/jpeg",
        access_token=credentials.token,
        service_account_email=credentials.service_account_email,
    )

    return {"url": url}

@app.get("/upload")
def upload_page(request: fastapi.Request):
    return templates.TemplateResponse("upload.html", {"request": request})
First, we need to refresh Google Cloud credentials, which will give us a new token. Then we will use these specific credentials for the Cloud Storage client and ask the service to sign the URL with our token. You might ask why can't we just do it like in AWS: use our IAM Role tied to Lambda to generate presigned URL? For some reason Google Cloud implements two types of credentials: one is typical tokens (like AWS STS with assumed roles) and another is "compute" credentials that have no private key that is needed for signing. It's just an implementation detail that nobody questions 🙄.
Either way continuing with our website, now we need to upload the file somehow.
In AWS S3 we would get a token for POST method that just accepts HTML forms.
In GCP we need to use JavaScript to perform a PUT request. So our site will be
a bit interactive. First we will generate a new signed URL when the user picks
a file in file chooser and then we will perform a PUT on a button click.
<div class="upload-container">
    <form id="upload-form">
        <input type="file" id="file-input" name="file" accept="image/*" required>
        <br>
        <button type="submit" id="upload-button" class="btn-submit" disabled>Upload to Gallery</button>
    </form>
</div>
const fileInput = document.getElementById('file-input');
const uploadButton = document.getElementById('upload-button');
let signedUrl = null;

// When user selects a file, call /api/upload-url and enable the "Upload" button
fileInput.addEventListener('change', async function() {
    const file = this.files[0];
    if (file) {
        console.log('Requesting upload permission...');
        try {
            const response = await fetch('/api/upload-url');
            const data = await response.json();
            if (data.url) {
                signedUrl = data.url;
                uploadButton.disabled = false;
            } else
                console.log('Error: ' + (data.error || 'Could not get upload URL'));
        } catch (e) {
            console.log('Error connecting to server.' + e);
        }
    } else {
        uploadButton.disabled = true;
        signedUrl = null;
    }
});
Now we can create another listener on button click that will perform the PUT
request to server and send us back to the index of the website.
const uploadForm = document.getElementById('upload-form');

uploadForm.addEventListener('submit', async function(e) {
    e.preventDefault();
    if (!signedUrl || !fileInput.files[0]) return;

    uploadButton.disabled = true;
    const file = fileInput.files[0];

    try {
        const response = await fetch(signedUrl, {
            method: 'PUT',
            body: file,
            headers: { 'Content-Type': 'image/jpeg' }
        });

        if (!response.ok) throw new Error(response.statusText);

        console.log('Upload successful! Redirect to index');
        setTimeout(() => { window.location.href = '/'; }, 2000);

    } catch (error) {
        console.log('Error during upload.' + error);
        uploadButton.disabled = false;
    }
});
The last thing you have to do is to place UPLOAD_BUCKET environment variable
in the original service we created in the previous part.
resource "google_cloud_run_v2_service" "website_service" {
  name                = "website-service"
  ...

  template {
    containers {
      ...
      env {
        name  = "UPLOAD_BUCKET"
        value = google_storage_bucket.tmp_upload_bucket.name
      }
    }
  }
}
I exposed the HTML file on /upload endpoint (although it's just a static file,
you can host it in the bucket as well). Now when rebuild and redeploy the
container and try to upload an image when you go to this URL on the Load
Balancer, it should appear in the temporary bucket.

Cloud Run Function for labeling the image
We can now continue to create a Cloud Run Function that will process each
uploaded image to the temporary bucket. For that we will use
functions-framework library for Python (as this is my language of choice). It
provides some decorators and classes that allow us to bind code and Cloud Run
Functions infrastructure. Our function will be later triggered by Eventarc so
we specify cloud_event as the entry point. This is similar to Lambda being
triggered by EventBridge.
import functions_framework
from flask import request

@functions_framework.cloud_event
def process_image(cloud_event):
    data = cloud_event.data
    ...
I will also define a helper log function that will be useful to format the
logs in a way expected by Logs Explorer and set the severity of the log as well.
Next I will define another function that will call Vision API with the path to
the uploaded object in the bucket. This function will get the applied labels
with scores formatted as string to be easy to use later.
@functions_framework.cloud_event
def process_image(cloud_event):
    data = cloud_event.data

    def log(msg, sev="INFO"):
        header = request.headers.get("X-Cloud-Trace-Context")
        tid = header.split("/")[0] if header else "n/a"
        print(json.dumps({
            "message": msg,
            "severity": sev,
            "logging.googleapis.com/trace": tid
        }))

    image_path = f"gs://{data['bucket']}/{data['name']}"
    labels = label_image(image_path, log)
    log("Labels detected by Vision API: " + ", ".join(labels))


from google.cloud import vision

def label_image(image_path, log):
    client = vision.ImageAnnotatorClient()
    image = vision.Image()
    image.source.gcs_image_uri = image_path

    try:
        log(f"Labelling image: {image_path}")
        response = client.label_detection(image=image)
        if response.error.message:
            raise Exception(response.error.message)

        labels = response.label_annotations
        return [ f"{label.description} (score: {label.score:.2f})" for label in labels ]

    except Exception as e:
        log(f"Error processing image with Vision API: {e}", "ERROR")
        raise e
Packing the function and deploying
Just as Lambda we need to package the Cloud Run function as a ZIP file. But also
we need to put it into a bucket first and then give Cloud Run gs:// location.
The following Terraform code will zip and upload the code to the bucket and do
it every time there are changes in image_processor directory. Remember to also
add requirements.txt in this directory with the following:
functions-framework==3.*
google-cloud-vision
google-cloud-storage
resource "google_storage_bucket" "function_source_bucket" {
  name                        = "function-source-${random_string.bucket_name.result}"
  location                    = "EU"
  storage_class               = "STANDARD"
  uniform_bucket_level_access = true
  force_destroy               = true
}

data "archive_file" "processor_source" {
  type        = "zip"
  source_dir  = "${path.module}/image_processor"
  output_path = "${path.module}/image_processor.zip"
}

resource "google_storage_bucket_object" "processor_zip" {
  name   = "source-${data.archive_file.processor_source.output_md5}.zip"
  bucket = google_storage_bucket.function_source_bucket.name
  source = data.archive_file.processor_source.output_path
}
Now we can define the new Cloud Run Function along with its Service Account. We will give permissions to read data in the temporary bucket as well as execute Vision API. To make the function future-proof, I will also set the memory to 512 MB and give a generous timeout of 200 seconds.
resource "google_cloudfunctions2_function" "image_processor" {
  name        = "image-processor"
  location    = "europe-west4"
  description = "Background processor for uploaded images"

  build_config {
    runtime     = "python311"
    entry_point = "process_image"
    source {
      storage_source {
        bucket = google_storage_bucket.function_source_bucket.name
        object = google_storage_bucket_object.processor_zip.name
      }
    }
  }

  service_config {
    max_instance_count    = 3
    available_memory      = "512M"
    timeout_seconds       = 200
    service_account_email = google_service_account.processor_sa.email
  }

  # event_trigger { ... to be revisited later }
}

resource "google_service_account" "processor_sa" {
  account_id   = "image-processor-sa"
  display_name = "Service Account for Image Processor Function"
}

resource "google_storage_bucket_iam_member" "processor_storage_viewer" {
  bucket = google_storage_bucket.tmp_upload_bucket.name
  role   = "roles/storage.objectViewer"
  member = "serviceAccount:${google_service_account.processor_sa.email}"
}

resource "google_project_iam_member" "processor_vision_user" {
  project = var.project_id
  role    = "roles/visionai.admin"
  member  = "serviceAccount:${google_service_account.processor_sa.email}"
}
But this is not all! Next we need to define a trigger that will cause any uploaded object into the bucket to invoke this function. For that we will need additional service account with specific permissions, namely receiving events from Eventarc, invoking this function and being usable by global Eventarc service account. We also need to allow Cloud Storage to use Pub/Sub in our project.
# All the permissions configuration
resource "google_service_account" "processor_event_sa" {
  account_id   = "image-processor-event-sa"
  display_name = "Service Account for tmp Bucket events"
}

resource "google_project_iam_member" "processor_event_receiver" {
  project = var.project_id
  role    = "roles/eventarc.eventReceiver"
  member  = "serviceAccount:${google_service_account.processor_event_sa.email}"
}

resource "google_cloud_run_v2_service_iam_member" "processor_invoker" {
  location = google_cloudfunctions2_function.image_processor.location
  project  = google_cloudfunctions2_function.image_processor.project
  name     = google_cloudfunctions2_function.image_processor.name
  role     = "roles/run.invoker"
  member   = "serviceAccount:${google_service_account.processor_event_sa.email}"
}

data "google_project" "project" {}

resource "google_service_account_iam_member" "eventarc_sa_user" {
  service_account_id = google_service_account.processor_event_sa.name
  role               = "roles/iam.serviceAccountUser"
  member             = "serviceAccount:service-${data.google_project.project.number}@gcp-sa-eventarc.iam.gserviceaccount.com"
}

resource "google_project_iam_member" "gcs_pubsub_publishing" {
  project = var.project_id
  role    = "roles/pubsub.publisher"
  member  = "serviceAccount:service-${data.google_project.project.number}@gs-project-accounts.iam.gserviceaccount.com"
}

### Edit the Cloud Run function and add a trigger

resource "google_cloudfunctions2_function" "image_processor" {
  name        = "image-processor"
  location    = "europe-west4"
  ...
  event_trigger {
    trigger_region        = "eu"
    event_type            = "google.cloud.storage.object.v1.finalized"
    retry_policy          = "RETRY_POLICY_DO_NOT_RETRY"
    service_account_email = google_service_account.processor_event_sa.email
    event_filters {
      attribute = "bucket"
      value     = google_storage_bucket.tmp_upload_bucket.name
    }
  }
}
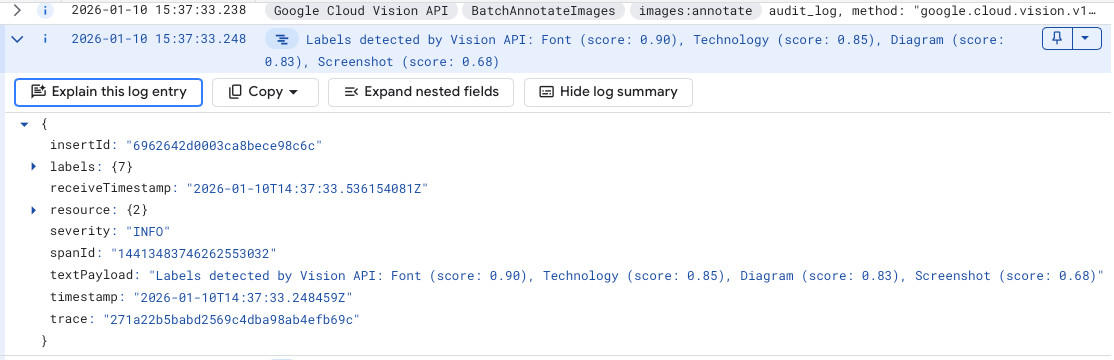
Now when you upload any image to the bucket you should see in the Logs Explorer and entry with the list of the labels that were created by Vision API along with the scores. However, not all images receive labels. Often screenshots or memes cannot be classified by this service.
Moving forward
In the next episode of this series, we are going to finish the project by enhancing each image using Gemini on Vertex AI, storing the results in a Firestore database and listing those on the main site.